
Assignments
To manage assignments, navigate to Orders page on Xpress Admin
Orders: Assign orders to pickers
As a user, I am able to assign orders to pickers.
Assigning to pickers is the first step of fulfillment and allows workers to shop for the order. After assignment, workers will see orders on their Shopper App. For more information on the Shopper App, see page Shopper App
📣 Orders in status New and Received can be assigned, re-assigned or unassigned from picker. After the order is Complete Shopping, assignment can no longer be edited.
Assign orders to picker
-
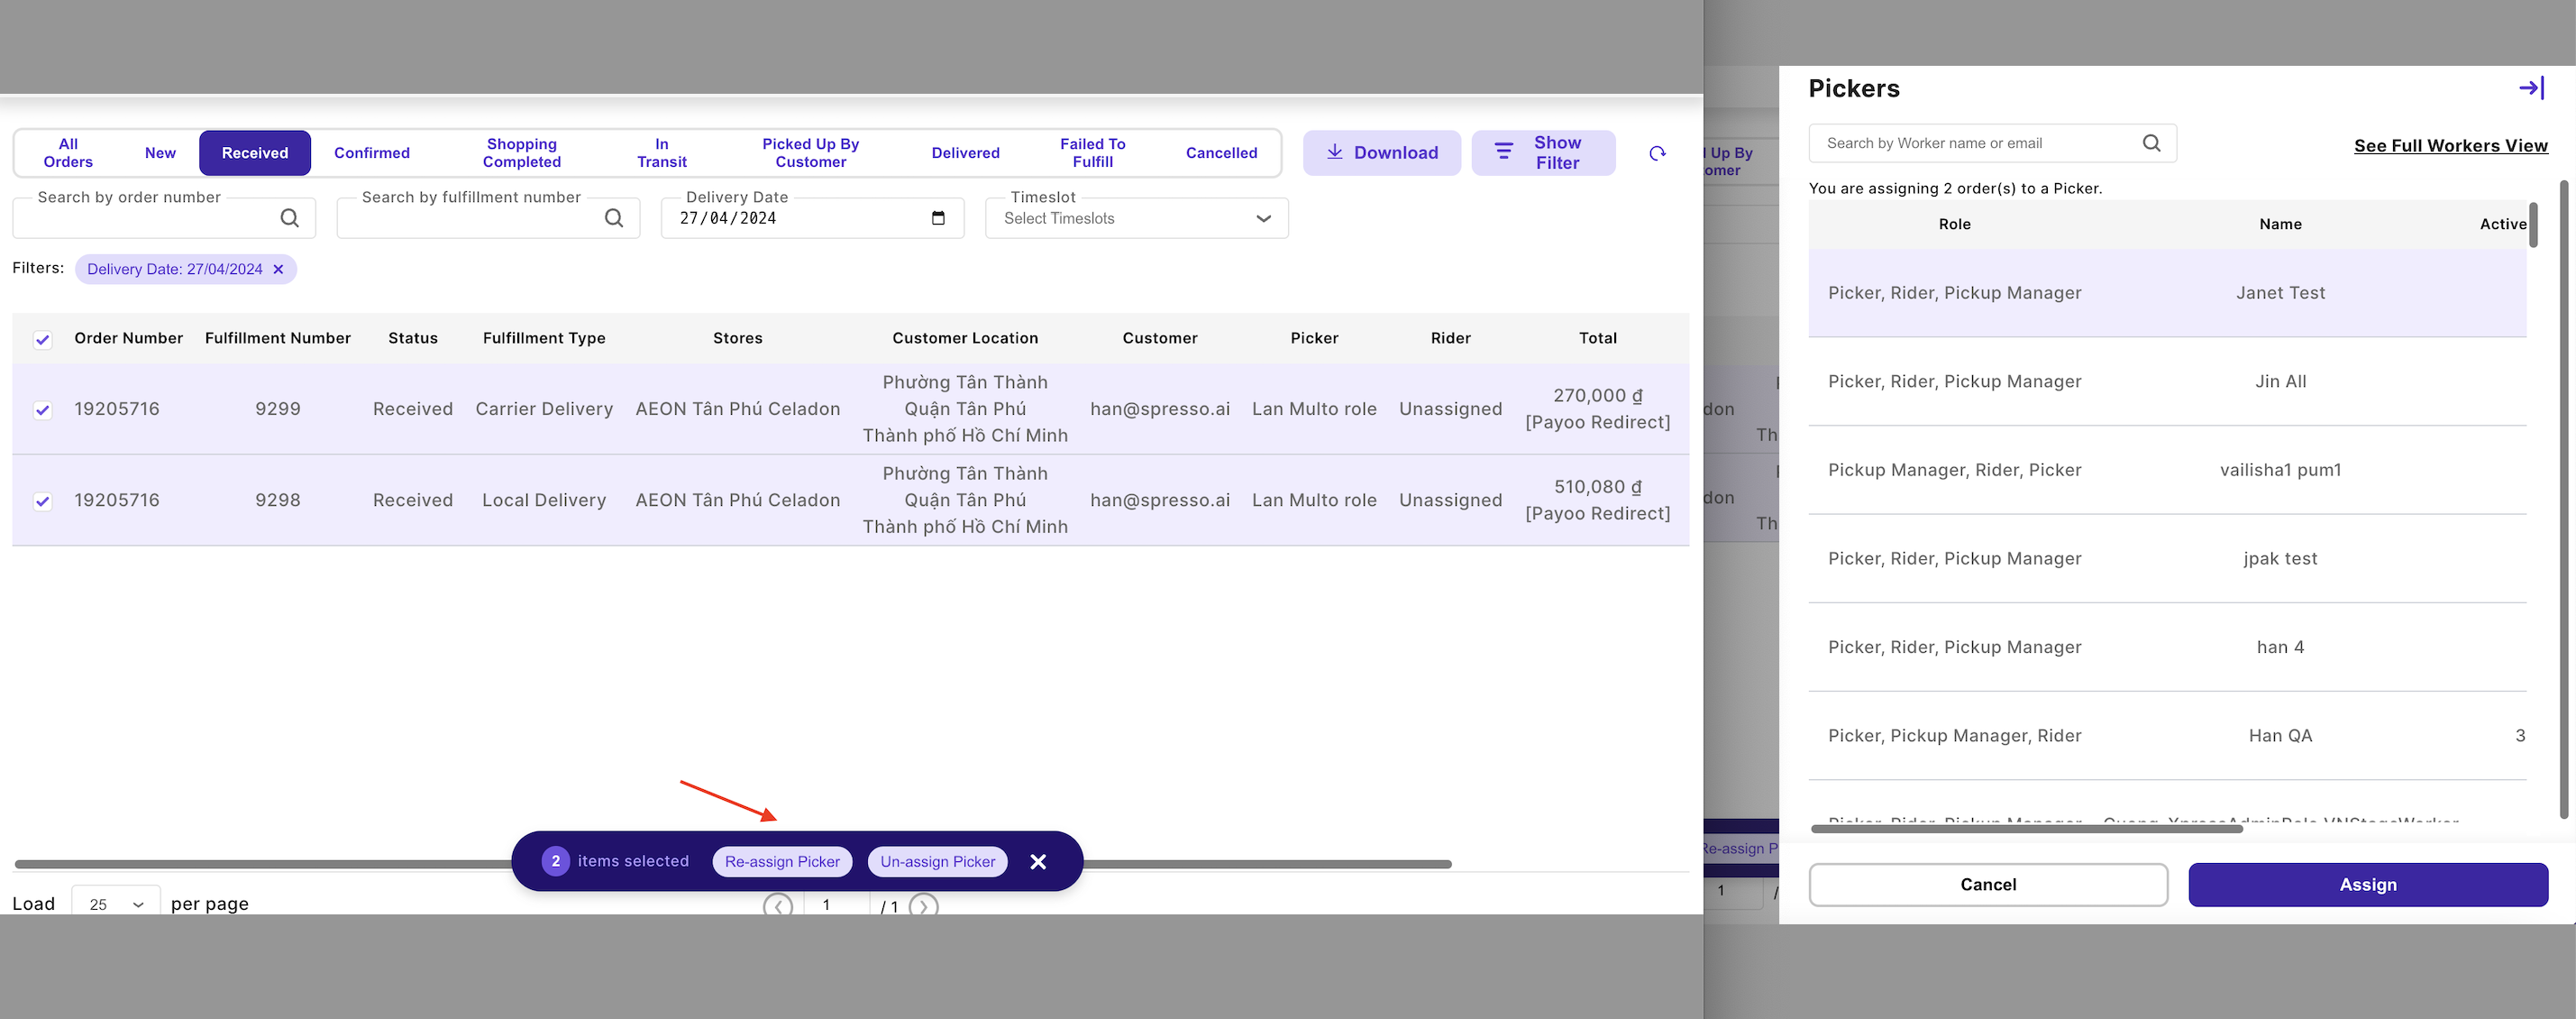
From Order List View (bulk action)
- Select the left-side checkboxes for the orders you wish to assign to picker
- Toaster slides up with count of selection and actions available to the user
- Click on “Assign Picker”
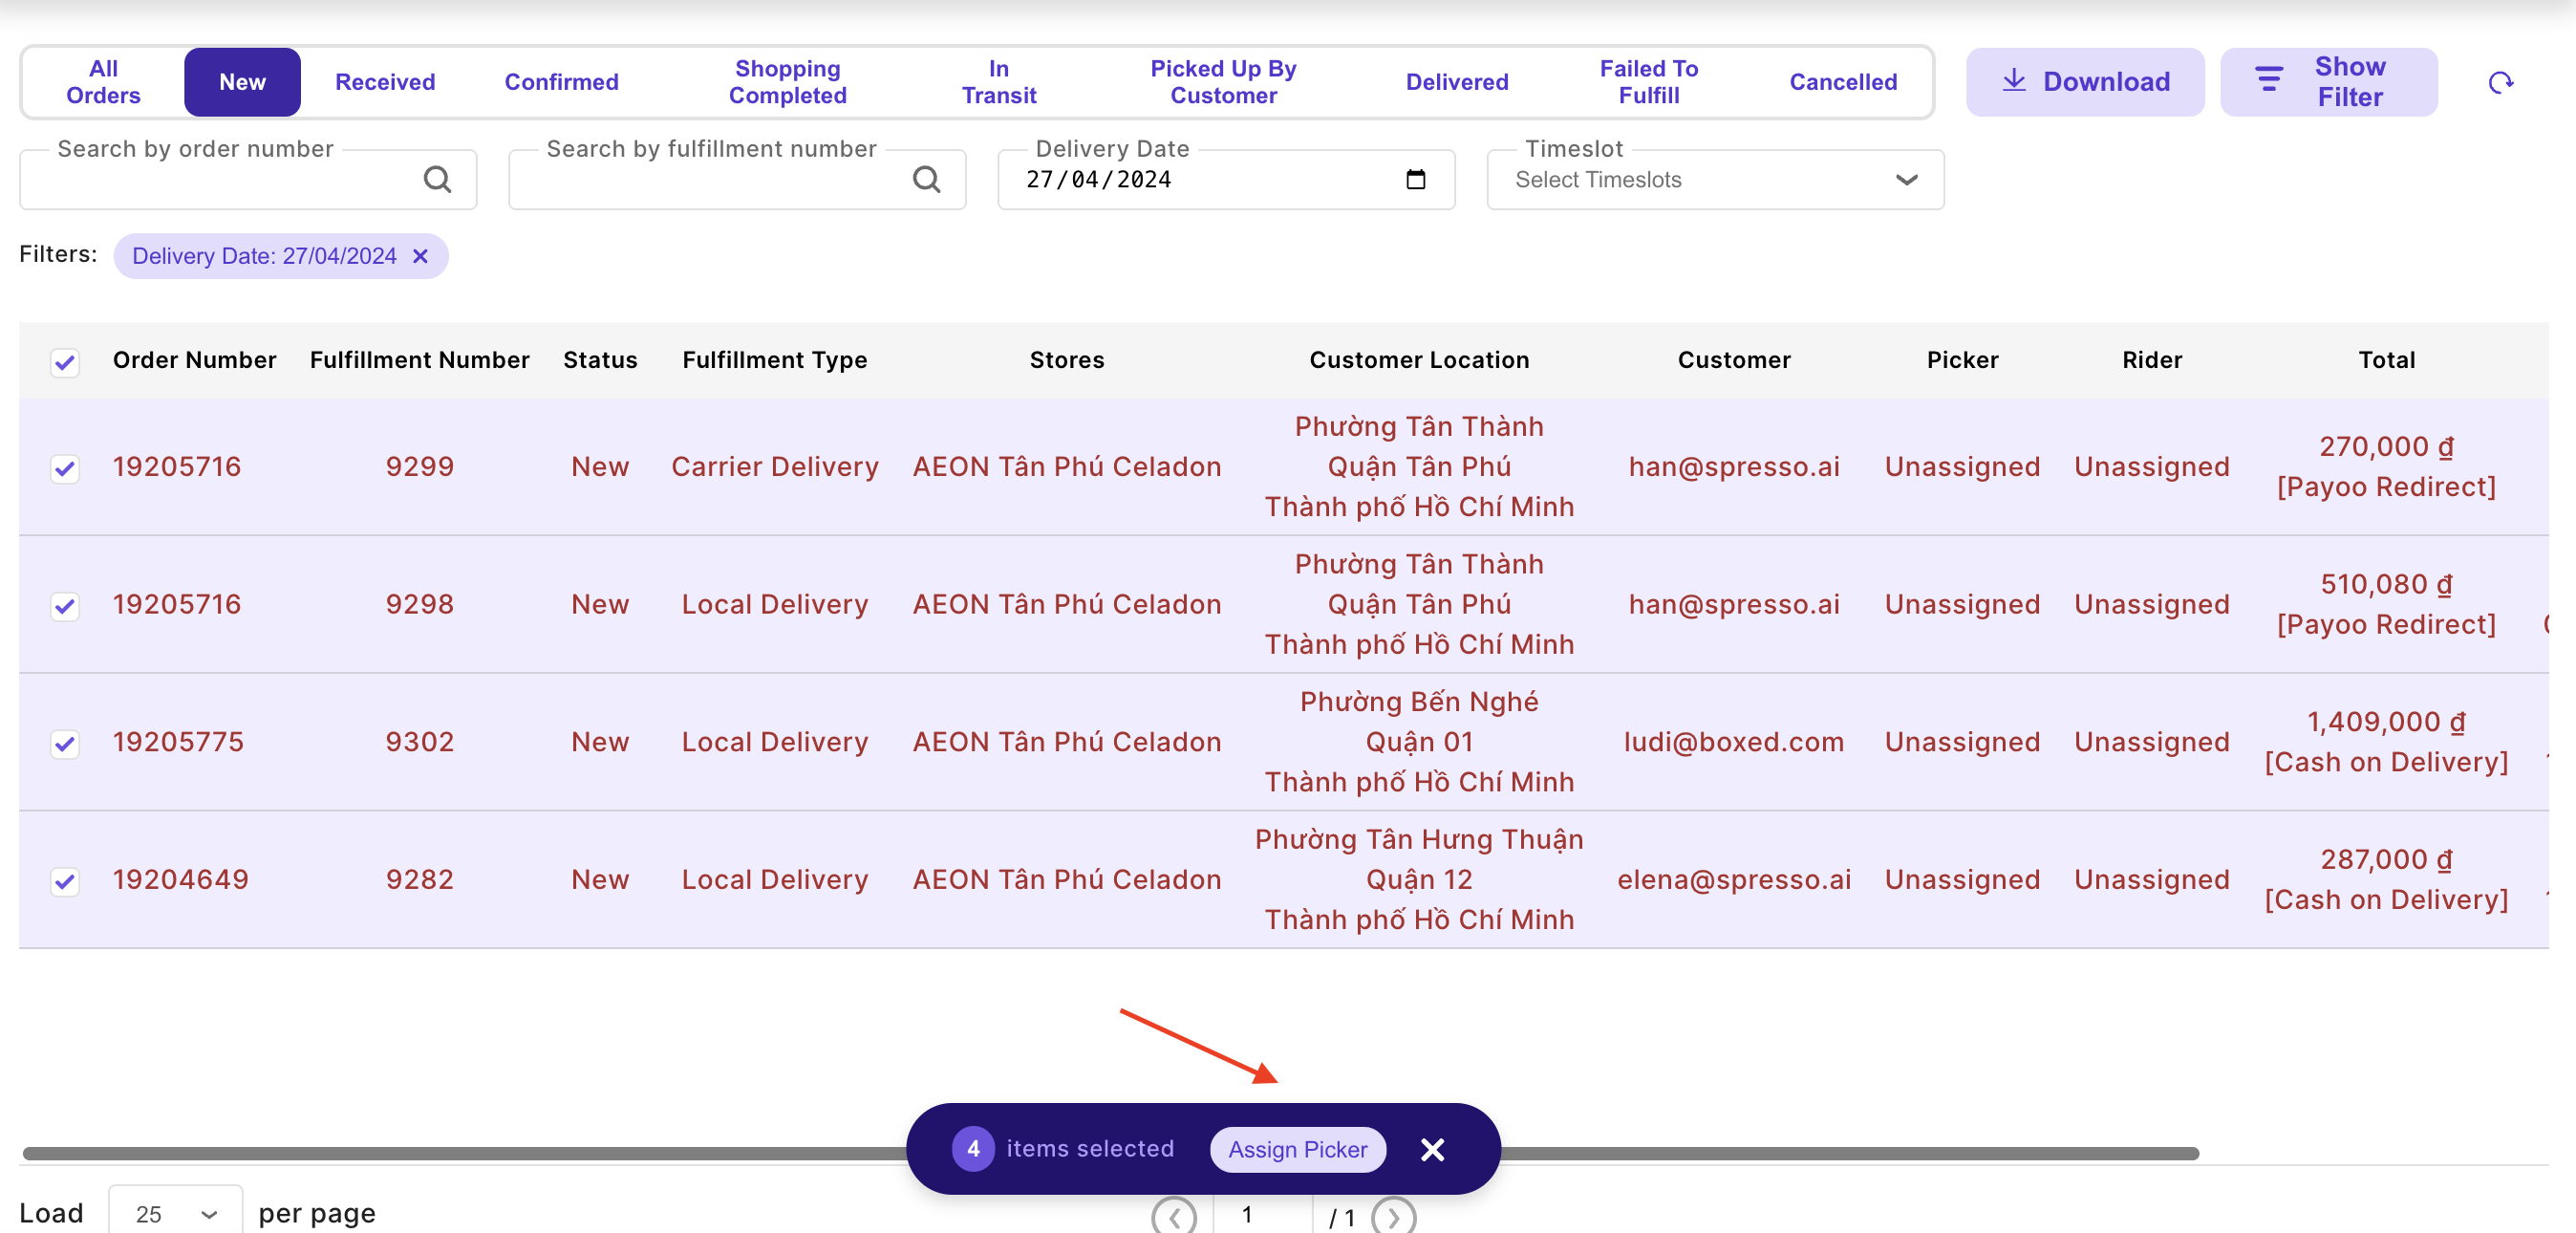
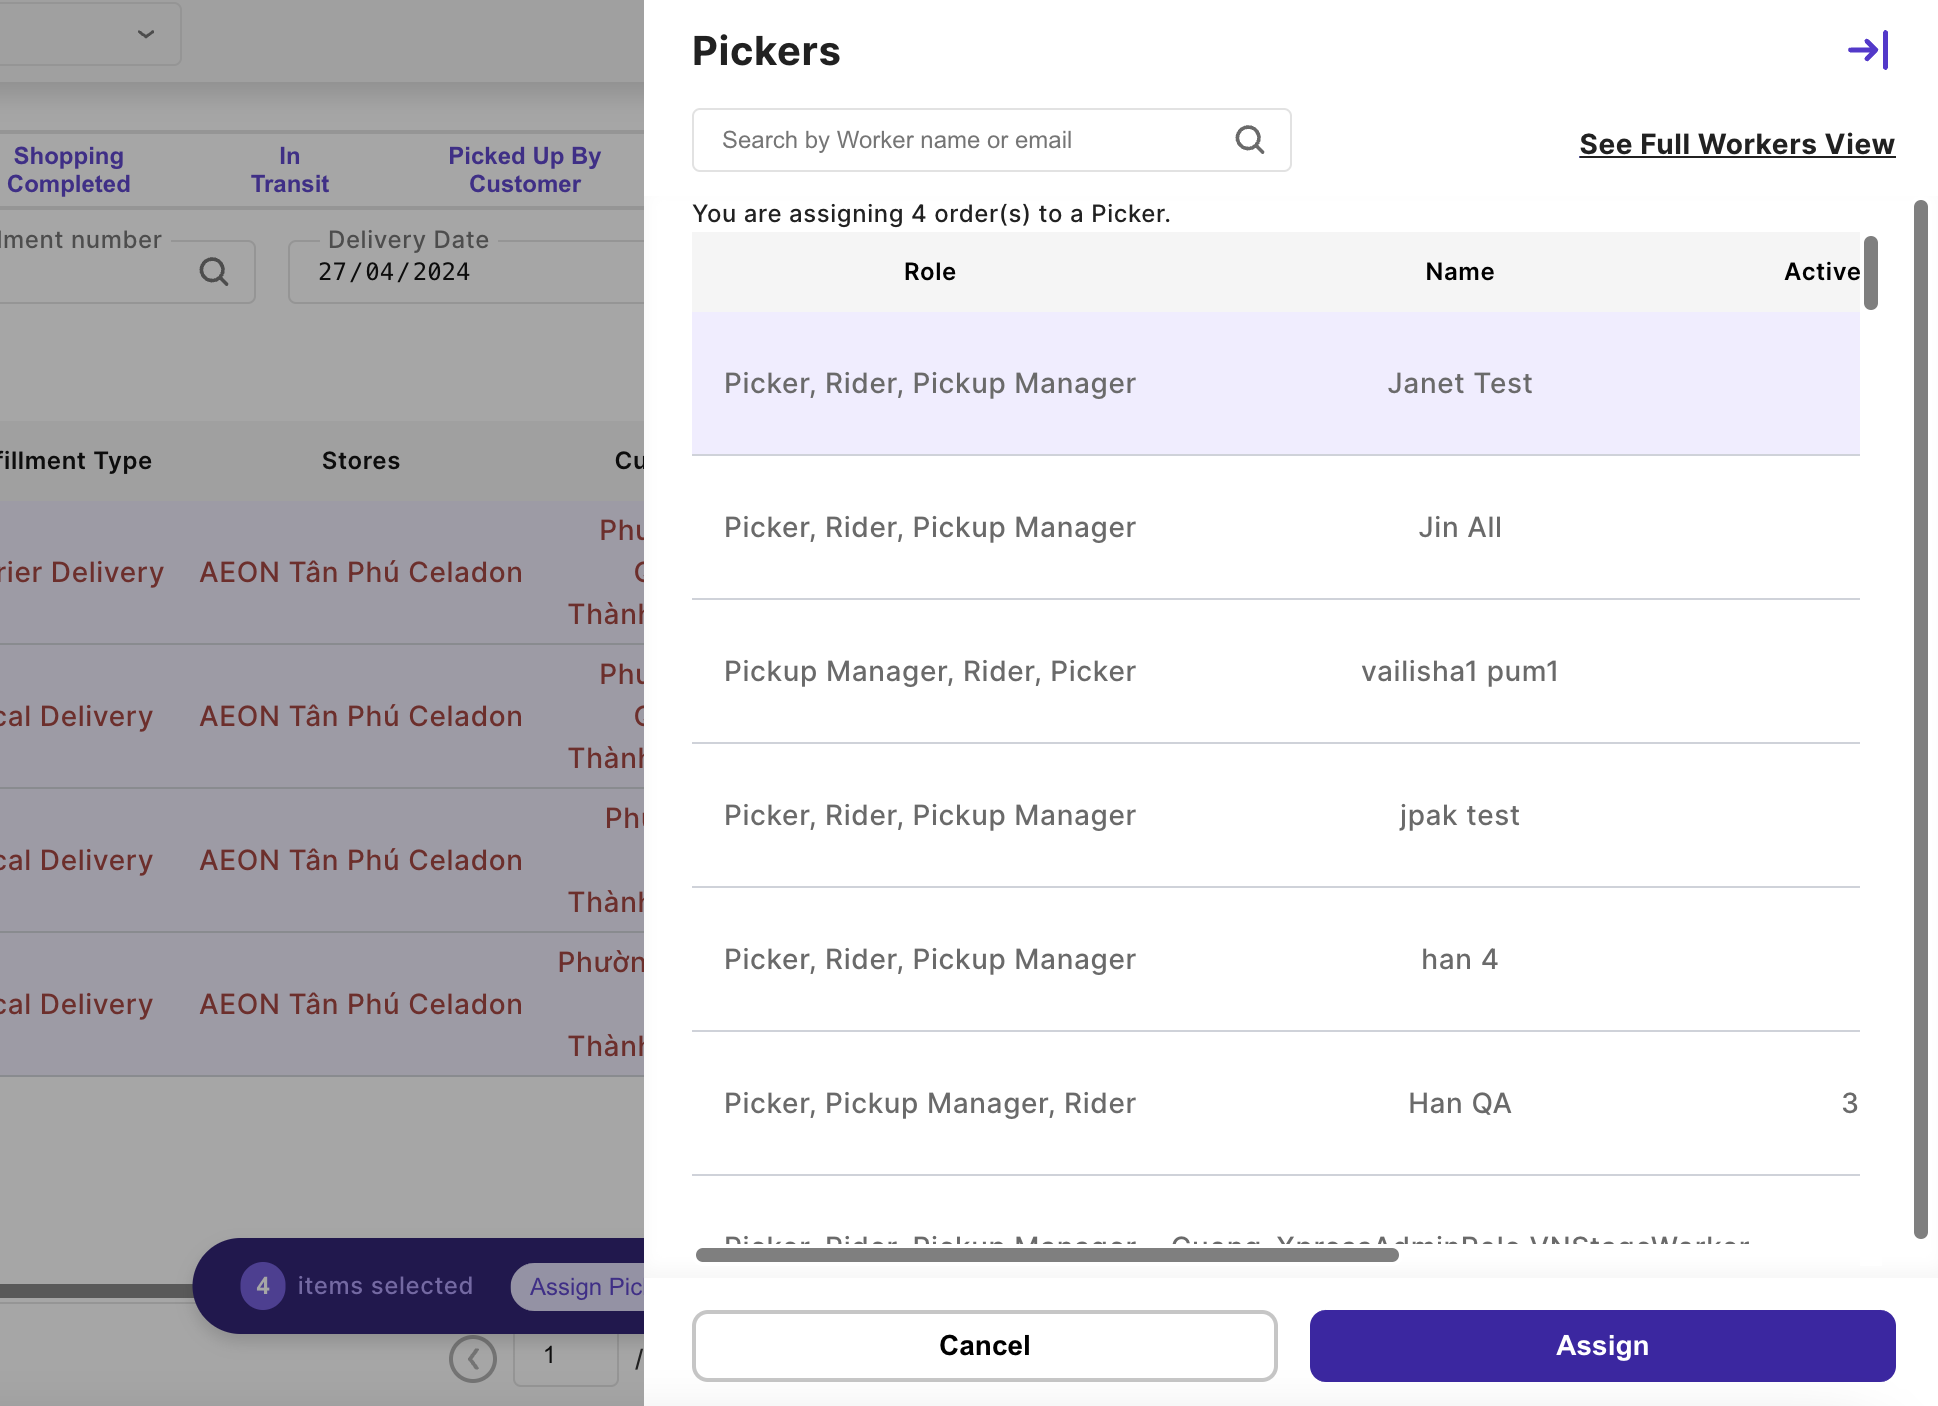
- Right-side panel opens with a list of
Activeworkers from the selected mall withPickerrole available to work on the orders
📣Pausedworkers are not displayed as they cannot receive any assignments
📣 Multi-role workers currently delivering orders (i.e. assigned to a Rider Request) are not displayed as they cannot receive picking assignments at the same time
📣 Workers with picking request that are alreadyComplete Shoppingare not displayed- The list of workers provides information to help team leads gauge the worker’s current workload
Active Request: Displays request number if the worker is currently assigned to a picking request.
📣 If this is blank, this worker is not busy at the momentAssigned: Number of orders in the current request, blank if no current requestReceived/Confirmed/Cancelled: Number of orders in each respective status in the current request, blank if no current request- Click on “See Full Worker View” to see the detail
- The list of workers provides information to help team leads gauge the worker’s current workload
- Click on a row to select a worker
- Click on “Assign” to apply the assignment
- All orders selected will be assigned to the worker. Status of the orders updates to
Received.
📣 In case the worker already had a request, the orders will be added to that same request.
-
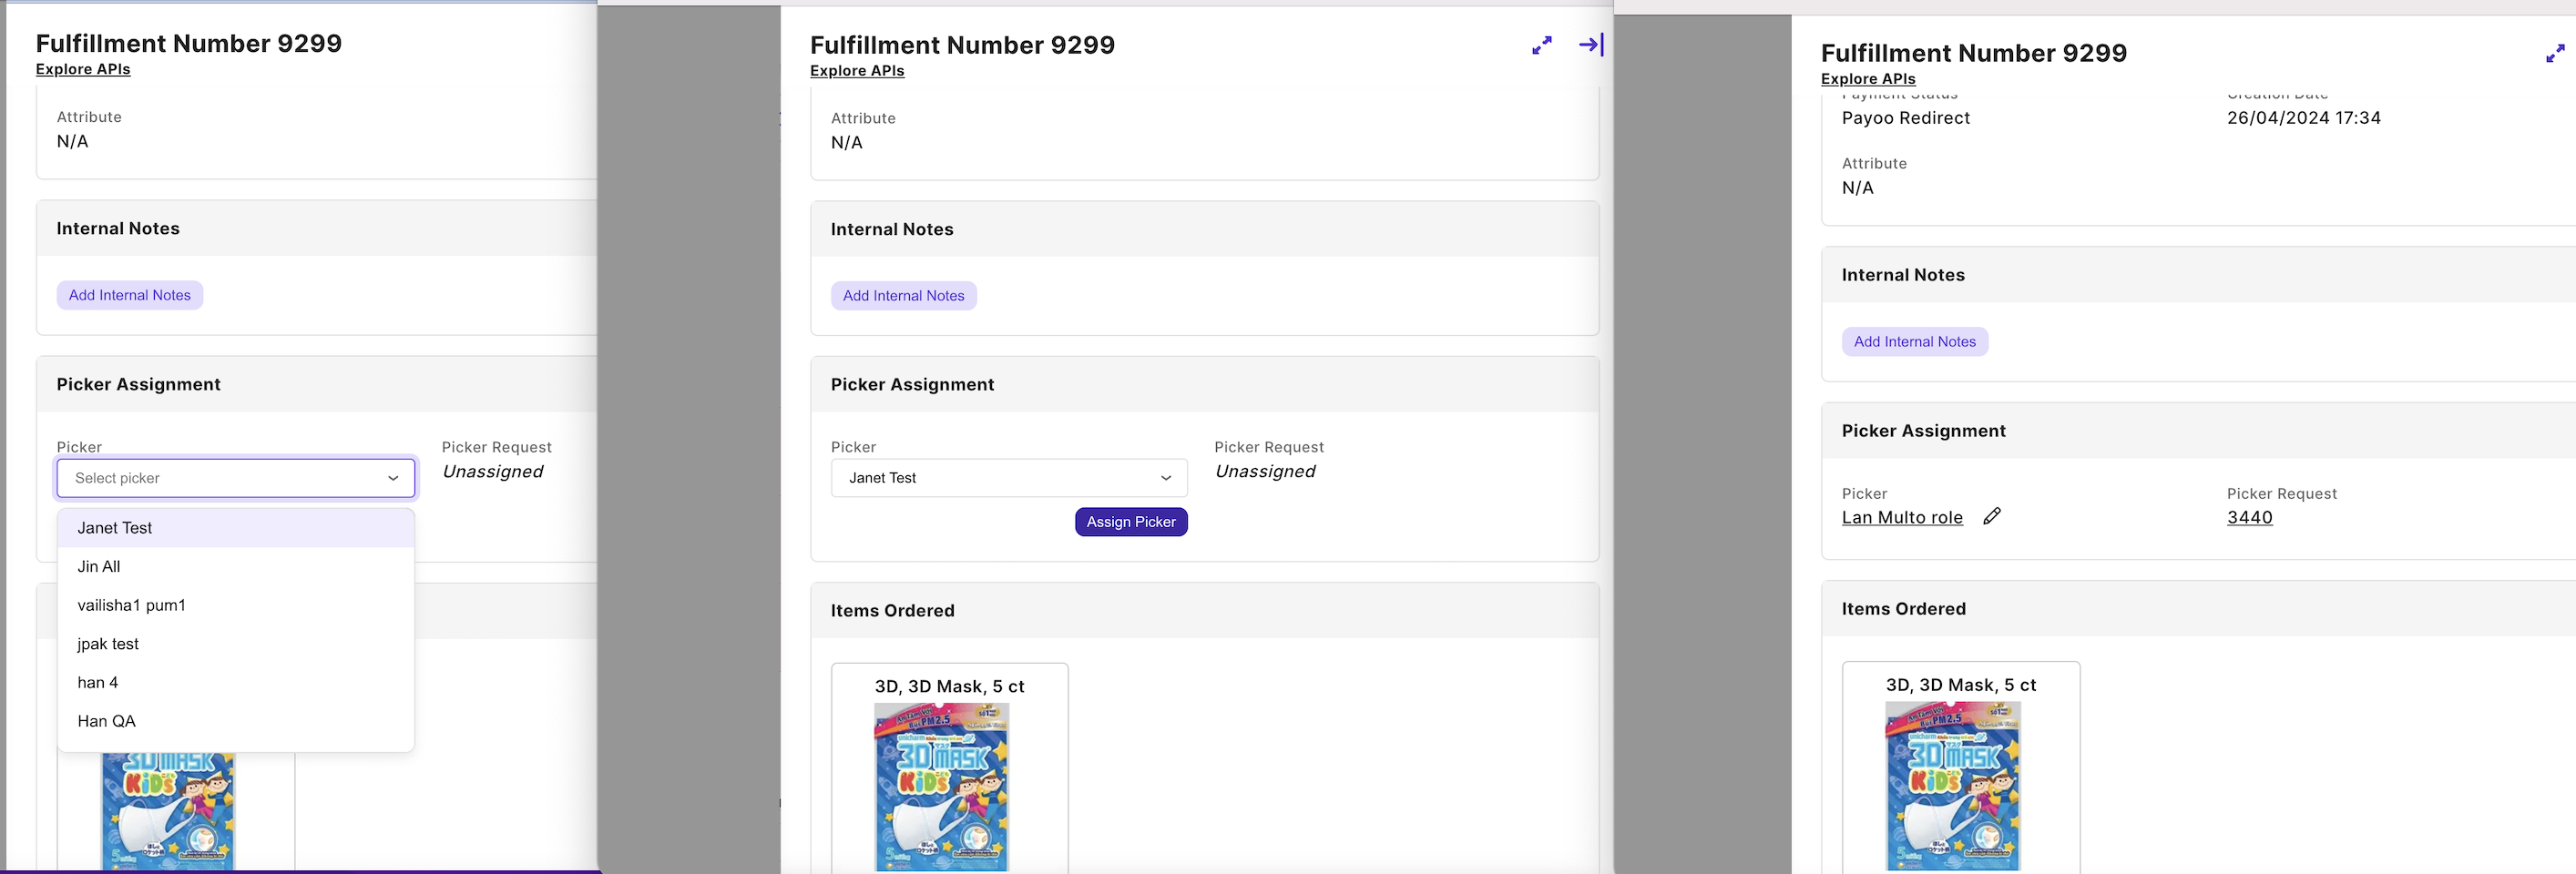
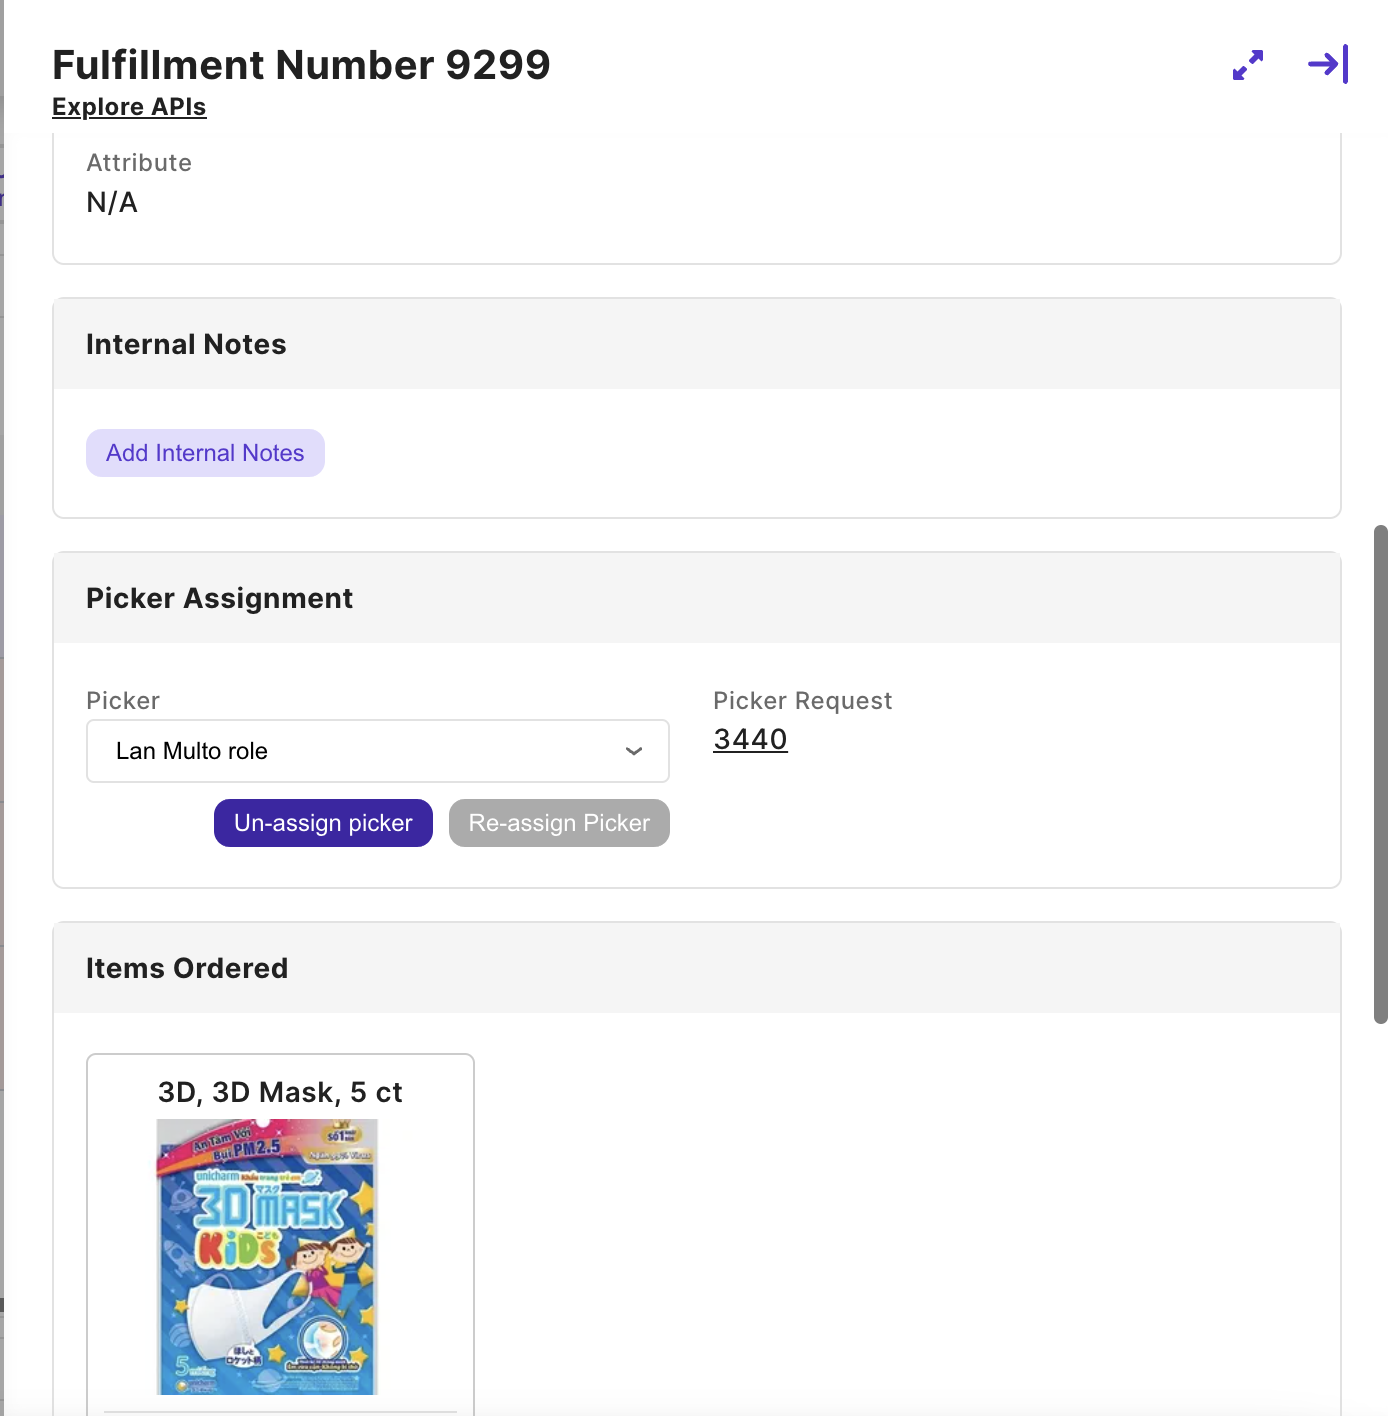
From Order Details (single order)
- Click on an order row to open the Order Details side panel
- In the Picker Assignment section, click on the dropdown to see a list of
Activeworkers from the selected mall withPickerrole available to work on the order
📣Pausedworkers are not displayed as they cannot receive any assignments
📣 Multi-role workers currently delivering orders (i.e. assigned to a Rider Request) are not displayed as they cannot receive picking assignments at the same time
📣 Workers with picking request that are alreadyComplete Shoppingare not displayed - Select a picker and click on “Assign” to apply the assignment
- Request number will appear on the screen after assignment
📣 In case the worker already had a request, the order will be added to that same request.
Unassign orders from picker
You can unassign an order from picker as long as the order is not Complete Shopping yet.
-
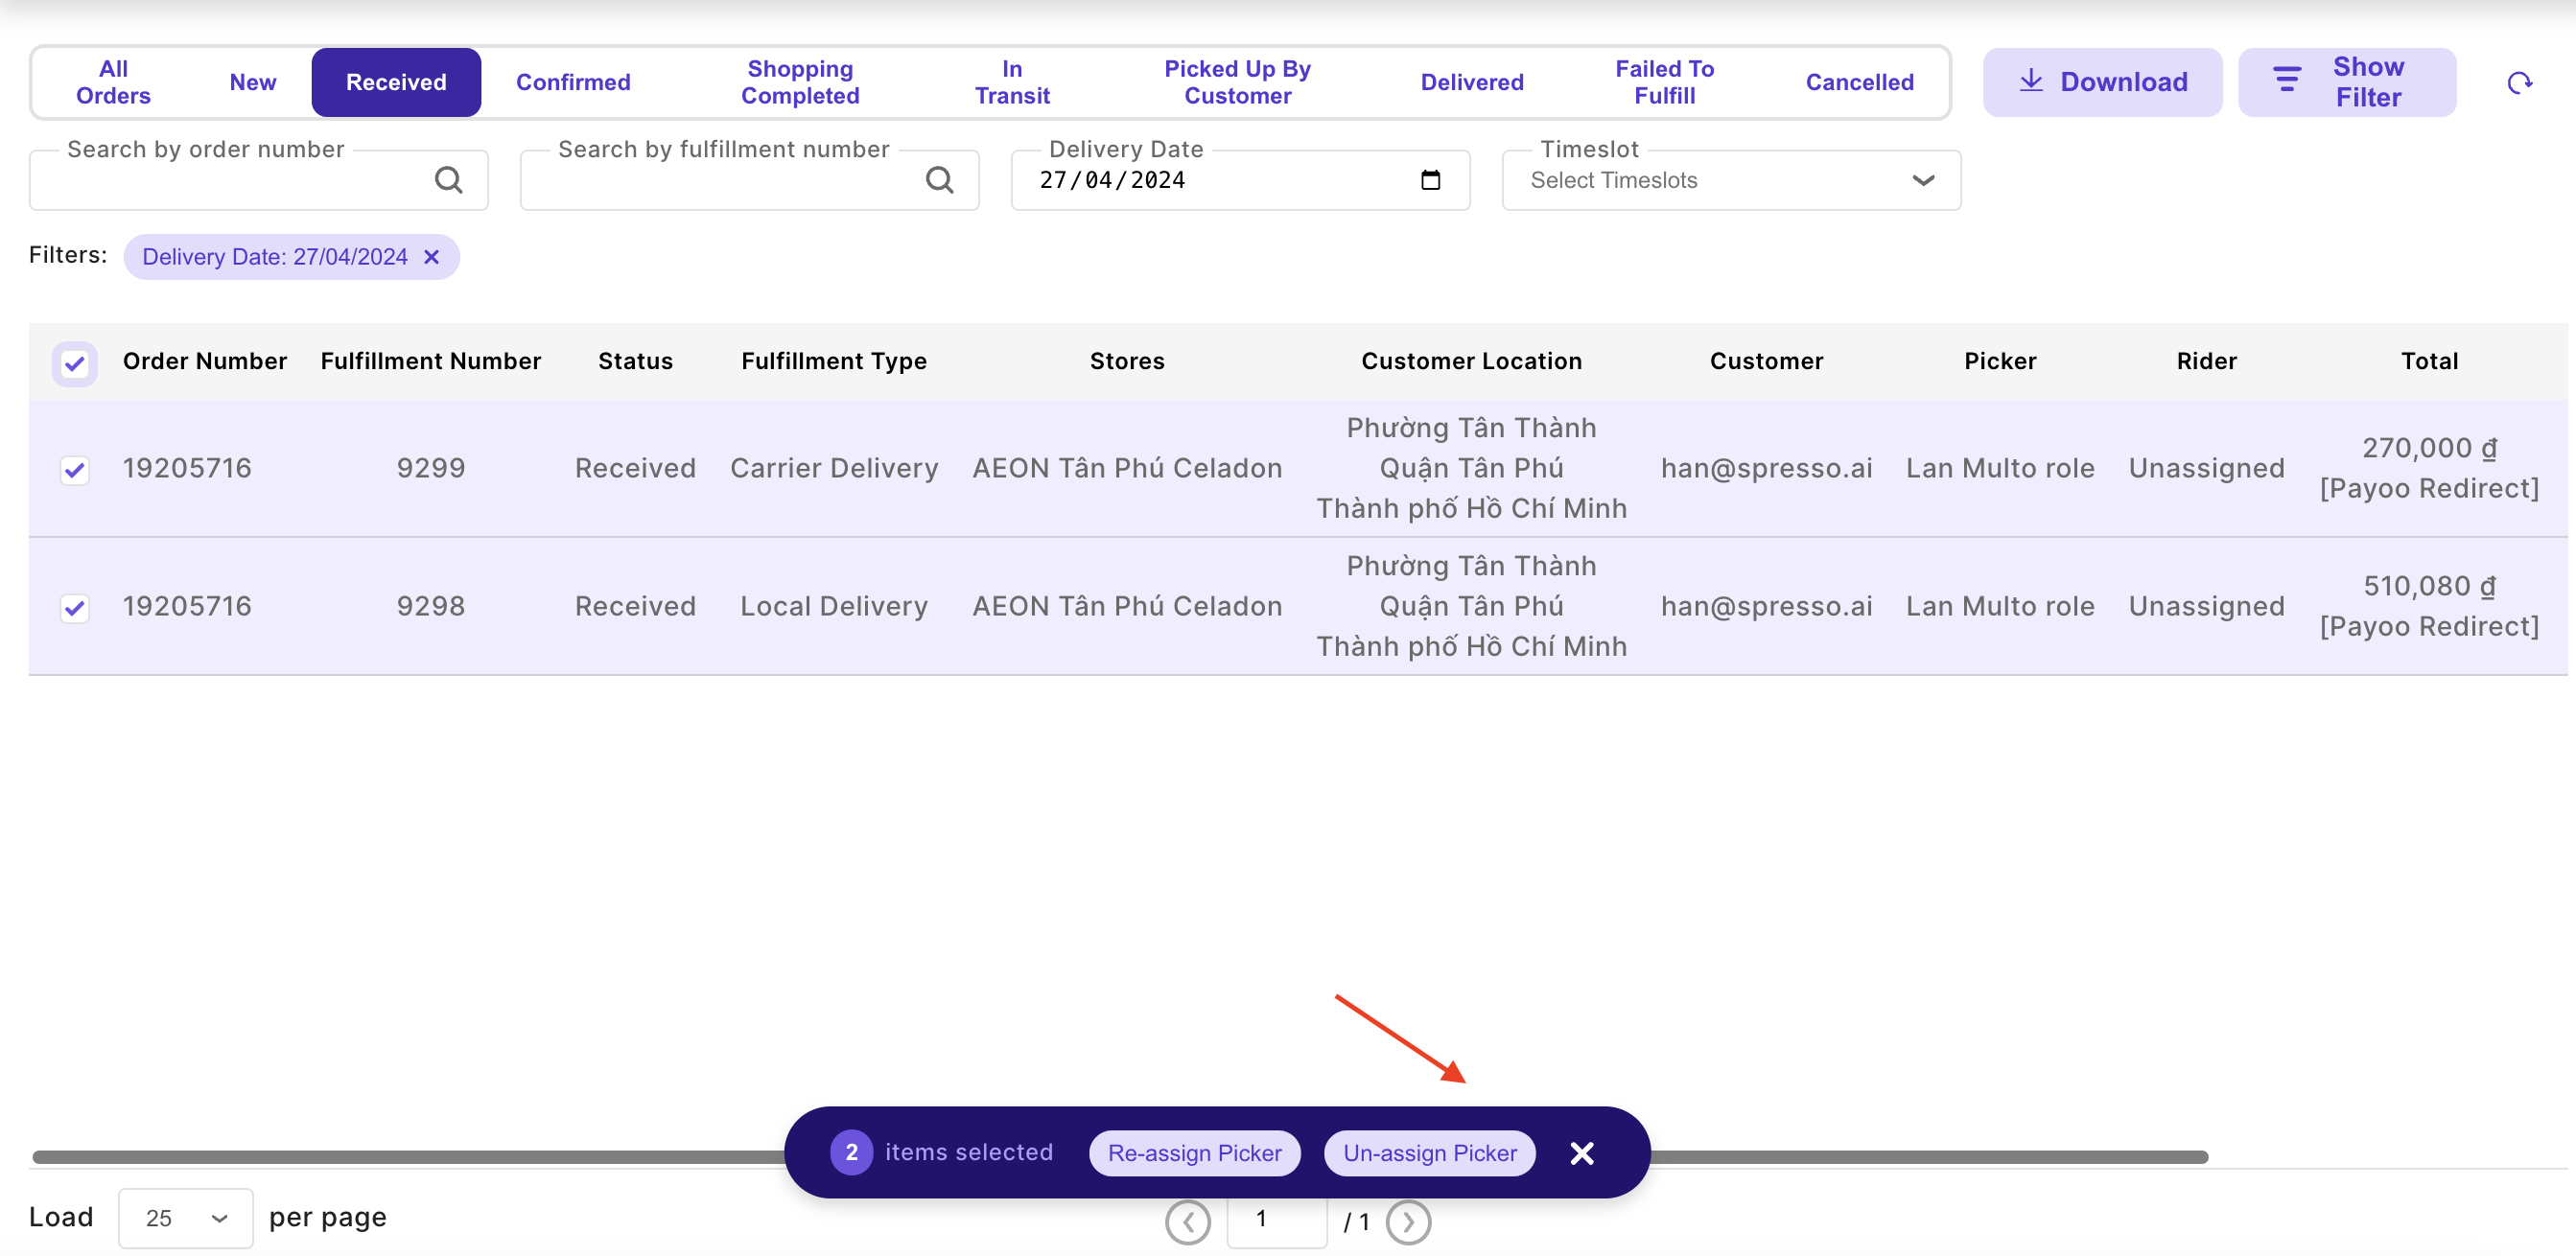
From Order List View (bulk action)
- Select the left-side checkboxes for the orders you wish to un-assign
- Click on “Unassign Picker” in the toaster
-
From Order Details (single order)
- Click on the
Editicon in Picker Assignment - Click on “Unassign Picker”
- Click on the
After the order is unassigned, it’s ready to be assigned to another picker.
You can also re-assign an order without unassigning first. See Re-assign order to another picker
Re-assign order to another picker
You can re-assign an order from one picker to another picker as long as the order is not Complete Shopping yet. Orders can be re-assigned as many times as needed.
-
From Order List View (bulk action)
- Select the left-side checkboxes for the orders you wish to reassign and click on “Re-Assign Picker” in the toaster.
- Select a new picker from the list of workers
📣 Workers currently assigned to the orders selected will be highlighted with tagAssigned to [Fulfillment Number]under their name - Click on “Assign” to apply the assignment
- All orders selected will be reassigned to the picker selected
-
From Order Details (single order)
- Click on the
Editicon in Picker Assignment - Select a new picker in the dropdown
- Click “Re-assign Picker”

- Click on the
After picking is done, the status of orders will be changed to Complete Shopping by the Shopper App. At this point, Express Delivery and Standard orders can be assigned to either internal riders or 3PL providers. On the other hand, Pick Up orders are ready for customers to collect.
Orders: Assign orders to internal riders
As a user I am able to assign orders to internal riders
Rider assignment is available once the order has been picked. Use this option when you want to assign to internal rider (not 3PL). Note that this only applies to Express Delivery, excluding Standard and Pick Up orders. After assignment, workers will see orders on their Shopper App. For more information on the Shopper App, see page Shopper App
📣 Orders in status Complete Shopping can be assigned, re-assigned or unassigned from rider. The order’s picking request must be closed for the order to be assignable to rider. After order is In Transit, assignment can no longer be edited.
Assign orders to rider
-
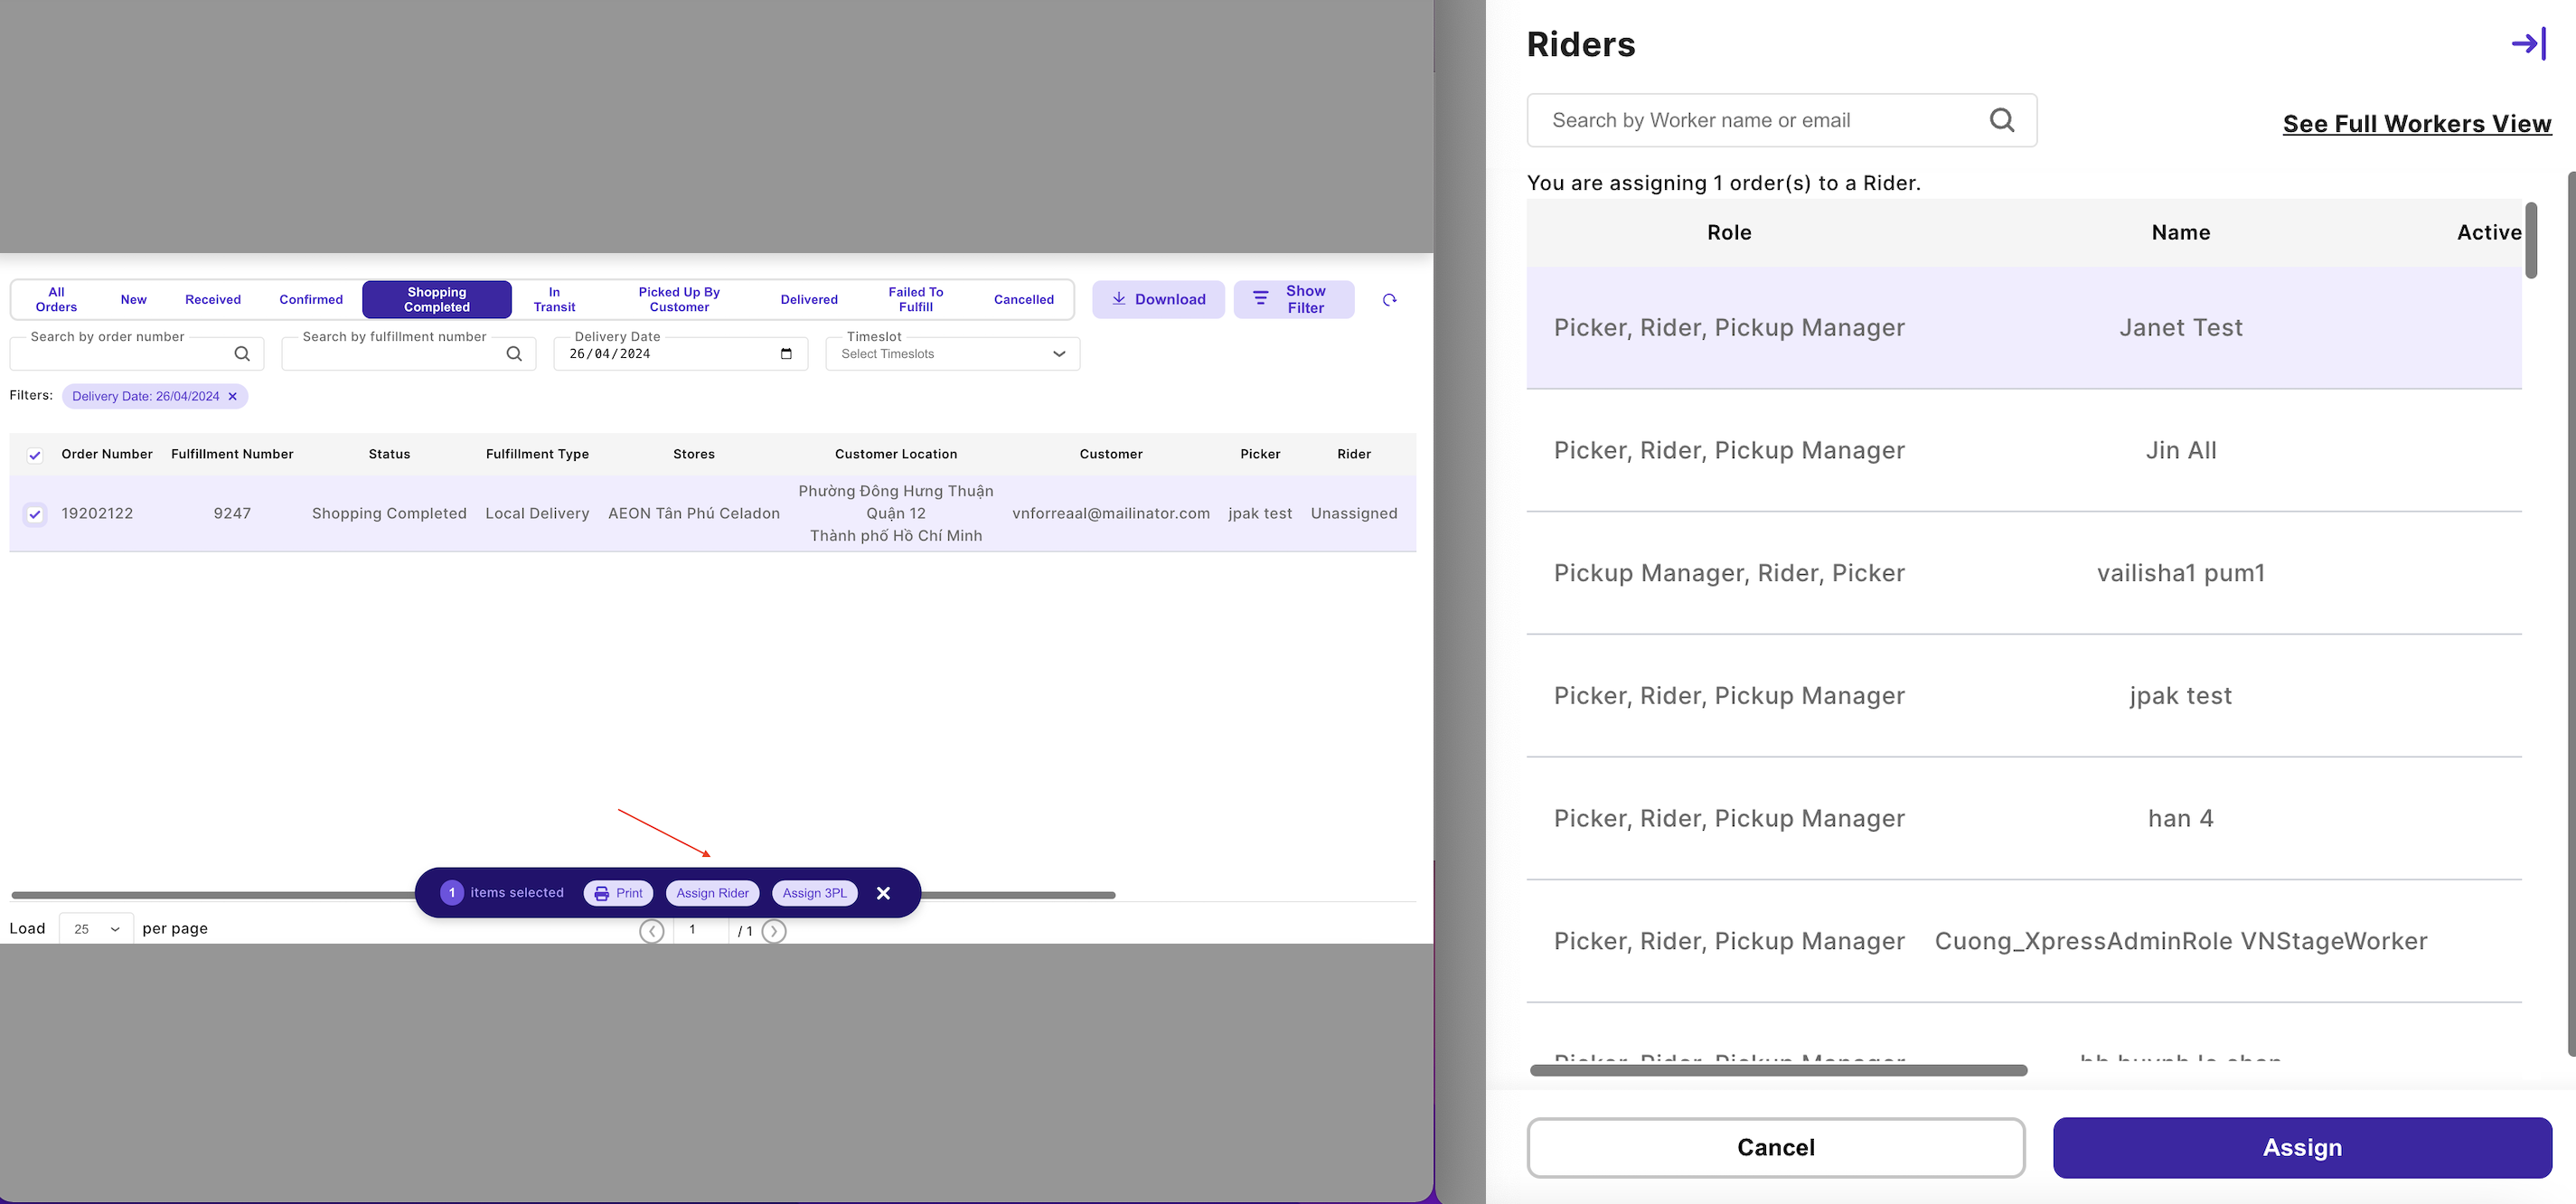
From Order List View (bulk action)
- Select the left-side checkboxes for the orders you wish to assign to rider
- Toaster slides up with count of selection and actions available to the user
- Click on “Assign Rider”
- Right-side panel opens with a list of
Activeworkers from the selected mall withRiderrole available to work on the orders
📣Pausedworkers are not displayed as they cannot receive any assignments
📣 Multi-role workers currently picking orders (i.e. assigned to a Picker Request) are not displayed as they cannot receive rider assignments at the same time
📣 Workers with rider requests that already haveDeliveredorders are not displayed- The list of workers provides information to help team leads gauge the worker’s current workload
Active Request: Displays request number if the worker is currently assigned to a rider reques
📣 If this is blank, this worker is not busy at the momentAssigned: Number of orders in the current request, blank if no current requestComplete Shopping/In Transit/Delivered/Failed/Cancelled: Number of orders in each respective status in the current request, blank if no current request- Click on “See Full Worker View” to see the detail
- The list of workers provides information to help team leads gauge the worker’s current workload
- Click on a row to select a worker
- Click on “Assign” to apply the assignment
- All orders selected will be assigned to the worker.
📣 In case the worker already had a request, the orders will be added to that same request.
-
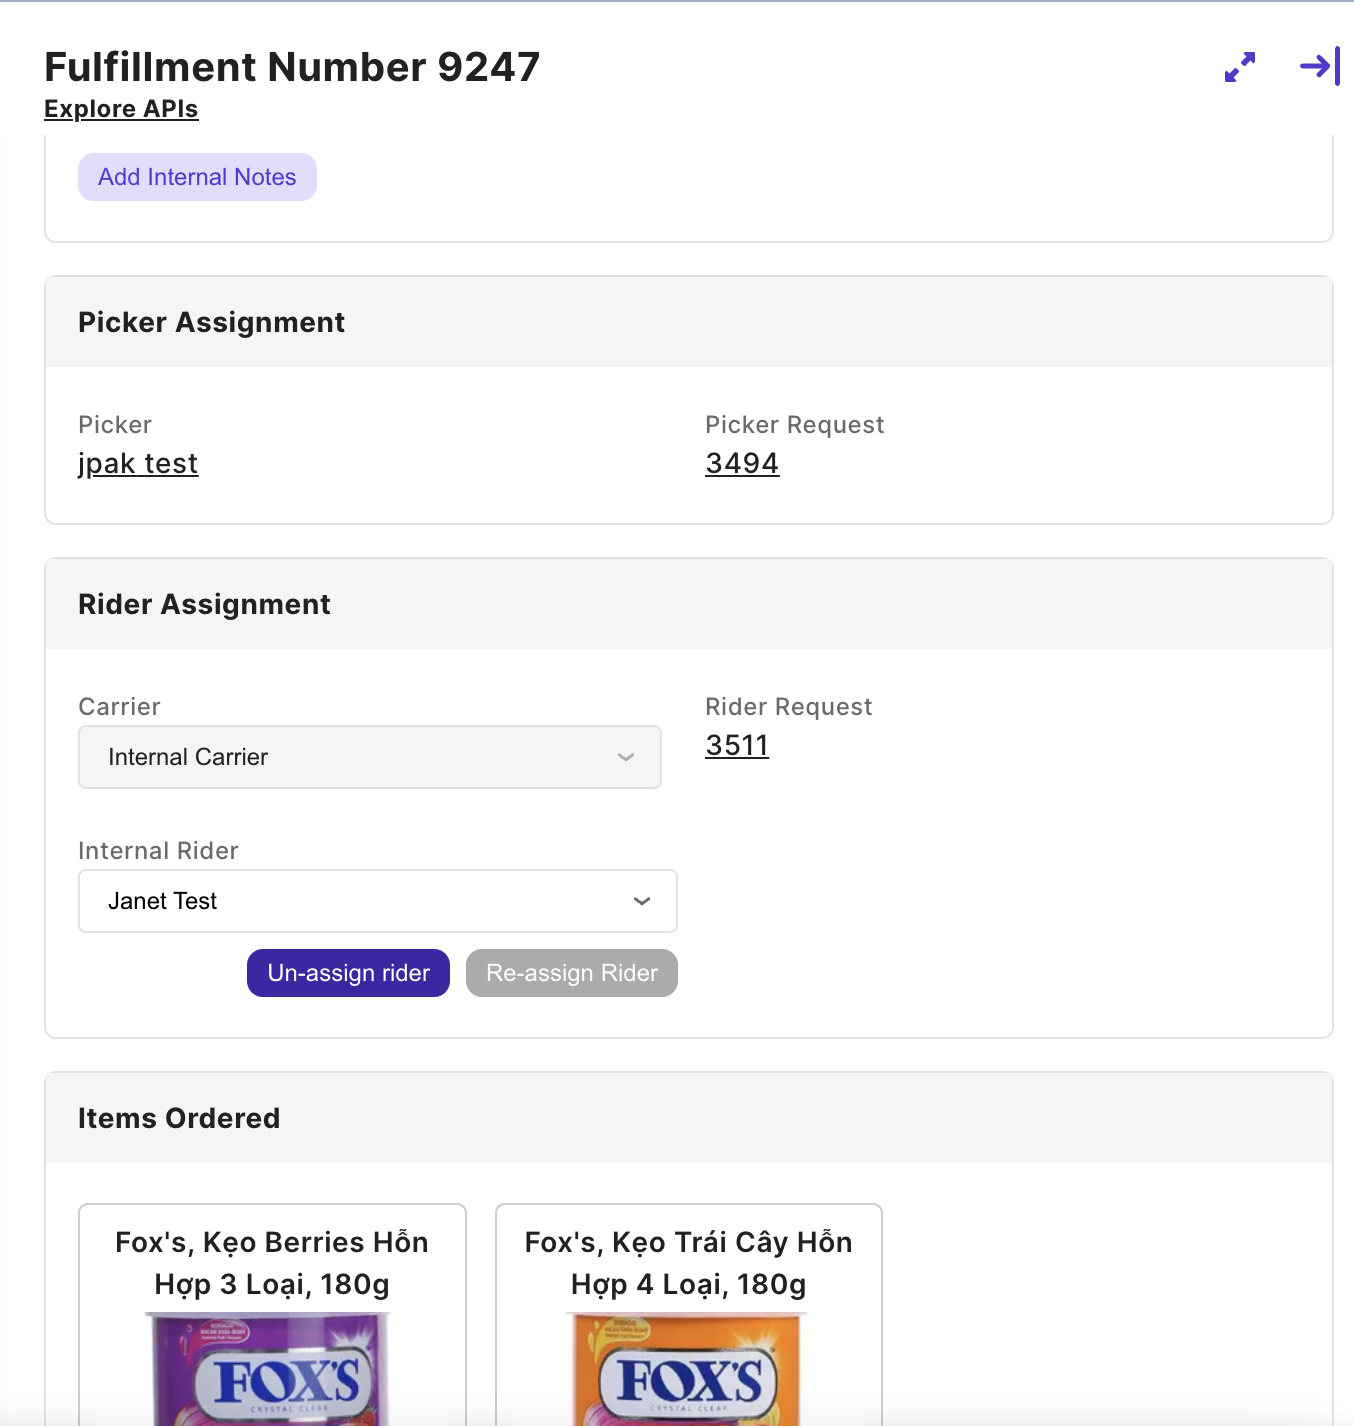
From Order Details (single order)
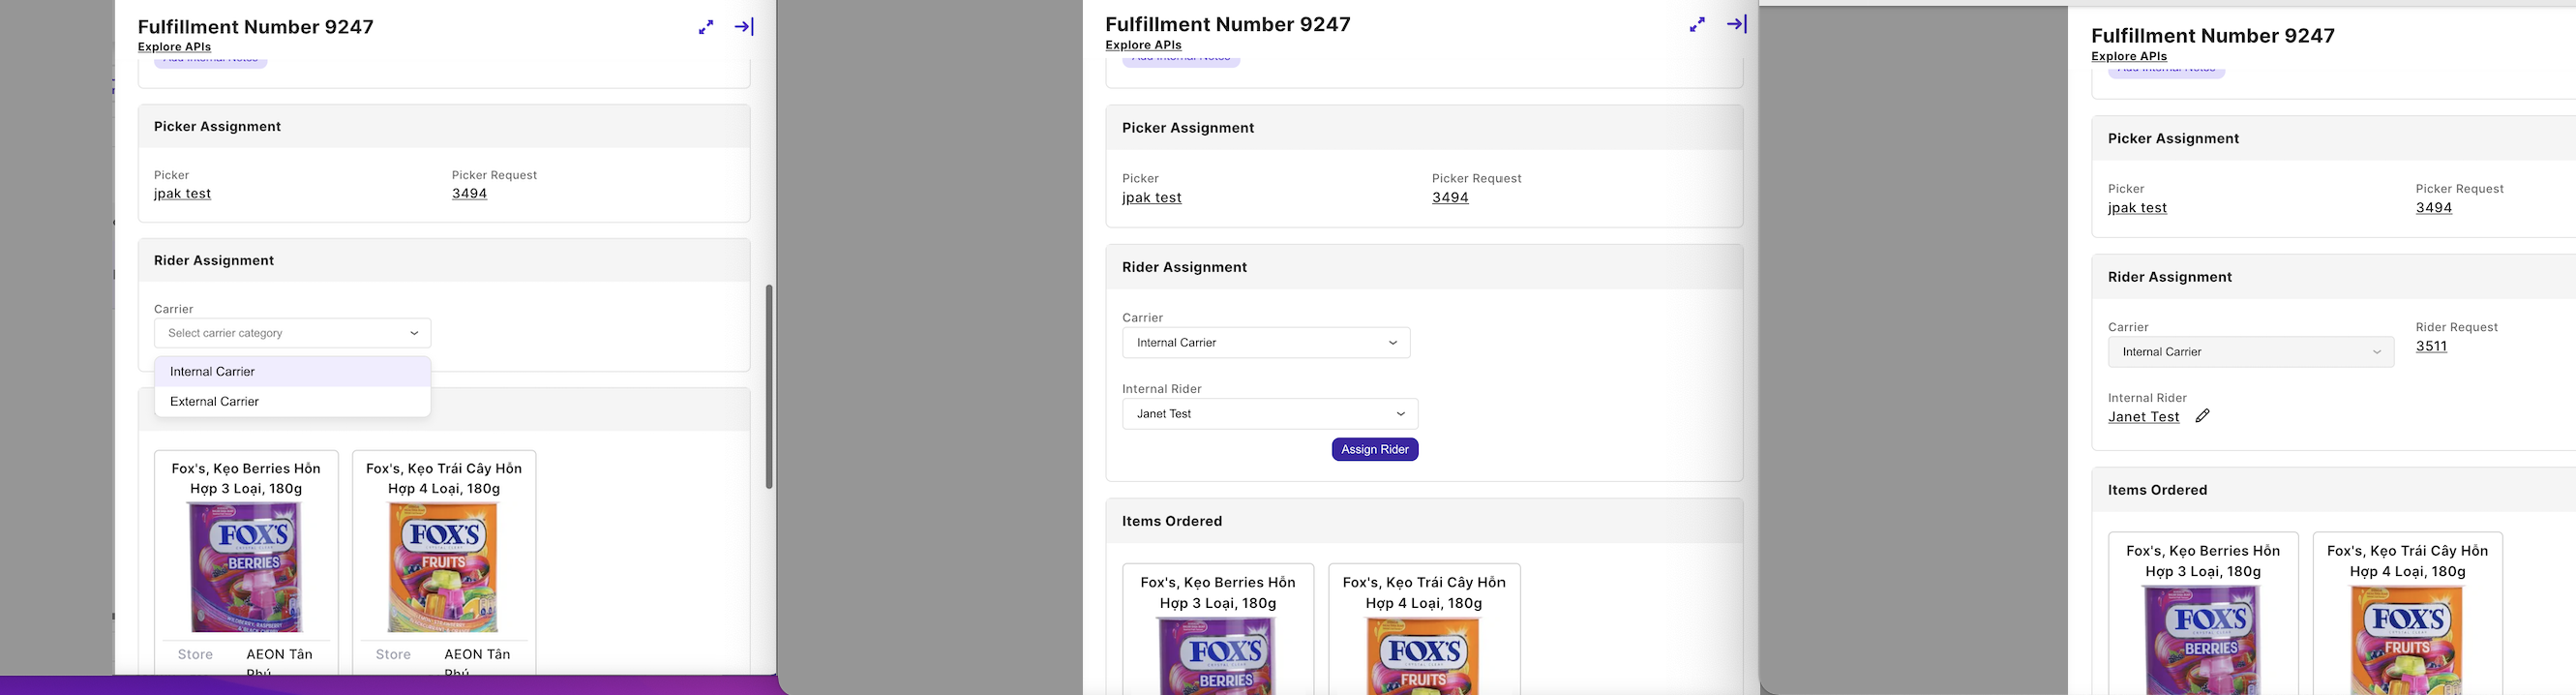
- Click on an order row to open the Order Details side panel
- In the Rider Assignment section, click on the
Carrierdropdown and selectInternal Carrier - Click on the
Internal Riderdropdown to see a list ofActiveworkers from the selected mall withRiderrole available to work on the order
📣Pausedworkers are not displayed as they cannot receive any assignments
📣 Multi-role workers currently picking orders (i.e. assigned to a Picker Request) are not displayed as they cannot receive rider assignments at the same time
📣 Workers with rider requests that already haveDeliveredorders are not displayed - Select a rider and click on “Assign” to apply the assignment
- Request number will appear on the screen after assignment
📣 In case the worker already had a request, the order will be added to that same request.
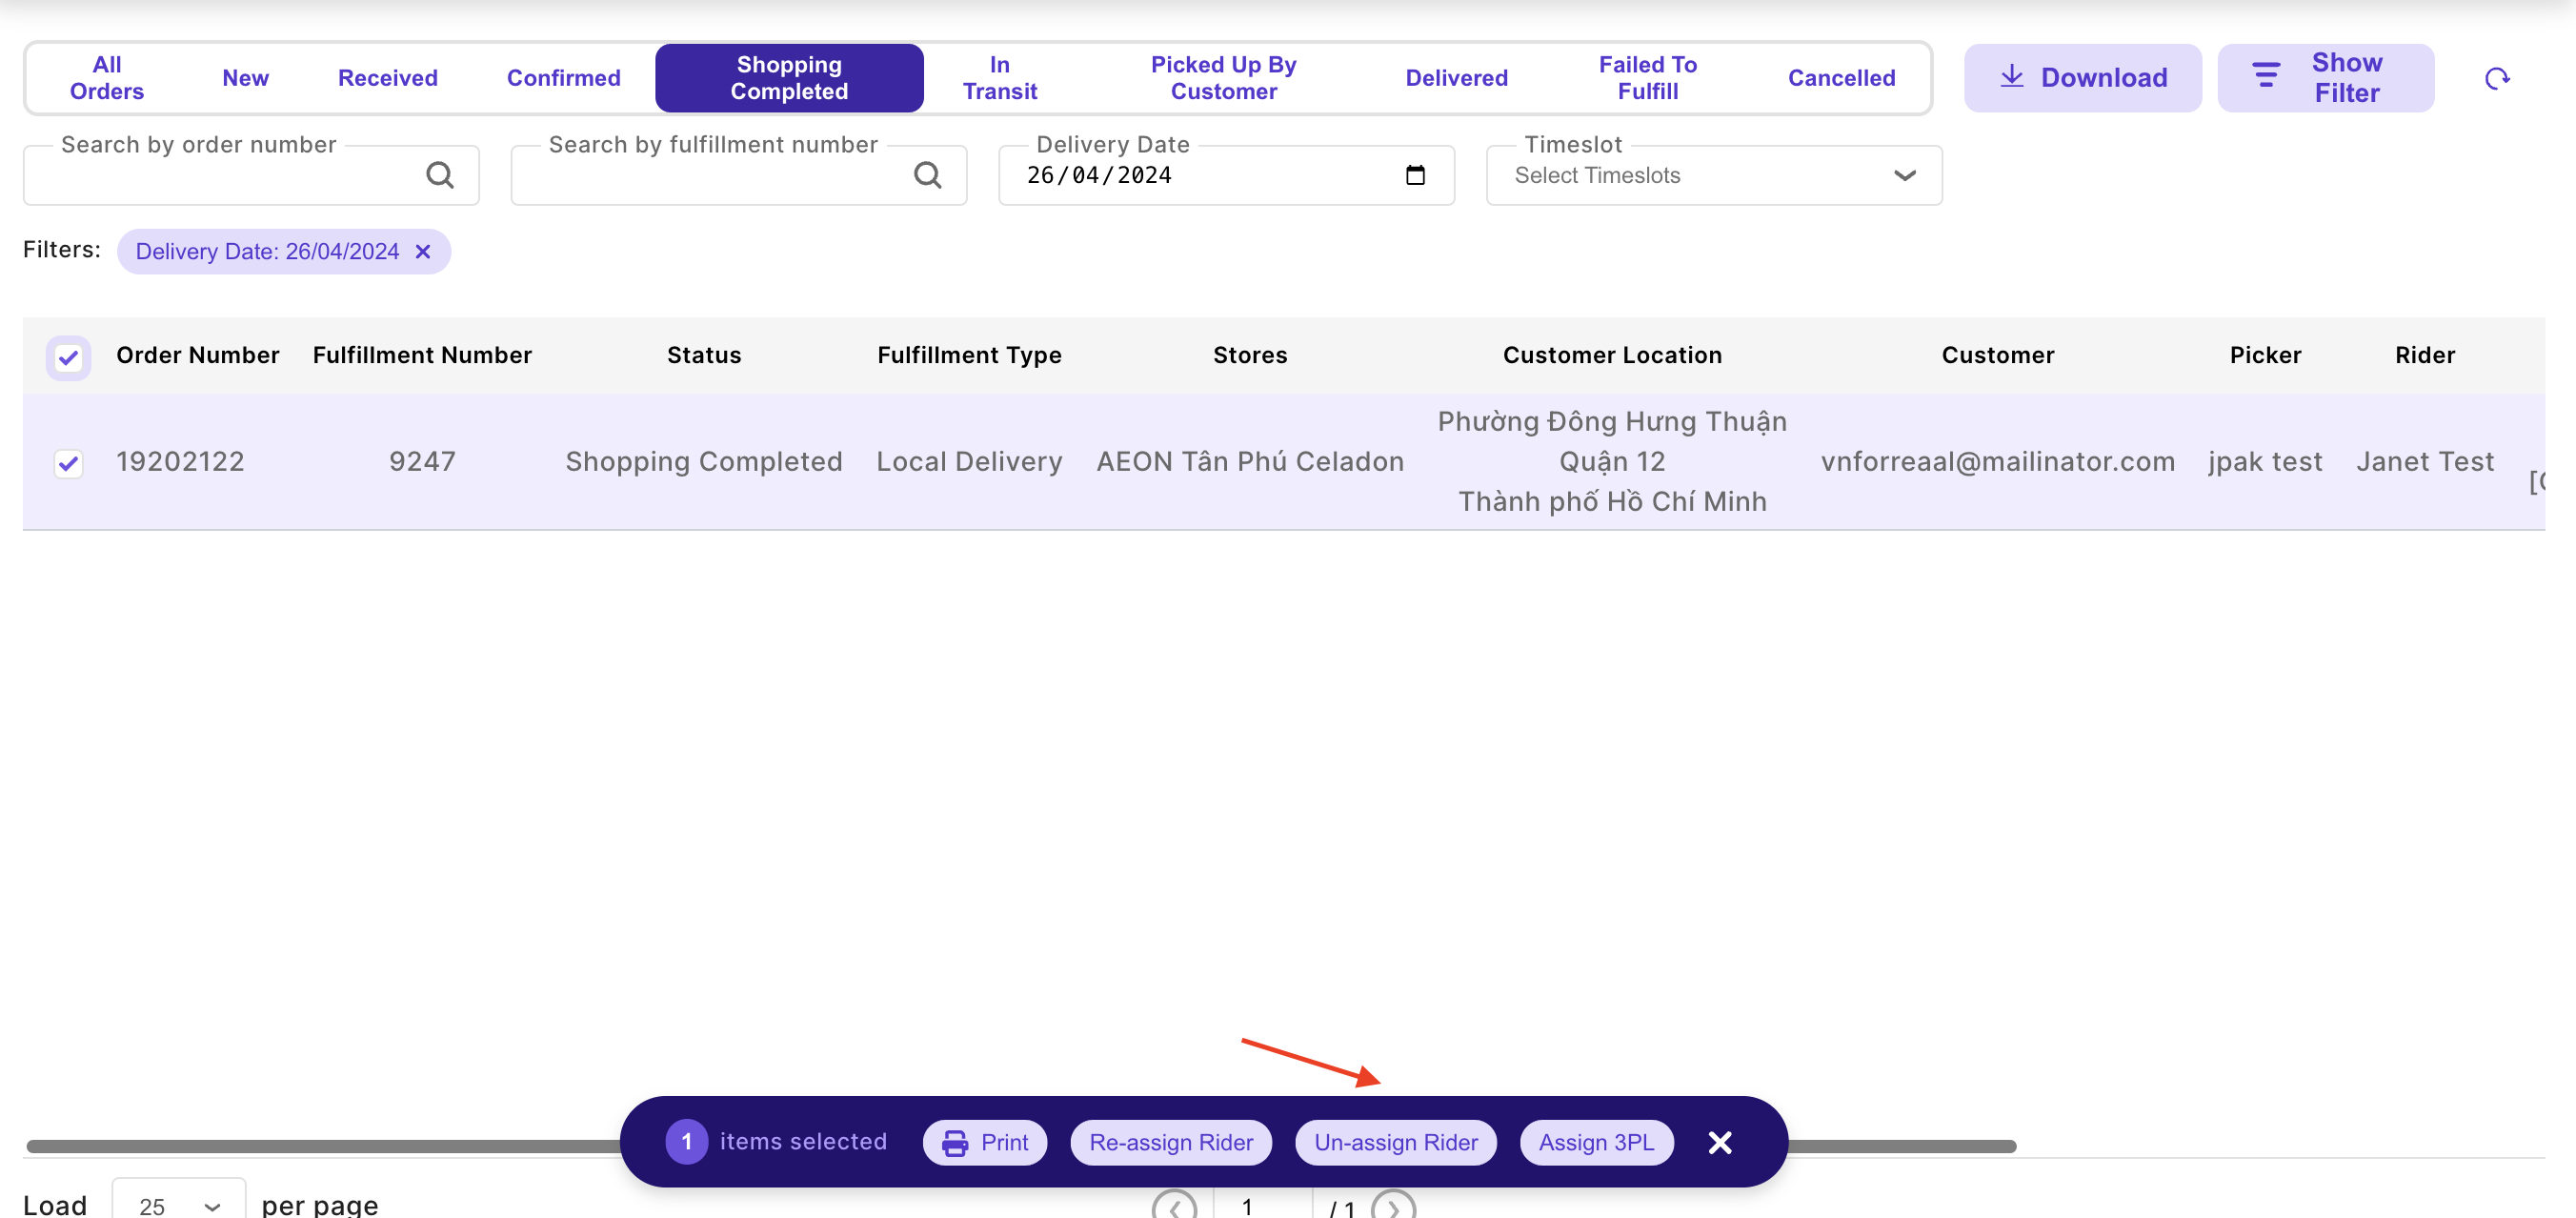
Unassign orders from rider
You can unassign an order from rider as long as the order is not In Transit yet.
-
From Order List View (bulk action)
- Select the left-side checkboxes for the orders you wish to un-assign
- Click on “Unassign Rider” in the toaster
-
From Order Details (single order)
- Click on the
Editicon in Rider Assignment - Click on “Unassign Rider”
- Click on the
After the order is unassigned, it’s ready to be assigned to another rider or to 3PL. This feature is only applicable if your organization is using 3PL service
You can also re-assign an order to another rider without unassigning first. See Re-assign order to another rider
However, to switch from Internal Rider to 3PL, you must unassign the order from first rider
Re-assign order to another rider
You can re-assign an order from one rider to another rider as long as the order is not In Transit yet. Orders can be re-assigned as many times as needed.
-
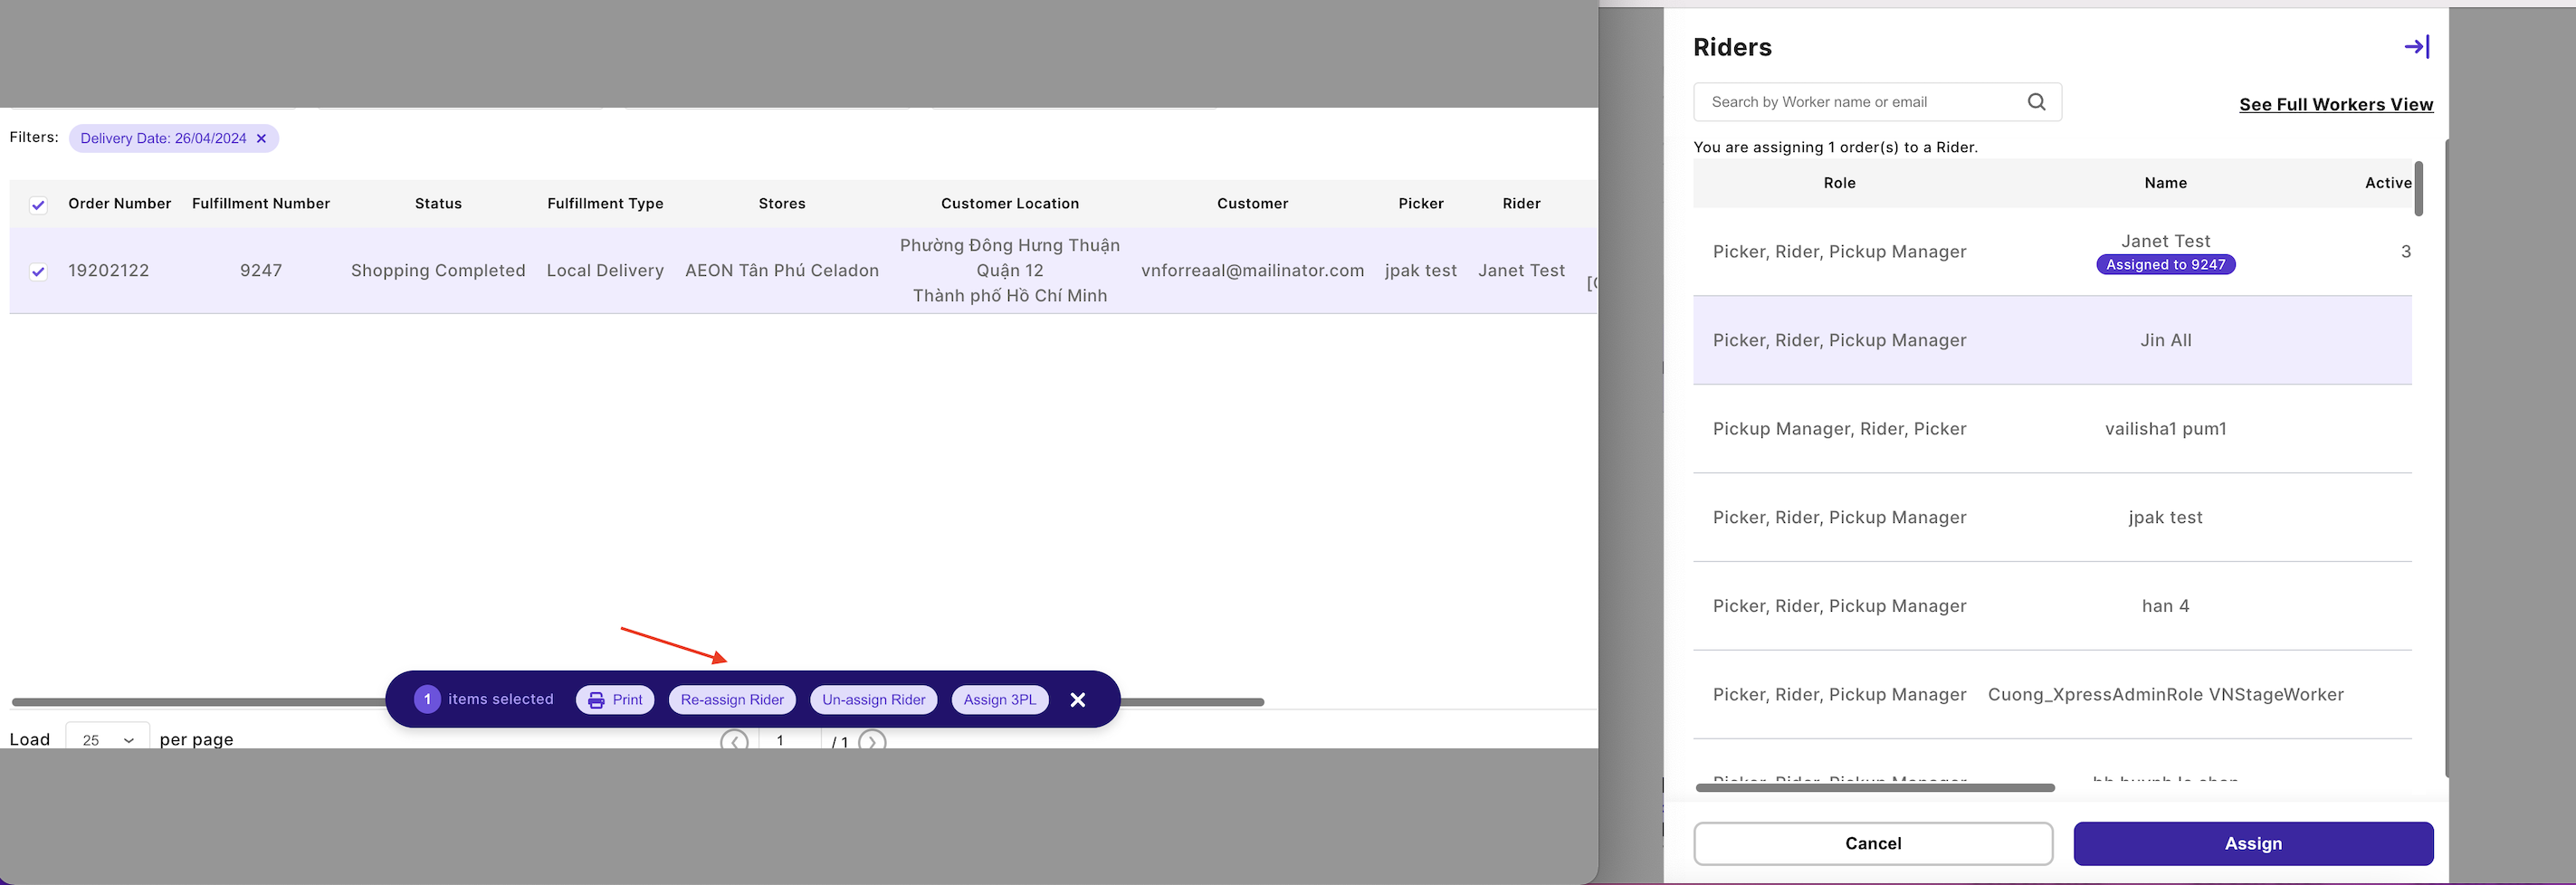
From Order List View (bulk action)
- Select the left-side checkboxes for the orders you wish to reassign and click on “Re-Assign Rider” in the toaster.
- Select a new rider from the list of workers
📣 Workers currently assigned to the orders selected will be highlighted with tagAssigned to [Fulfillment Number]under their name - Click on “Assign” to apply the assignment
- All orders selected will be reassigned to the rider selected
-
From Order Details (single order)
- Click on the
Editicon in Rider Assignment - Select a new rider in the
Internal Riderdropdown - Click “Re-assign Rider”
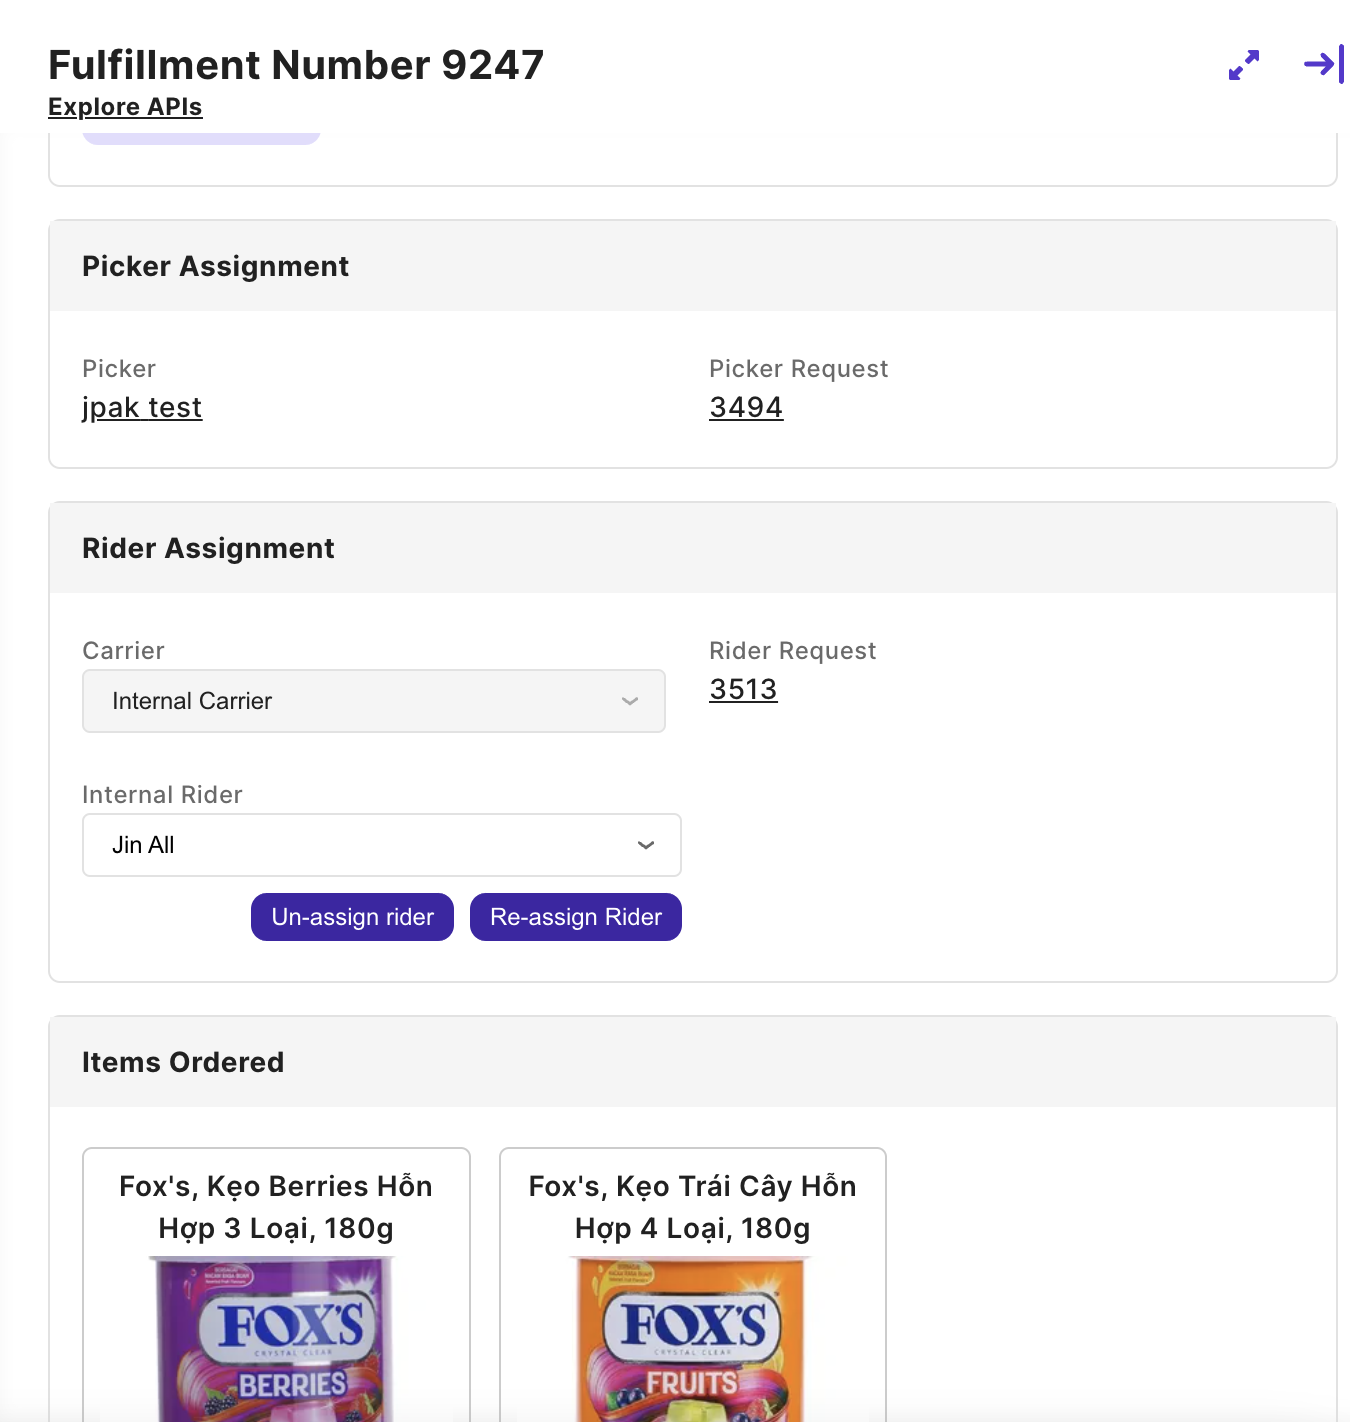
- Click on the
Re-assign order to 3PL
To switch from Internal Rider to 3PL, you must unassign the order first. Afterwards, 3PL assignment options will be available again.
Orders: assign orders to 3PL manually
As a user I am able to assign orders to 3PL manually
Orders may be assigned to an external 3PL rider manually by creating the 3PL request directly in the 3PL website. Use the manual option to create the request in this fashion. To create a 3PL request via API, see the 3PL API assignment section. This feature is only applicable if your organization is using 3PL.
Assign orders to 3PL manually
-
From Order List View (bulk action)
- Select the left-side checkboxes for the orders you wish to assign to a 3PL rider
- Toaster slides up with count of selection and actions available to the user
- Click on
Assign 3PL - Right-side panel opens with order details for the first order selected in the the Order List view requiring action
📣 While orders can be selected in bulk in the Order List View, 3PL requests must still be submitted one at a time to the 3PL
📣 User can toggle between multiple orders by selectingNext OrderorPrevious Orderlinks
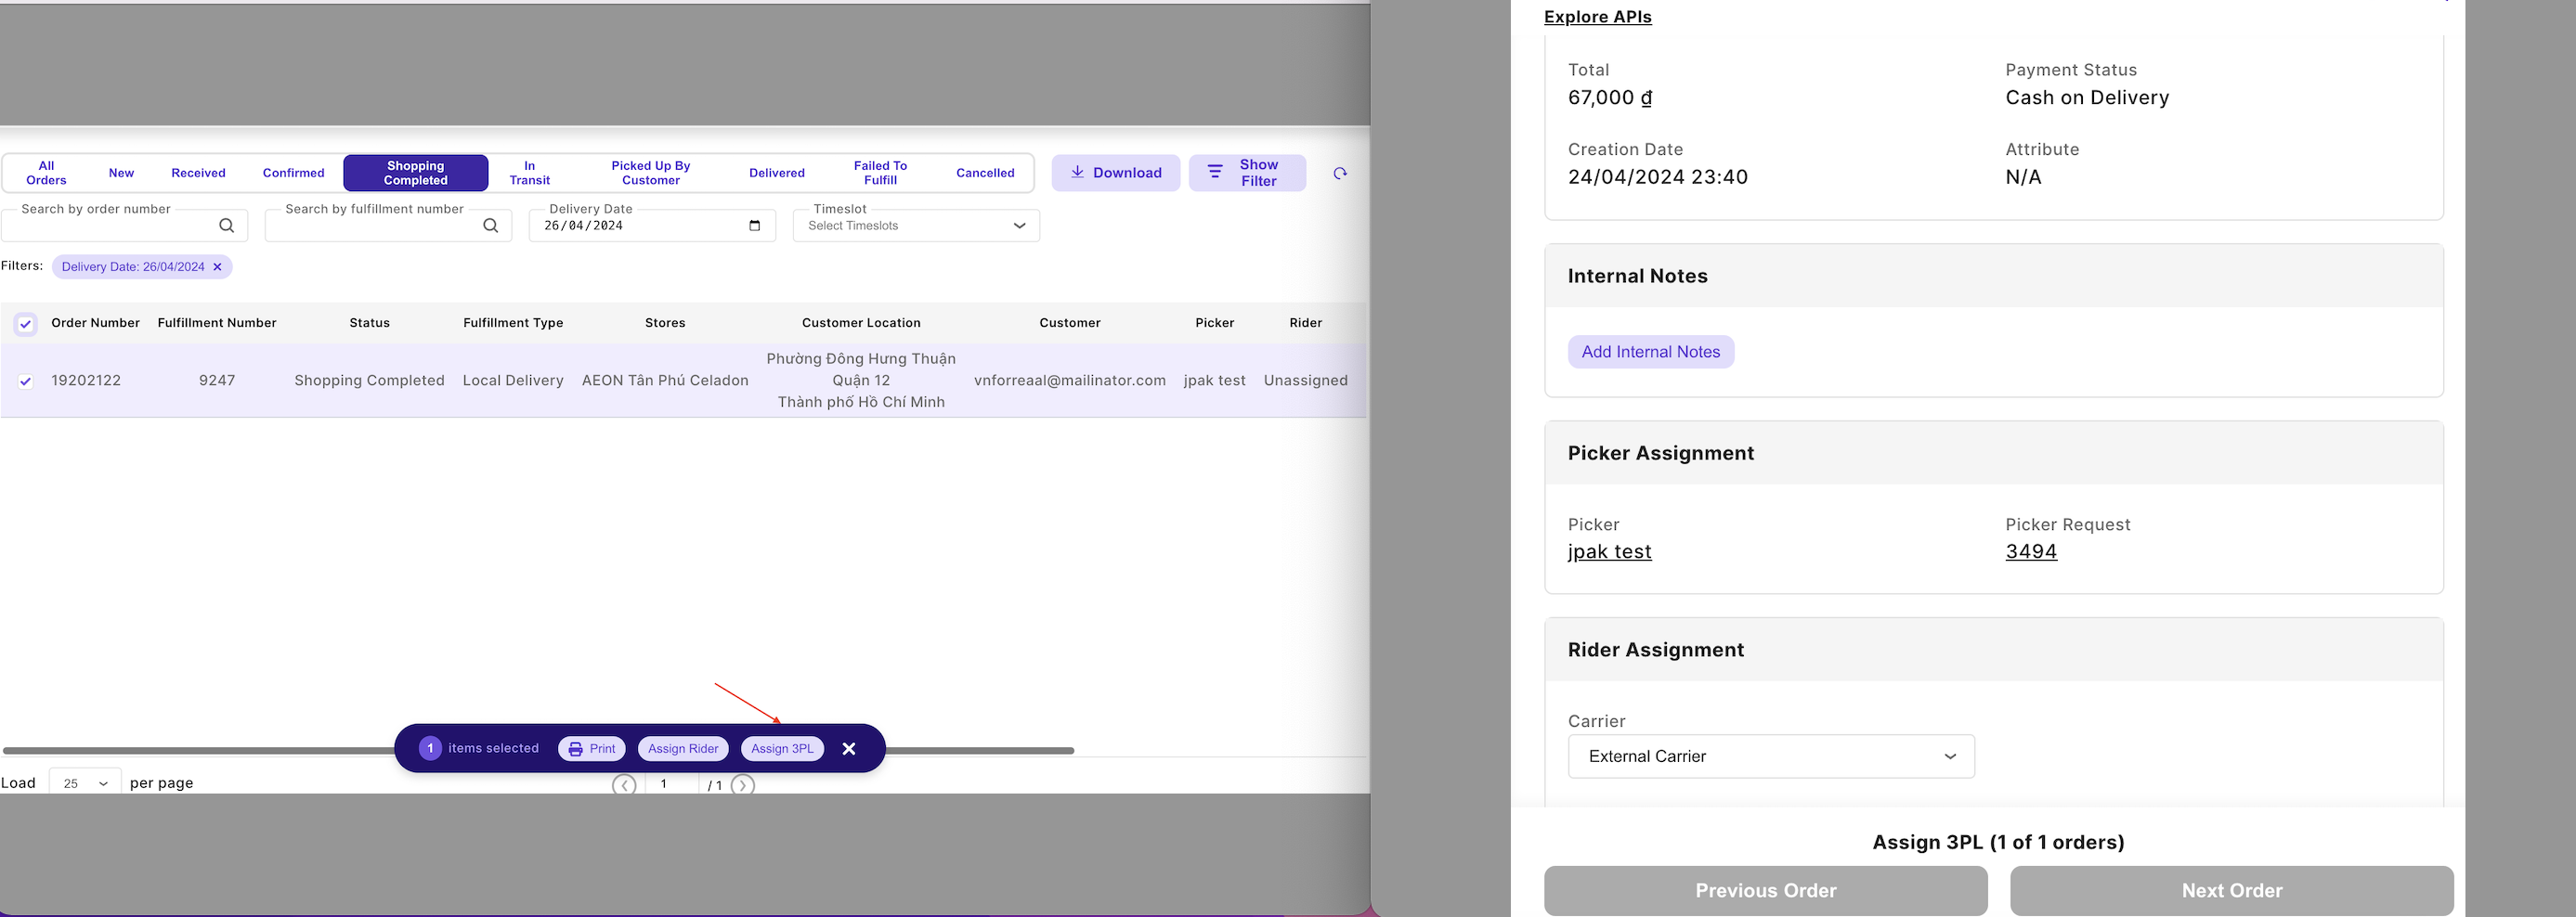
- See Order Details (single order) assignment below for 3PL assignment
-
From Order Details (single order)
-
Click on an order row to open the Order Details side panel
-
In the Rider Assignment section, click on the
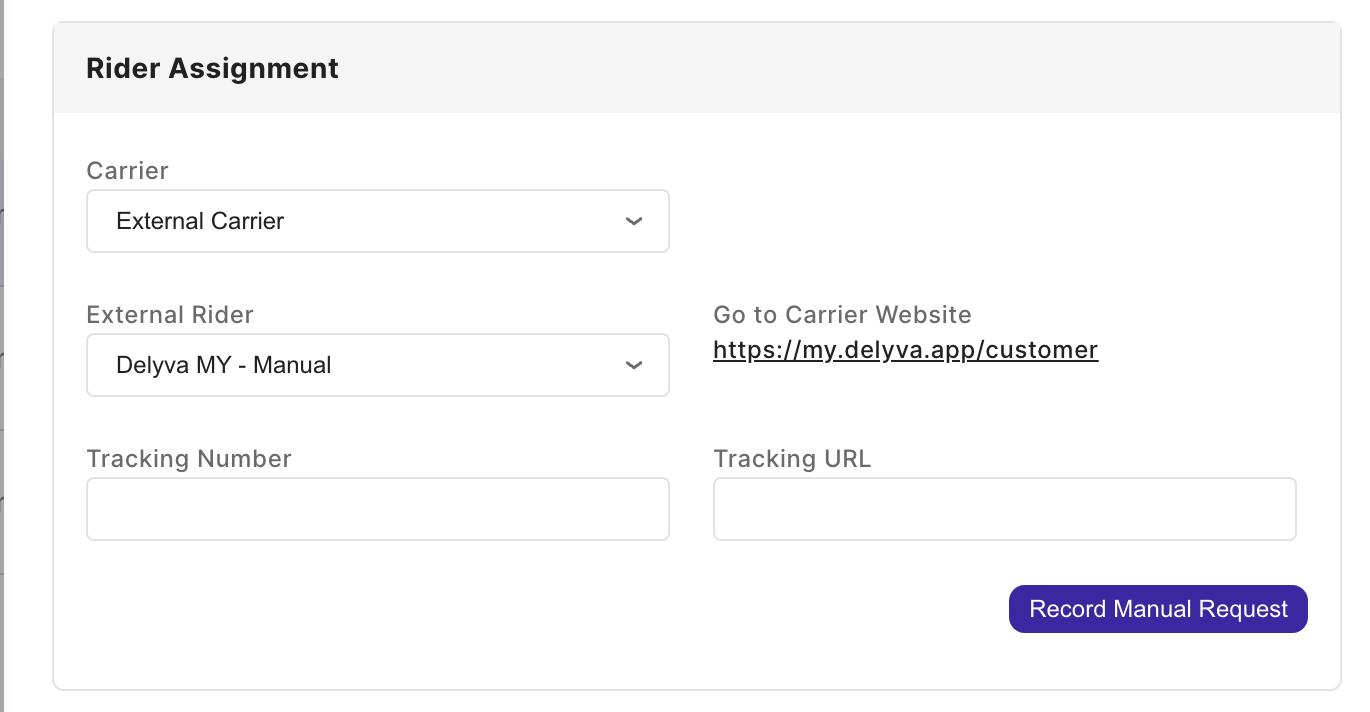
Carrierdropdown and selectExternal Carrier-
Click on the
External Riderdropdown to see a list of the 3PL options. The 3PLs list you see depend on the integrations enabled for your organization.
📣 Manual options:Ahamove VN - ManualNinjavan VN - ManualSagawa - ManualDelyva MY - Manual
📣 API options:Ahamove VN - APINinjavan VN - APISagawa - API
-
Select the 3PL manual options and click on the link to open a new tab with the 3PL website. The 3PLs list you see depend on the integrations enabled for your organization
-
📣 Create an
Ahamove VN - Manualrequest: If you selectAhamove VN - Manualin the External Rider dropdown, a link directing you to the Ahamove website will be displayed which will open up in a new tab when clicked.- Upon creating a request directly on the Ahamove website, fill out provided tracking information (number and URL) and click
Record Manual Request.
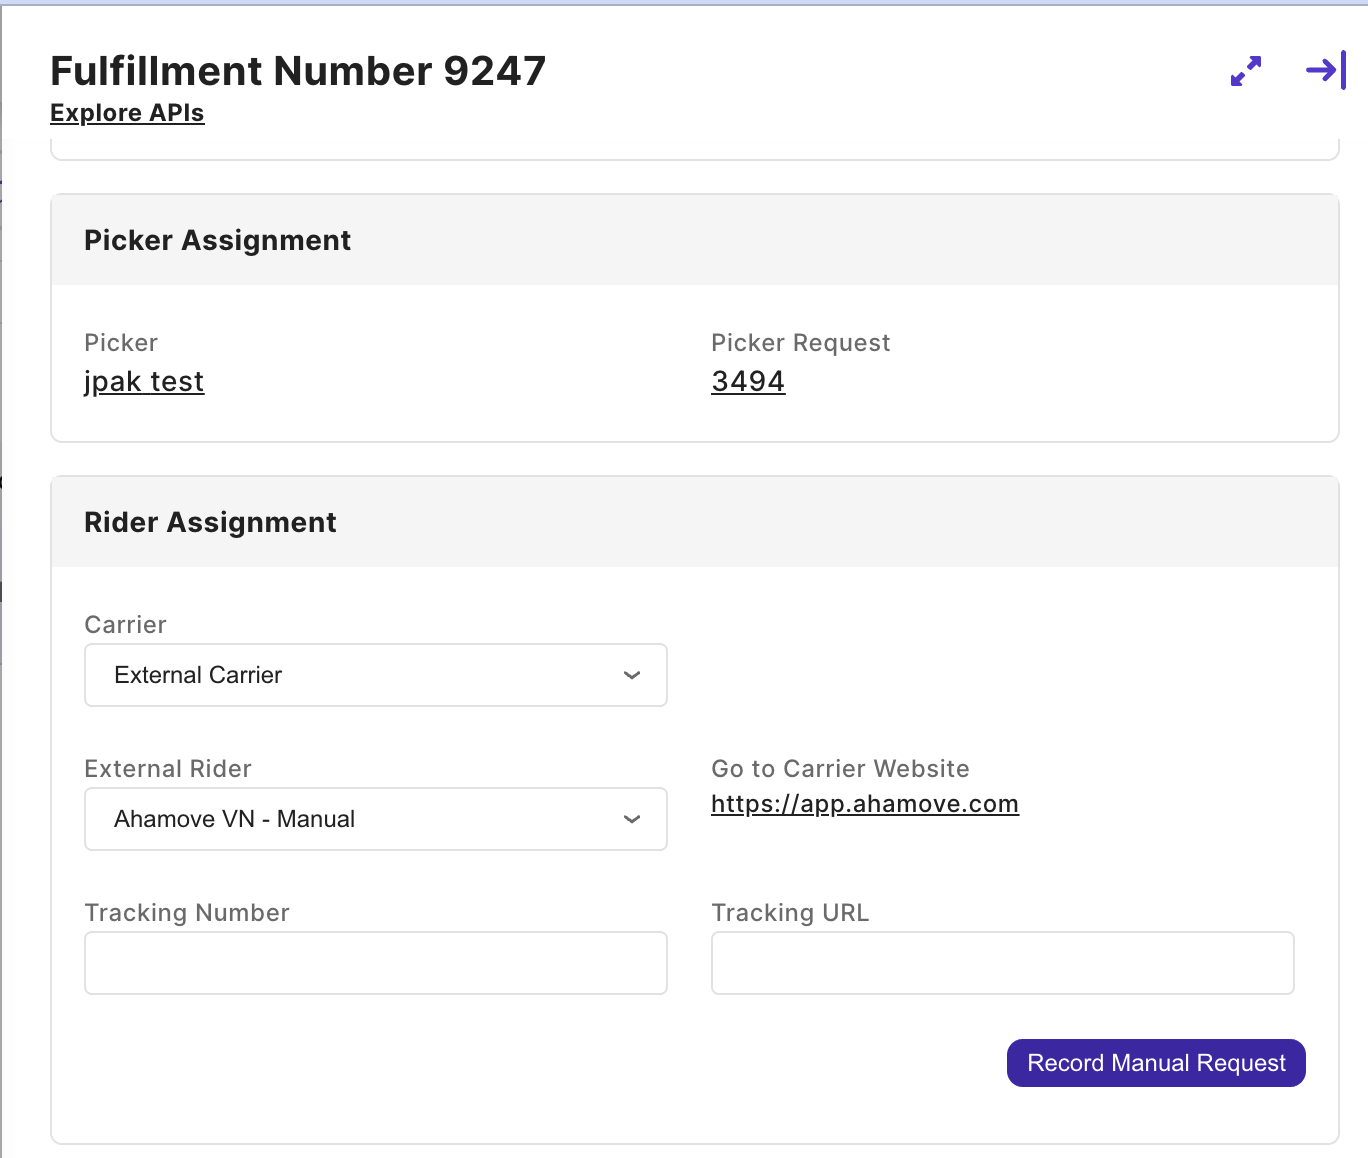
- Upon creating a request directly on the Ahamove website, fill out provided tracking information (number and URL) and click
-
📣 Create a
Ninjavan VN - Manualrequest: If you selectNinjavan VN - Manualin the External Rider dropdown, a link directing you to the Ninjavan website will be displayed which will open up in a new tab when clicked.- Upon creating a request directly on the Ninjavan website, fill out provided tracking information (number and URL) and click
Record Manual Request.
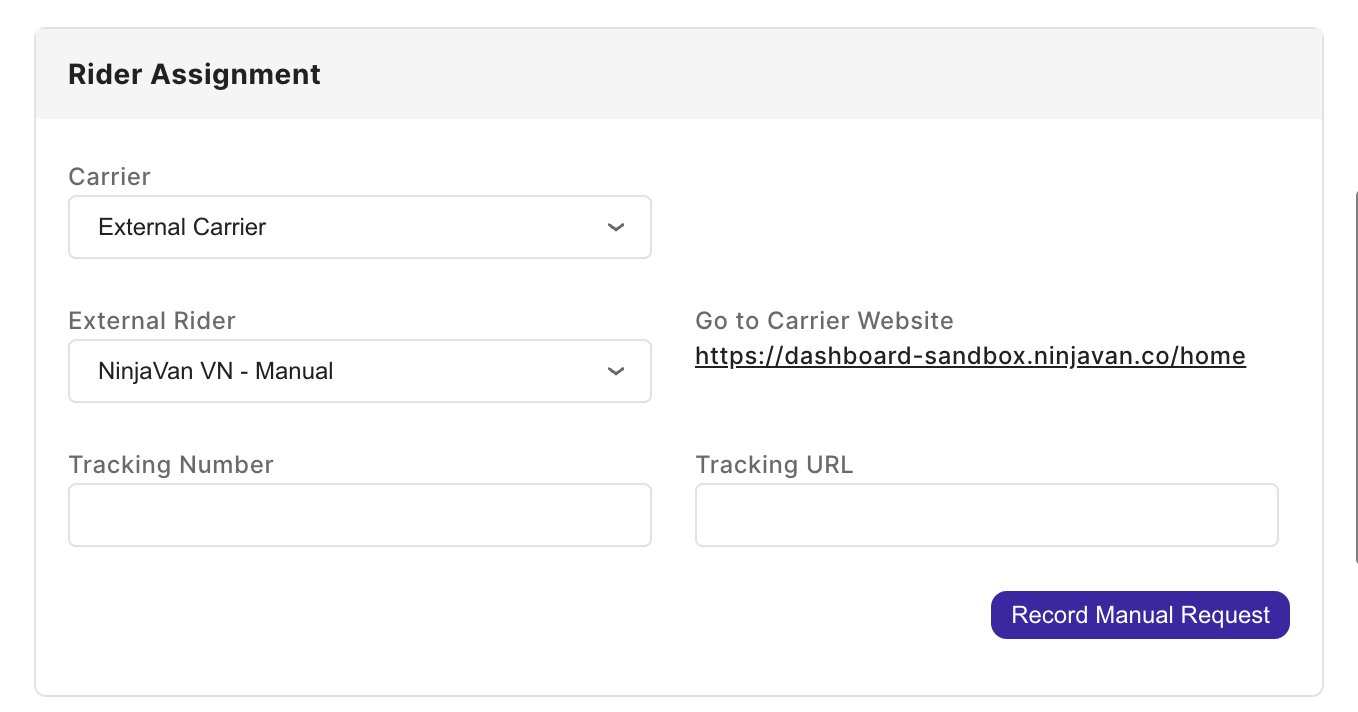
- Upon creating a request directly on the Ninjavan website, fill out provided tracking information (number and URL) and click
-
📣 Create a
Sagawa - Manualrequest: If you selectSagawa - Manualin the External Rider dropdown, a link directing you to the Sagawa website will be displayed which will open up in a new tab when clicked.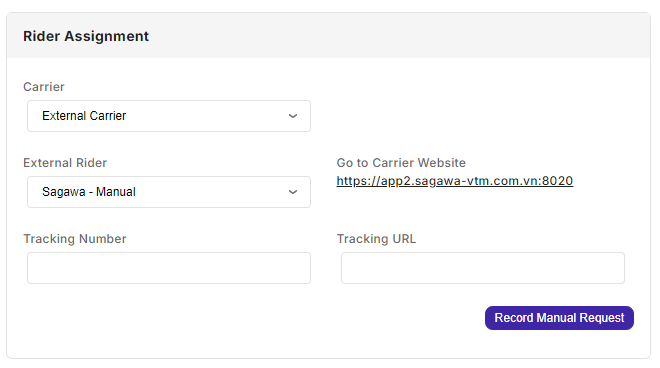
-
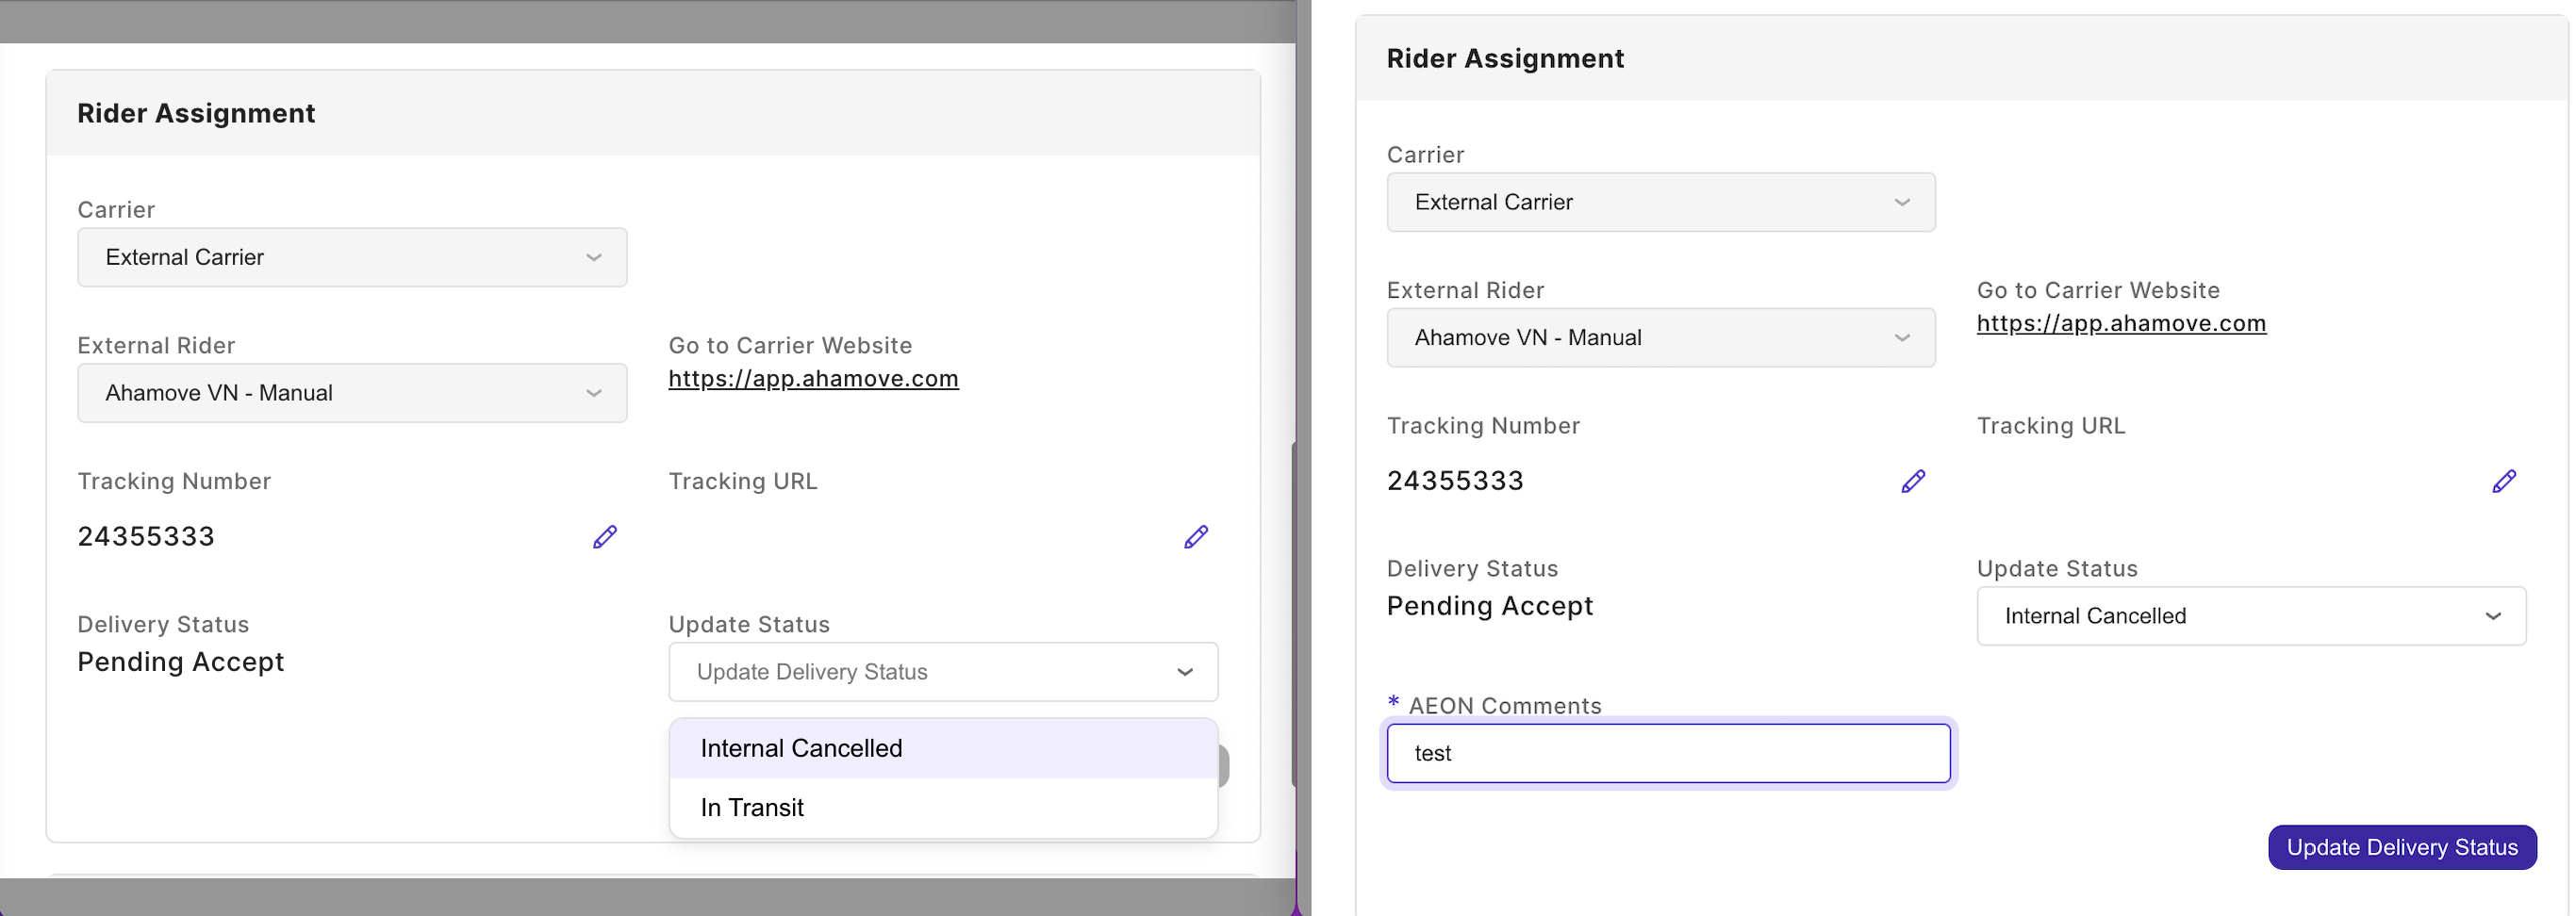
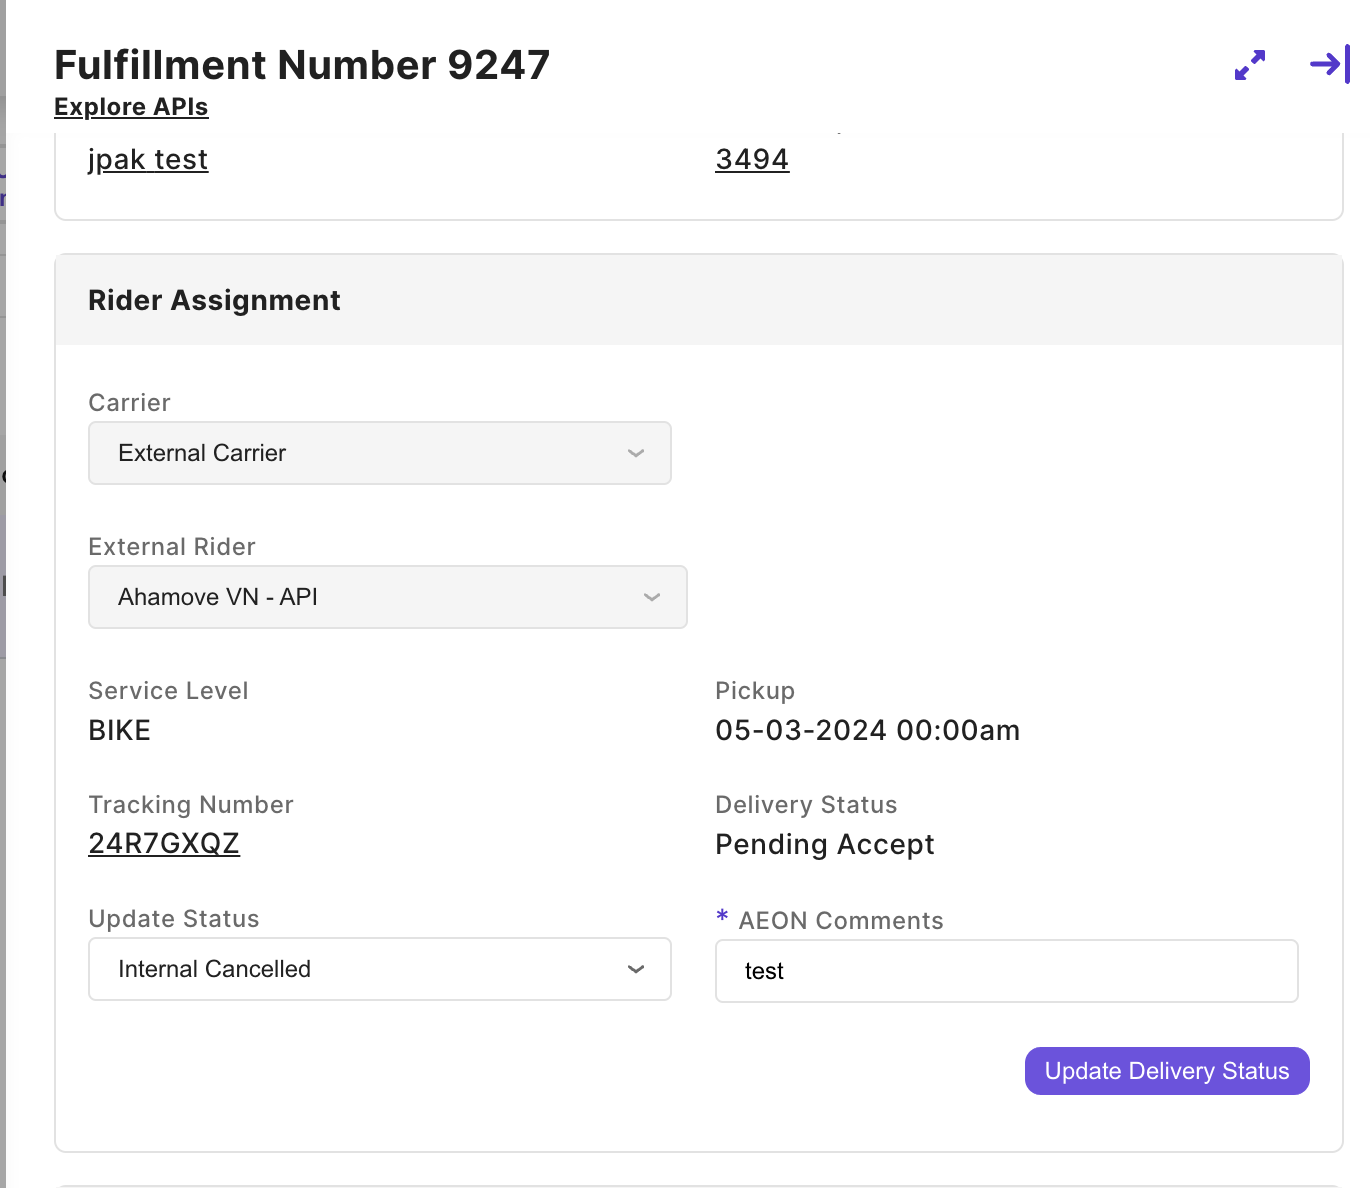
Upon successful recording of the manual 3PL request, the Rider Assignment section will update to display the 3PL tracking information entered, 3PL Delivery Status, and Update Status dropdown to allow manual adjustment of the 3PL delivery status.
- If tracking URL provided, the tracking number will be linked to the 3PL website to provide latest tracking details.
- The 3PL delivery status will be set to
Pending Accept. - Manual adjustment of the 3PL delivery status is required to properly move the order to the correct status since the 3PL request was created manually on the 3PL website, and therefore Xpress Admin will not be receiving automatic updates to the order.
📣 Orders assigned to 3PLs manually (through the creation of 3PL request directly on the 3PL website) will not automatically receive delivery status updates and will require manual adjustment of delivery status .
-
📣 Create a
Delyva MY - Manualrequest: If you selectDelyva MY - Manualin the External Rider dropdown, a link directing you to the Delyva website will be displayed which will open up in a new tab when clicked.- Create the order directly on the Delyva website, then fill out provided tracking information (tracking number and URL) in Xpress Admin and click
Record Manual Request
- The Rider Assignment section will update to display the 3PL tracking information entered, 3PL Delivery Status, and Update Status dropdown to allow manual adjustment of the 3PL delivery status
- The 3PL delivery status will be set to
Pending Accept - We are integrated to receive automatic status updates from Delyva using the tracking number provided
- See 3PL Delivery Status for the flow of status updates
- 📣 As Delyva status updates will be sent automatically, we recommend to not manually update statuses to prevent any conflict.
- 📣 Payment on delivery orders cannot be assigned to 3PL as Delyva does not support Payment on delivery.
- Create the order directly on the Delyva website, then fill out provided tracking information (tracking number and URL) in Xpress Admin and click
-
-
-
3PL Delivery Statuses
Delivery statuses are used to track 3PL status and will update order statuses accordingly. For 3PL manual assignment, the user must update delivery statuses manually. For 3PL API assignment, delivery statuses will be updated automatically.
Pending Accept: The 3PL request has been submitted- Order Status:
Completed Shopping
- Order Status:
Pending Pickup: The 3PL request has been confirmed and accepted, and the order is awaiting pickup by the 3PL.- Order Status:
Completed Shopping
- Order Status:
In Transit: The 3PL driver has picked up the order, and the order is on its way to be delivered to the customer.- Order Status:
In Transit
- Order Status:
Delivered: The 3PL driver has delivered the order to the customer.- Order Status:
Delivered
- Order Status:
Failed: The 3PL driver has not been able to deliver the order to the customer.- Order Status:
Failed
- Order Status:
Internal Cancelled: 3PL request has been cancelled.- Order Status:
Completed Shopping
- Order Status:
External Cancelled: The 3PL provider cancelled the 3PL request.- Order Status if externally cancelled before the status is
In Transit:Completed Shopping - Order Status if externally cancelled when the status is
In Transit:Failed
- Order Status if externally cancelled before the status is
Cancel a manual 3PL request
You can cancel a manual 3PL request created directly on the 3PL website as long as the Delivery Status has not yet been moved to In Transit or Pending Pickup
- Click on an order row to open the Order Details side panel for the order that has the 3PL request you wish to cancel.
- In the Rider Assignment section, select
Internal Cancelledin theUpdate Statusdropdown. - Enter a reason in the
Commentstext box. - Click on
Update Delivery Status. - Upon successful cancellation, the order status will go back to
Completed Shoppingand the Rider Assignment table will refresh for new rider assignment.
You must cancel the order in Delyva separately. Cancelling in Xpress Admin does not automatically cancel the order in Delyva.
Manually adjust 3PL delivery status
The 3PL delivery status for orders that have been assigned to 3PL riders manually will require manual adjustment.
- Select the status you would to adjust the delivery status to in the Update Status dropdown and click on the
Update Delivery Statusbutton.- Update to
In Transitwhen order has been picked up by 3PL - Update to
Internal Cancelledto cancel the 3PL manual request. See more here - Update to
Deliveredonce the order has been delivered by 3PL - Update to
Failedwhen 3PL driver has not been able to deliver the order to the customer
- Update to
As Delyva status updates will be sent automatically, we recommend to not manually update statuses to prevent any conflict.
Orders: Assign orders to 3PL via API
This feature is only applicable if 3PL API integrations are enabled for your organization
Orders may be assigned to an external 3PL riders by creating a 3PL request via API or by manually creating a request in the 3PL website. Use the API option to create a request through Xpress Admin directly. To create a 3PL request manually, see the 3PL manual assignment section. Note that 3PL assignment only applies to Express Delivery and Standard orders, excluding Pick Up orders.
Assign orders to 3PL via API
-
From Order List View (bulk action)
- Select the left-side checkboxes for the orders you wish to assign to a 3PL rider
- Toaster slides up with count of selection and actions available to the user
- Click on
Assign 3PL - Right-side panel opens with order details for the first order selected in the the Order List view requiring action
📣 While orders can be selected in bulk in the Order List View, 3PL requests must still be submitted one at a time to the 3PL
📣 User can toggle between multiple orders by selectingNext OrderorPrevious Orderlinks

- See Order Details (single order) assignment below for 3PL assignment
-
From Order Details (single order)
-
Click on an order row to open the Order Details side panel
-
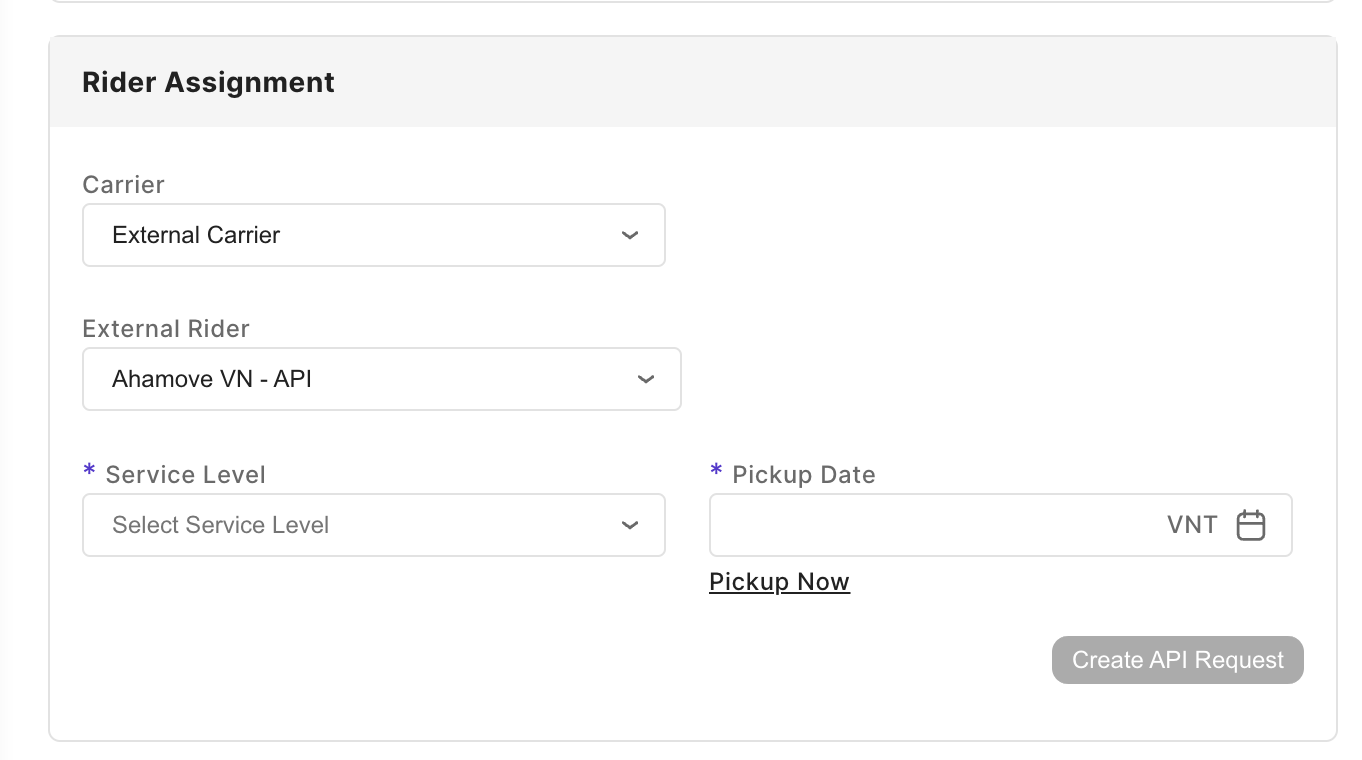
In the Rider Assignment section, click on the
Carrierdropdown and selectExternal Carrier -
Click on the
External Riderdropdown to see a list of the 3PL API options
📣 API options:Ahamove VN - API,Ninjavan VN - APIandSagawa - APIThe 3PL API options you see depend on the integrations enabled for your organization. -
Select one of the 3PL API options and fill in the carrier-specific information needed to create the 3PL request directly in Xpress Admin. The 3PL API options you see depend on the integrations enabled for your organization.
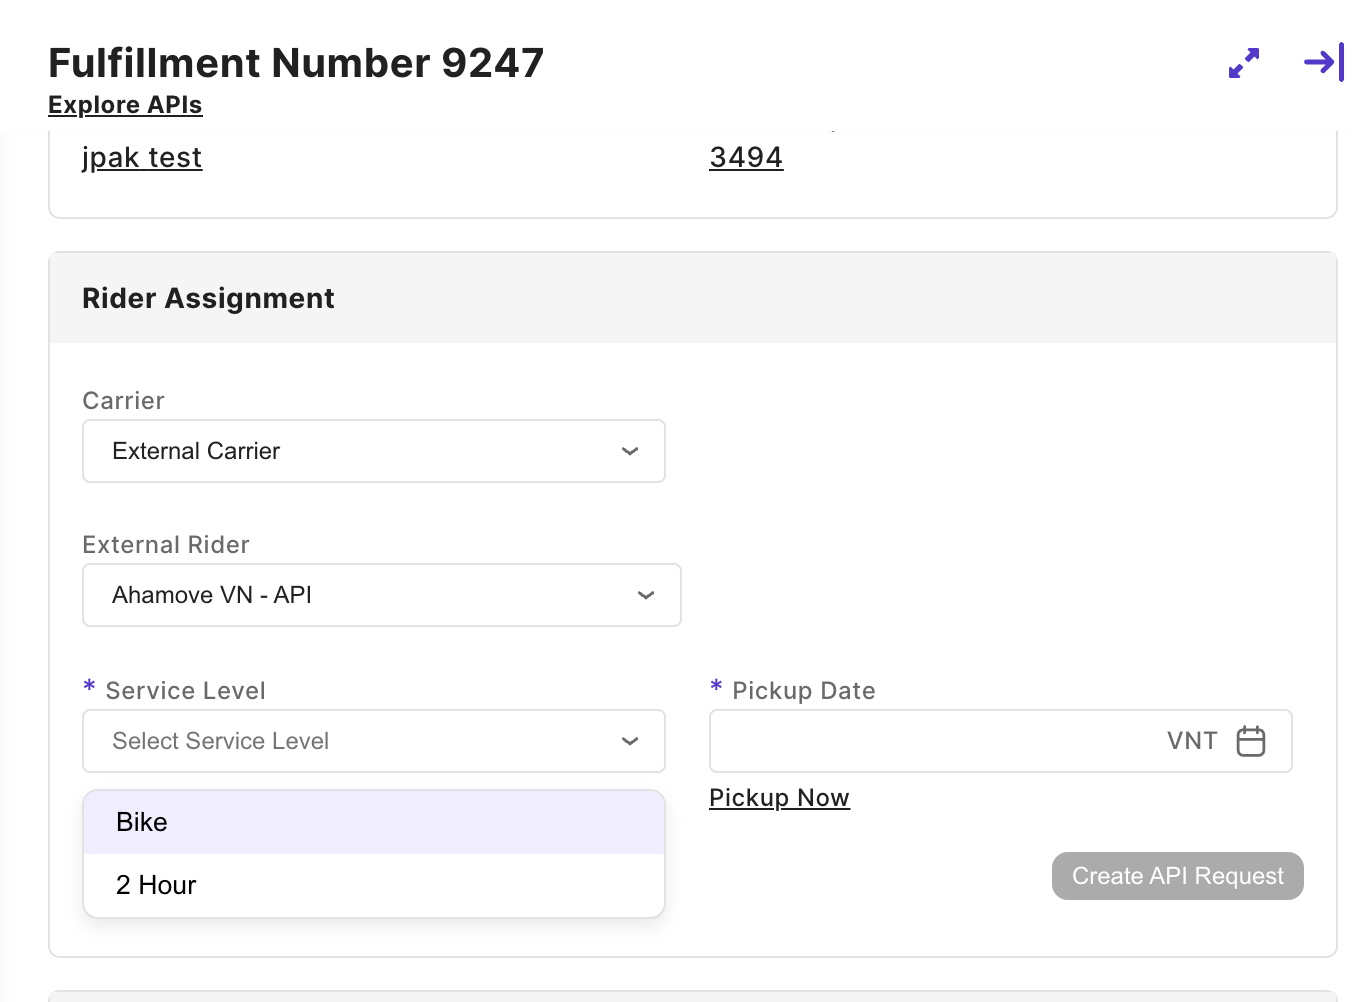
📣 Create an
Ahamove VN - APIrequest: If you selectAhamove VN - APIin the External Rider dropdown, you will be asked to selectService LevelandPickup Date-
Service Level: SelectBike(1 hour) ,2 HourorWAREHOUSEservice-
Bikeand2 Hourservices will requirePickup Date- Select
Pickup Nowlink for immediate pickup or select a specific date and time (in 15 minute increments)
- Select
-
WAREHOUSEservice will require packing dimensions including:Weight (kg): The weight of the package (kg)Height (m): The height of the package(m)Width (m): The width of the package(m)Length (m): The length of the package(m)
📣 Create a
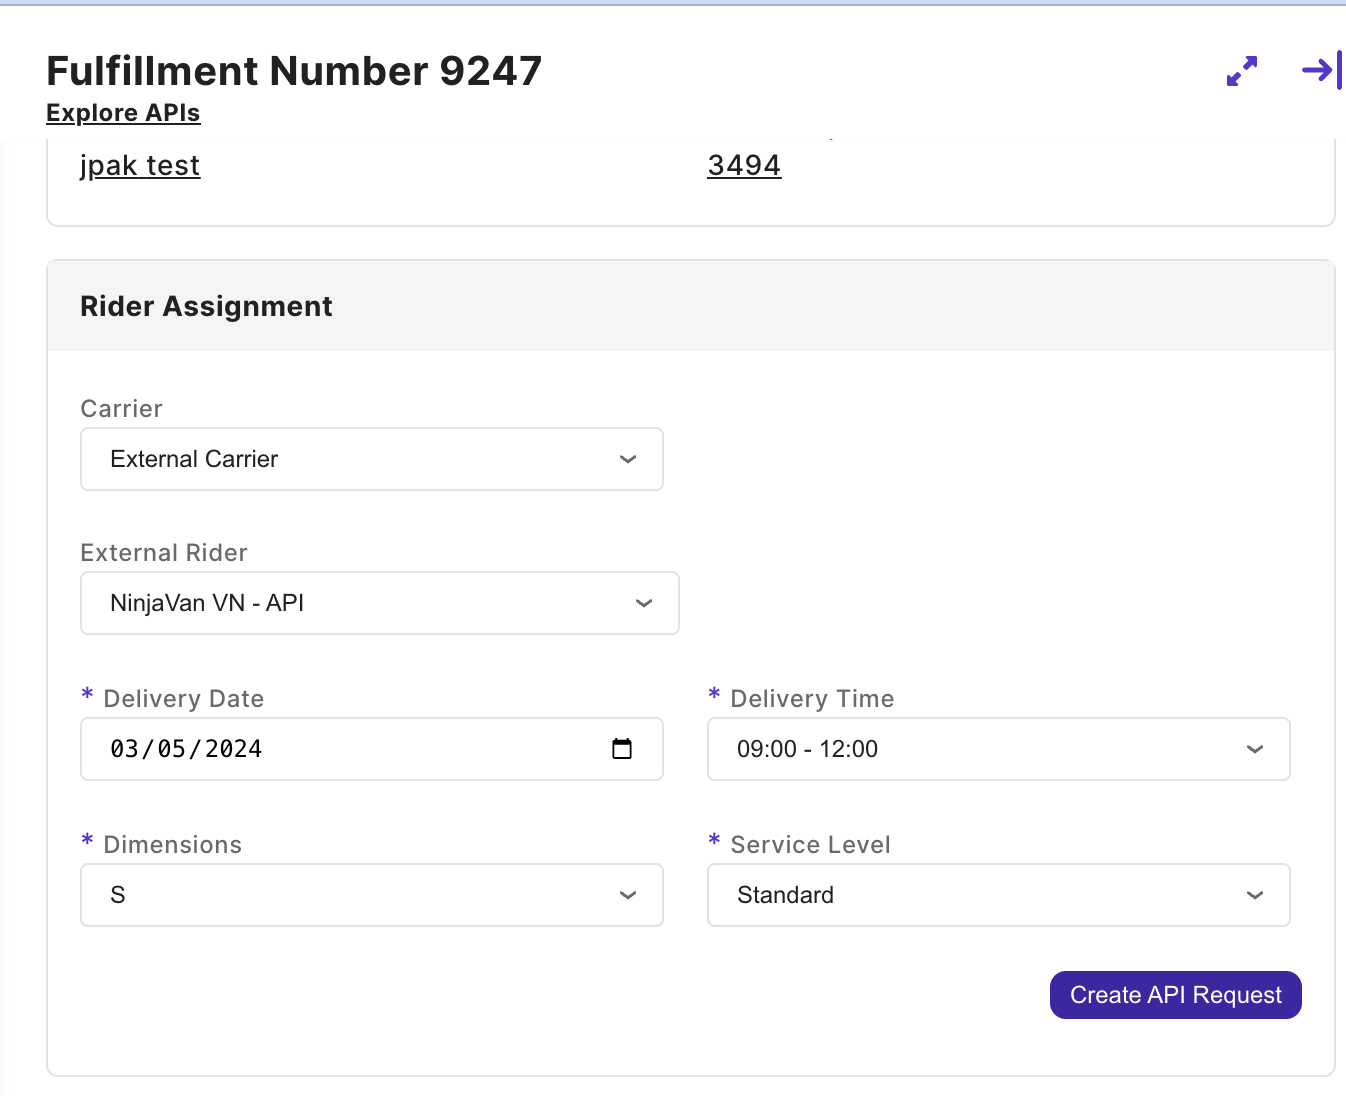
Ninjavan VN - APIrequest: If you selectNinjavan VN - APIin the External Rider dropdown, you will be asked to selectDelivery Date,Delivery Time,DimensionsandService Level -
-
Delivery Date: Defaulted to estimated delivery date based on lead time but can be changed to a different future date -
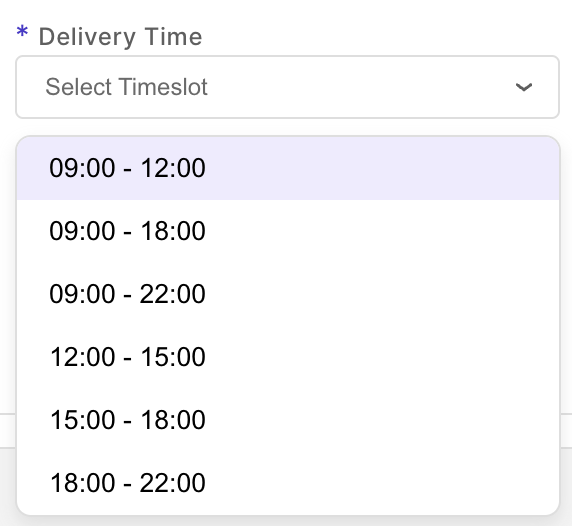
Delivery Time: Select from a list of set Ninjavan timeslots. Current set Ninjavan timeslots below:
Dimensions: SelectS,M,L,XL, orXXLService Level: SelectStandardorNext Dayservice
-
-
📣 Create a
Sagawa - APIrequest: If you selectSagawa APIin the External Rider dropdown, you will be asked to selectDelivery Dateand enterTotal Weight(in grams)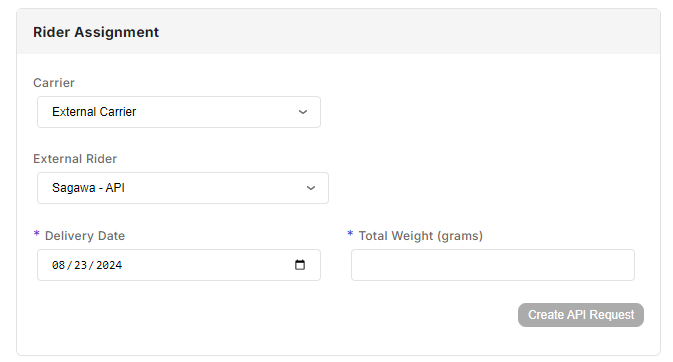
-
Once all fields have been selected or filled in for Ahamove, Ninjavan or Sagawa, click on
Create API Request -
Upon successful submission, a tracking number will be returned and the Rider Assignment section will update to display the information submitted to the 3PL along with the tracking number and 3PL Delivery Status.
- The tracking number will be linked to the 3PL website to provide latest tracking details.
- If eligible, the option to cancel the 3PL request will also be displayed. See Cancel a 3PL Request section below.
-
Cancel a 3PL request
You can cancel a 3PL request created via API as long as the Delivery Status is not in In Transit (if Ninjavan/Delyva/Sagawa) or Pending Pickup (if Ahamove). The 3PL API options you see depend on the integrations enabled for your organization.
- Click on an order row to open the Order Details side panel for the order that has the 3PL request you wish to cancel.
- In the Rider Assignment section, select
Internal Cancelledin theUpdate Statusdropdown. - Enter a reason in the
Commentstext box. - Click on
Update Delivery Status.
- Upon successful cancellation, the order status will go back to
Completed Shoppingand the Rider Assignment table will refresh for new rider assignment.
Reassign orders to 3PL
Orders can be reassigned to a 3PL as long as the order is not yet In Transit.
- To switch from Internal Rider to 3PL, you must unassign the order first. See Unassign orders from rider section above. After the order has been unassigned, the 3PL assignment options will be displayed.
- To assign to a different 3PL, the current 3PL request must first be cancelled. See Cancel a 3PL request section above.
Updated over 1 year ago