
Configurations
Overview
The Configurations tab is used to view and update timeslots as well as control cutoff time. It is hidden behind a permission so only select users can see this page, see section Access.
High-Level Summary:
- Ensure access is setup for users in your organization
- To start updating timeslots, use the Timeslots Configuration tab to create new timeslots. Updates must be scheduled ahead of time.
- To make changes to timeslots already live at checkout, use the Timeslot Calendar tab. Only capacity can be edited.
- You can have a different set of timeslot configurations for Business customers. See details in B2B Timeslots. This is only applicable if your organization uses B2B-specfic timeslots.
All timeslots are set up at the mall-level.
Definitions
Active timeslot: Timeslots currently displayed at checkout. This means that customers are able to place orders for these timeslots.Default Configs: These are the default timeslots used for the mall. All timeslots are generated using the default configs, unless an override has been created.Override Configs: These are timeslots set up to be applied instead of the default configs for the dates selected. There are two types of overrides:Temporary: Use this for holidays, special events and adhoc updates (e.g. Lunar New Year, fasting periods, etc.). A start and end date must be specified. During this period, the override timeslots will be used. After the end date, theDefault Configswill resume.Permanent: Use this to updateDefault Configspermanently. A start date must be specified. On the start date, new timeslots from the override config will apply and they will replace theDefault Configs.
Capacity: This is the total number of orders that can be accepted for a given timeslot. This reflect the total order capacity and does not adjust based on orders already placed.
Access to Configurations
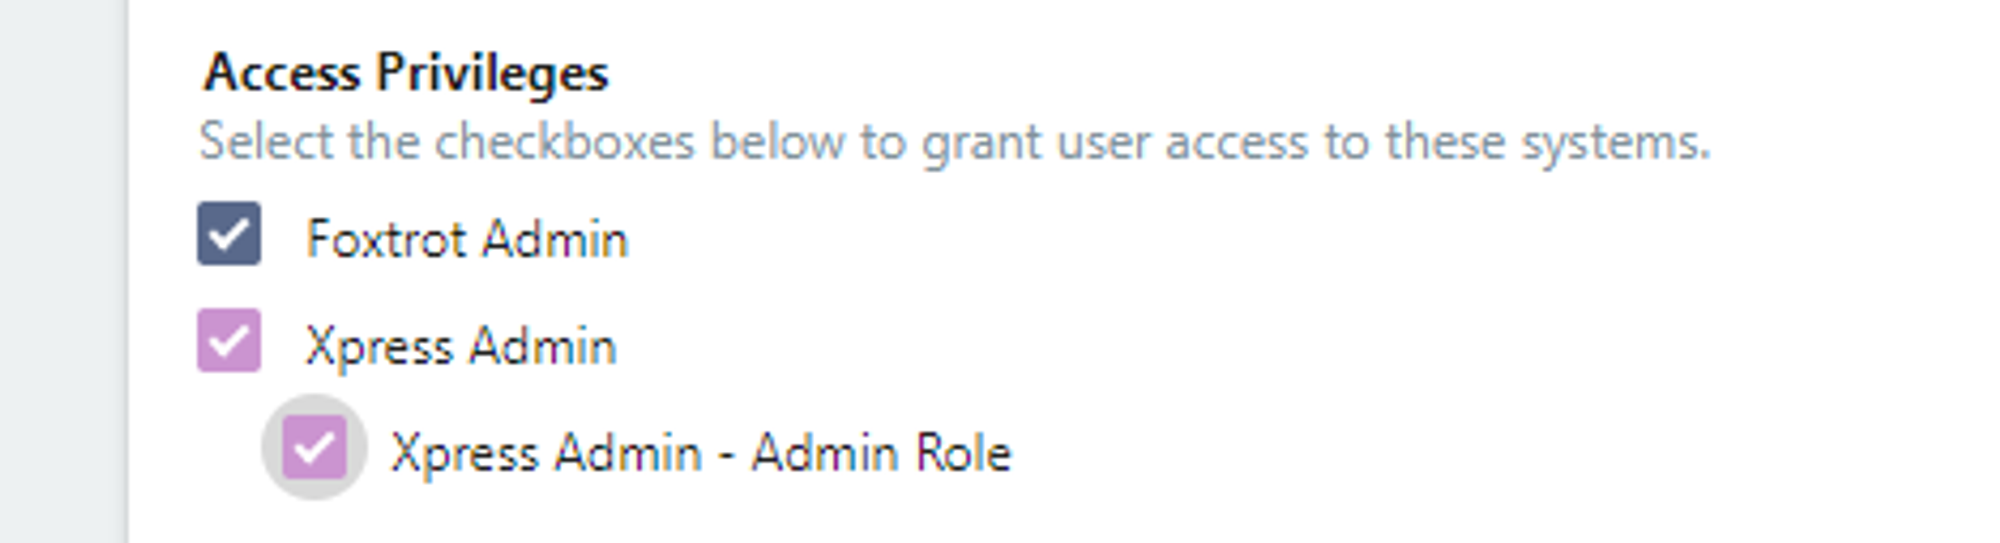
In Foxtrot > Admin Users, user must have permissions for Xpress Admin and Xpress Admin - Admin Role in order to see the Configurations tab on Xpress Admin.
After setting the permission, the user may need to log out/log back into Xpress Admin to see the new tab in left side menu.
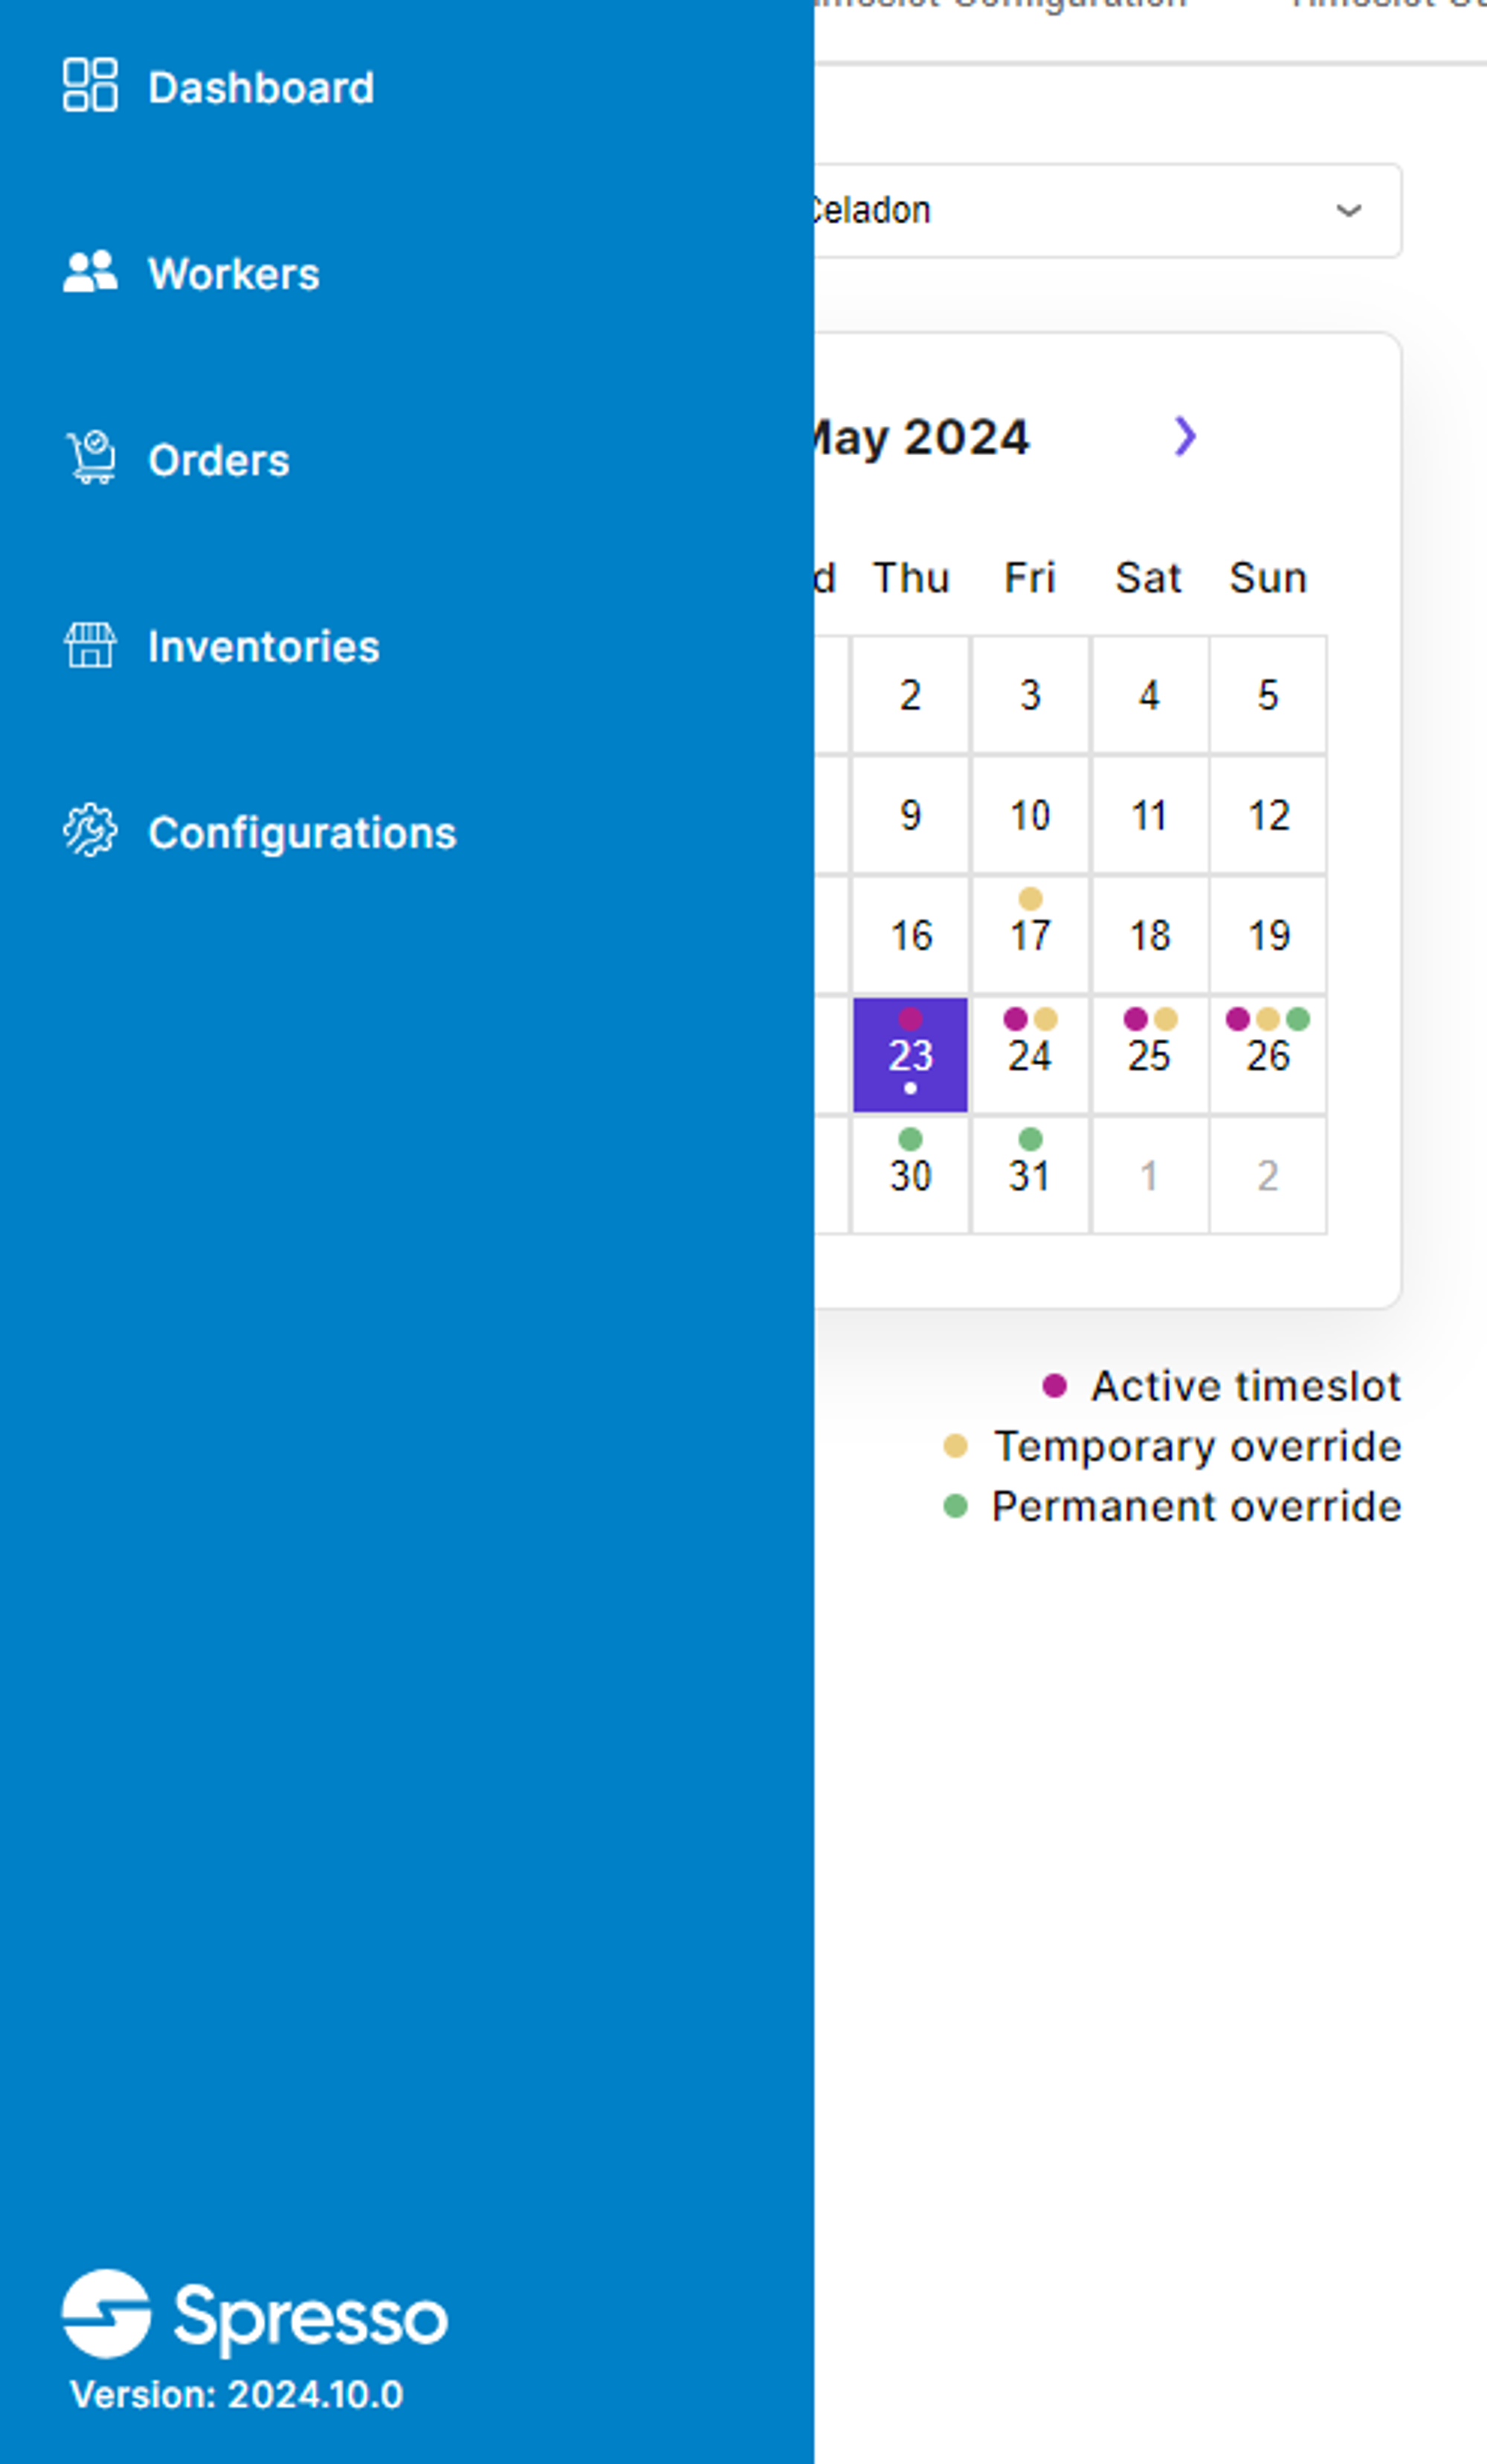
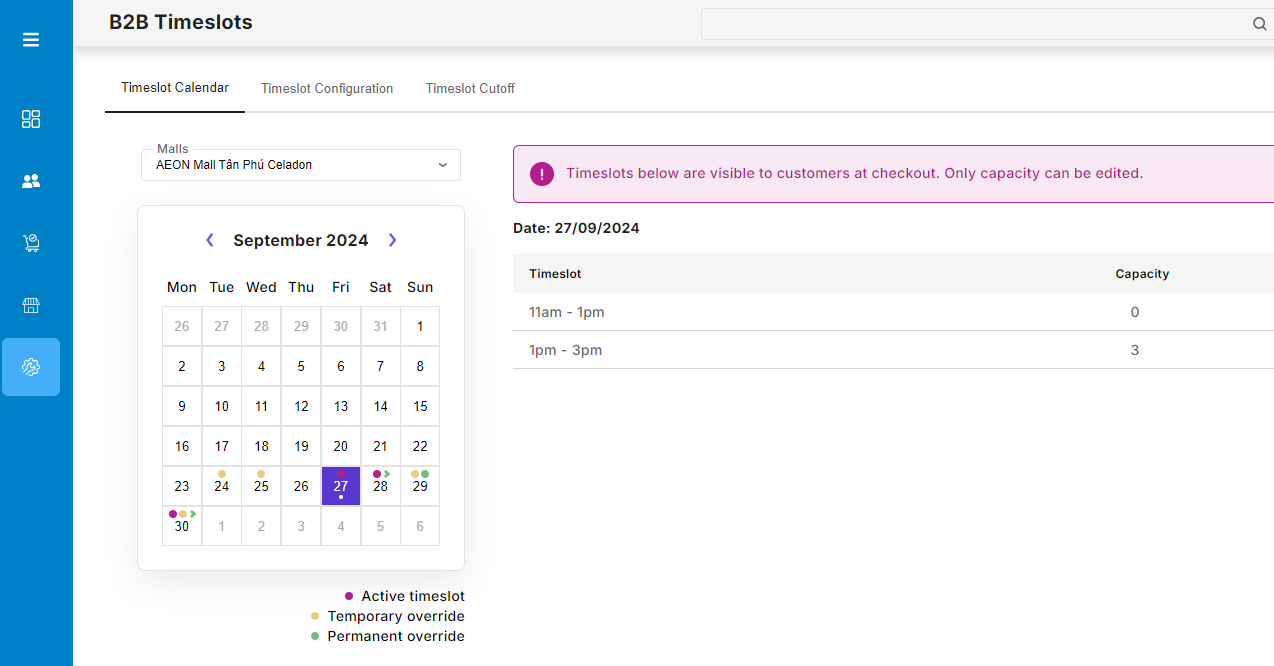
Configurations: Timeslot Calendar
On this page, user can view timeslots for each day and review overrides. They can also update capacity for active timeslots.
-
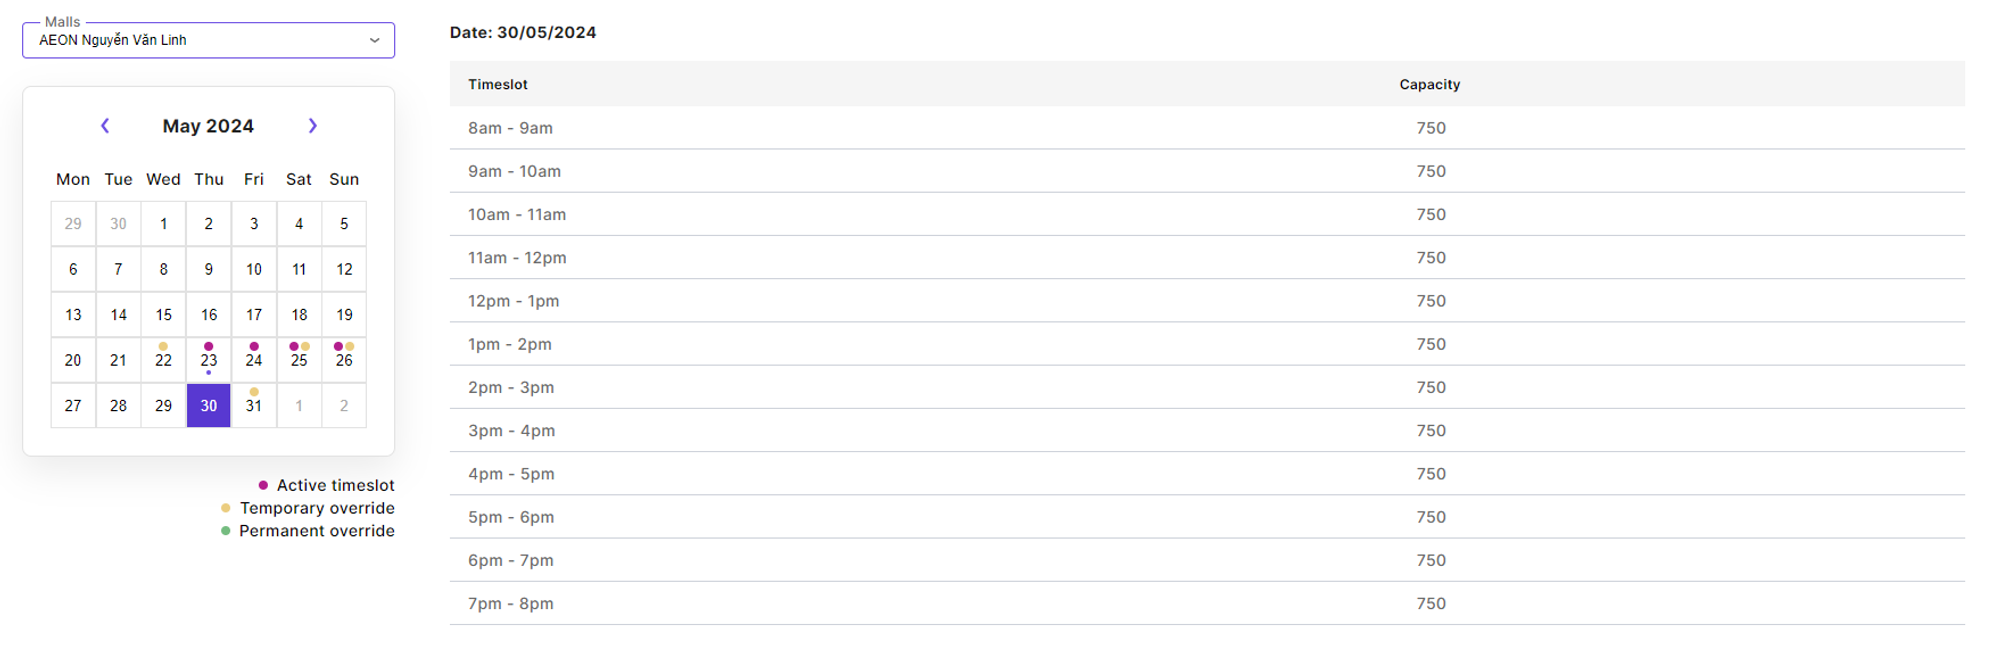
Select the relevant mall at the top of the page
-
Select a date to view timeslots & capacity for this day
-
Calendar Legend
Active timeslot: Applies to days currently displayed at checkout. This means that customers are able to place orders for these timeslots.- The number of active days showing at checkout depends on the configurations for your organization
Temporary override: Applies if a temporary override exists for this date.- 📢Records are kept for 1 month in the past
Permanent override: Applies if a permanent override exists for this date.- 📢The calendar dot will no longer be shown after the start date of the override
-
Info box with additional details will be shown on the page if the date falls on an Active Timeslot, Temporary Override or Permanent Override.
-
Active Override

-
Temporary Override
- Click on the override to view/update

-
Permanent Override
- Click on the override to view/update

-
Update Active Timeslots
On the calendar tab, you can edit active timeslots. Only capacity can be edited as timeslots are displayed at checkout and orders may already be placed for these times.
To edit timeslots in the future (dates not shown at checkout), create Overrides in the Timeslot Configurations tab.
- Click on an Active Date
- Click on “Edit” in the top right
- Update capacity
- To make a timeslot unavailable, update capacity to 0
- The timeslot will be shown as greyed out at checkout
📢 Click on “Set all capacity to 0” to set automatically set capacity to 0 for all timeslots
- Save changes

When setting capacity to 0 or decreasing the capacity, orders already placed in the timeslot will not be automatically cancelled. If you cannot fulfill these orders anymore, you must manually cancel or reschedule them.
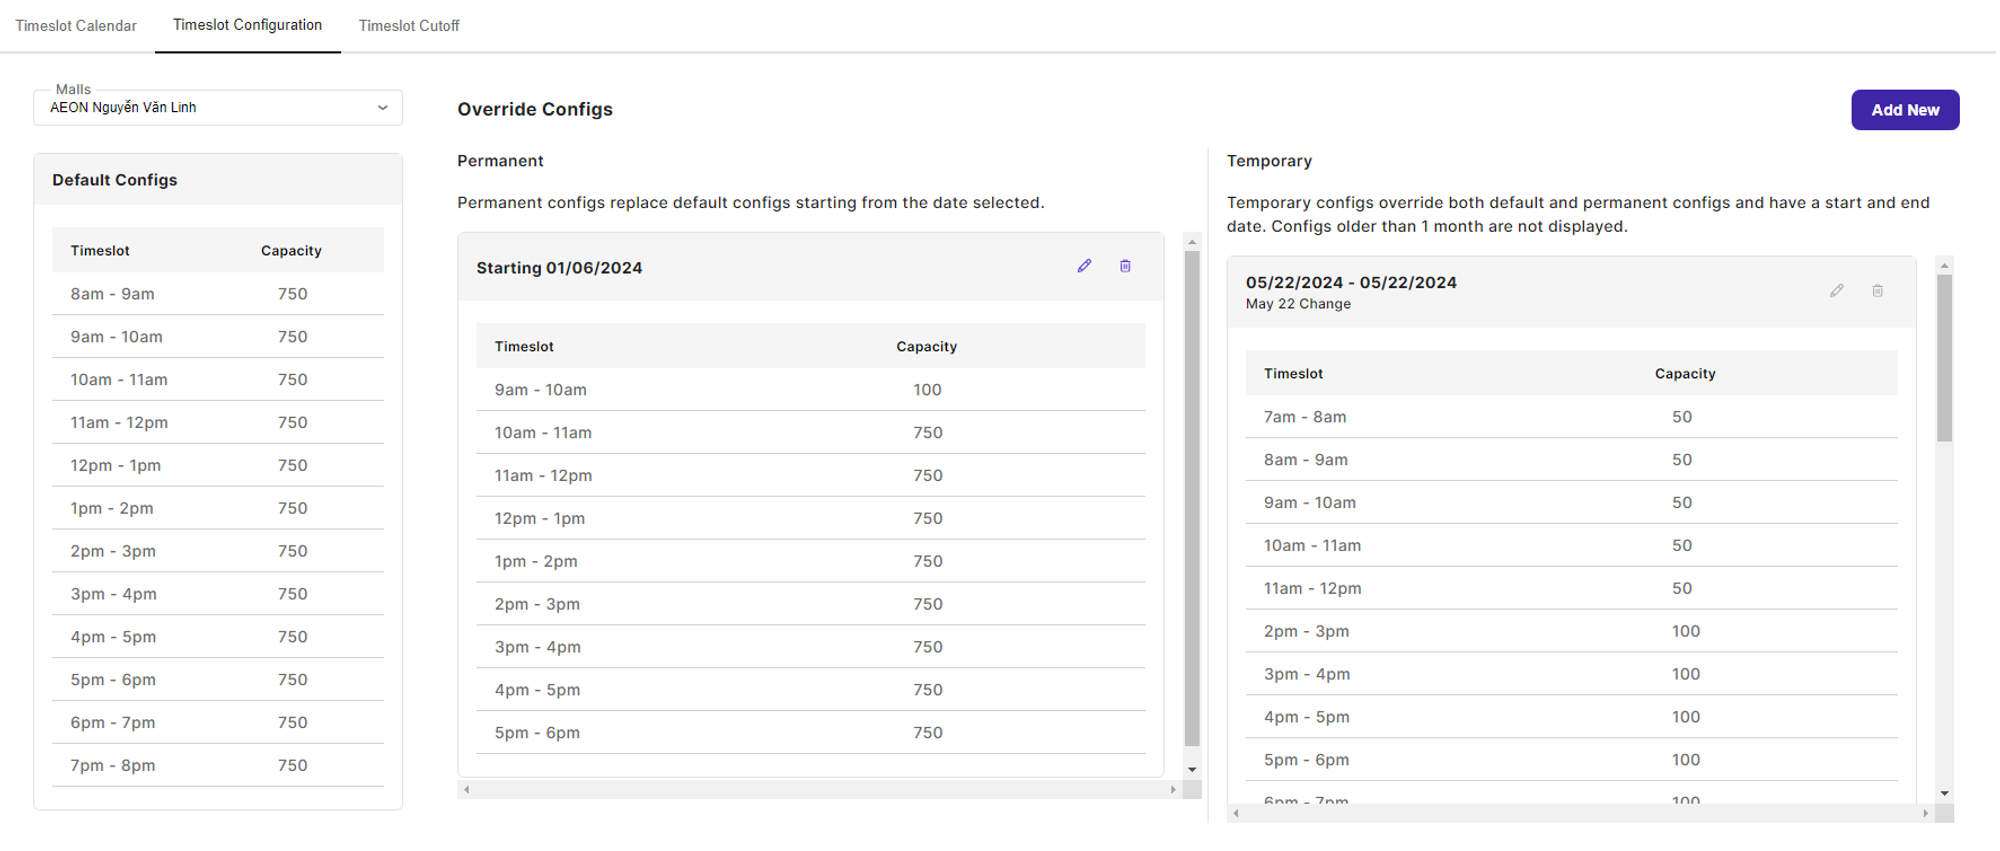
Configurations: Timeslot Configuration
On this page, user can update timeslots by creating Overrides.
Overrides must be scheduled ahead of time, before timeslots appear in checkout. They cannot apply to timeslots displayed at checkout. To edit Active timeslots, go to the Timeslot Calendar tab.
- Select the relevant mall at the top of the page
Default Configsdisplays the default timeslots & capacity used for this mallOverride Configsdisplays any overrides created for the mall. This section is broken between Permanent and Temporary Overrides.- Permanent Override
- Section will display the override’s start date and the timeslots & capacity of the override
- Past the start date, the override will no longer display in this section and will replace
Default Configsinstead
- Temporary Override
- Section will dispplay the override’s start and end date, the name of the override and the timeslots & capacity of the override
- Past overrides are kept for a period of one month
- Permanent Override
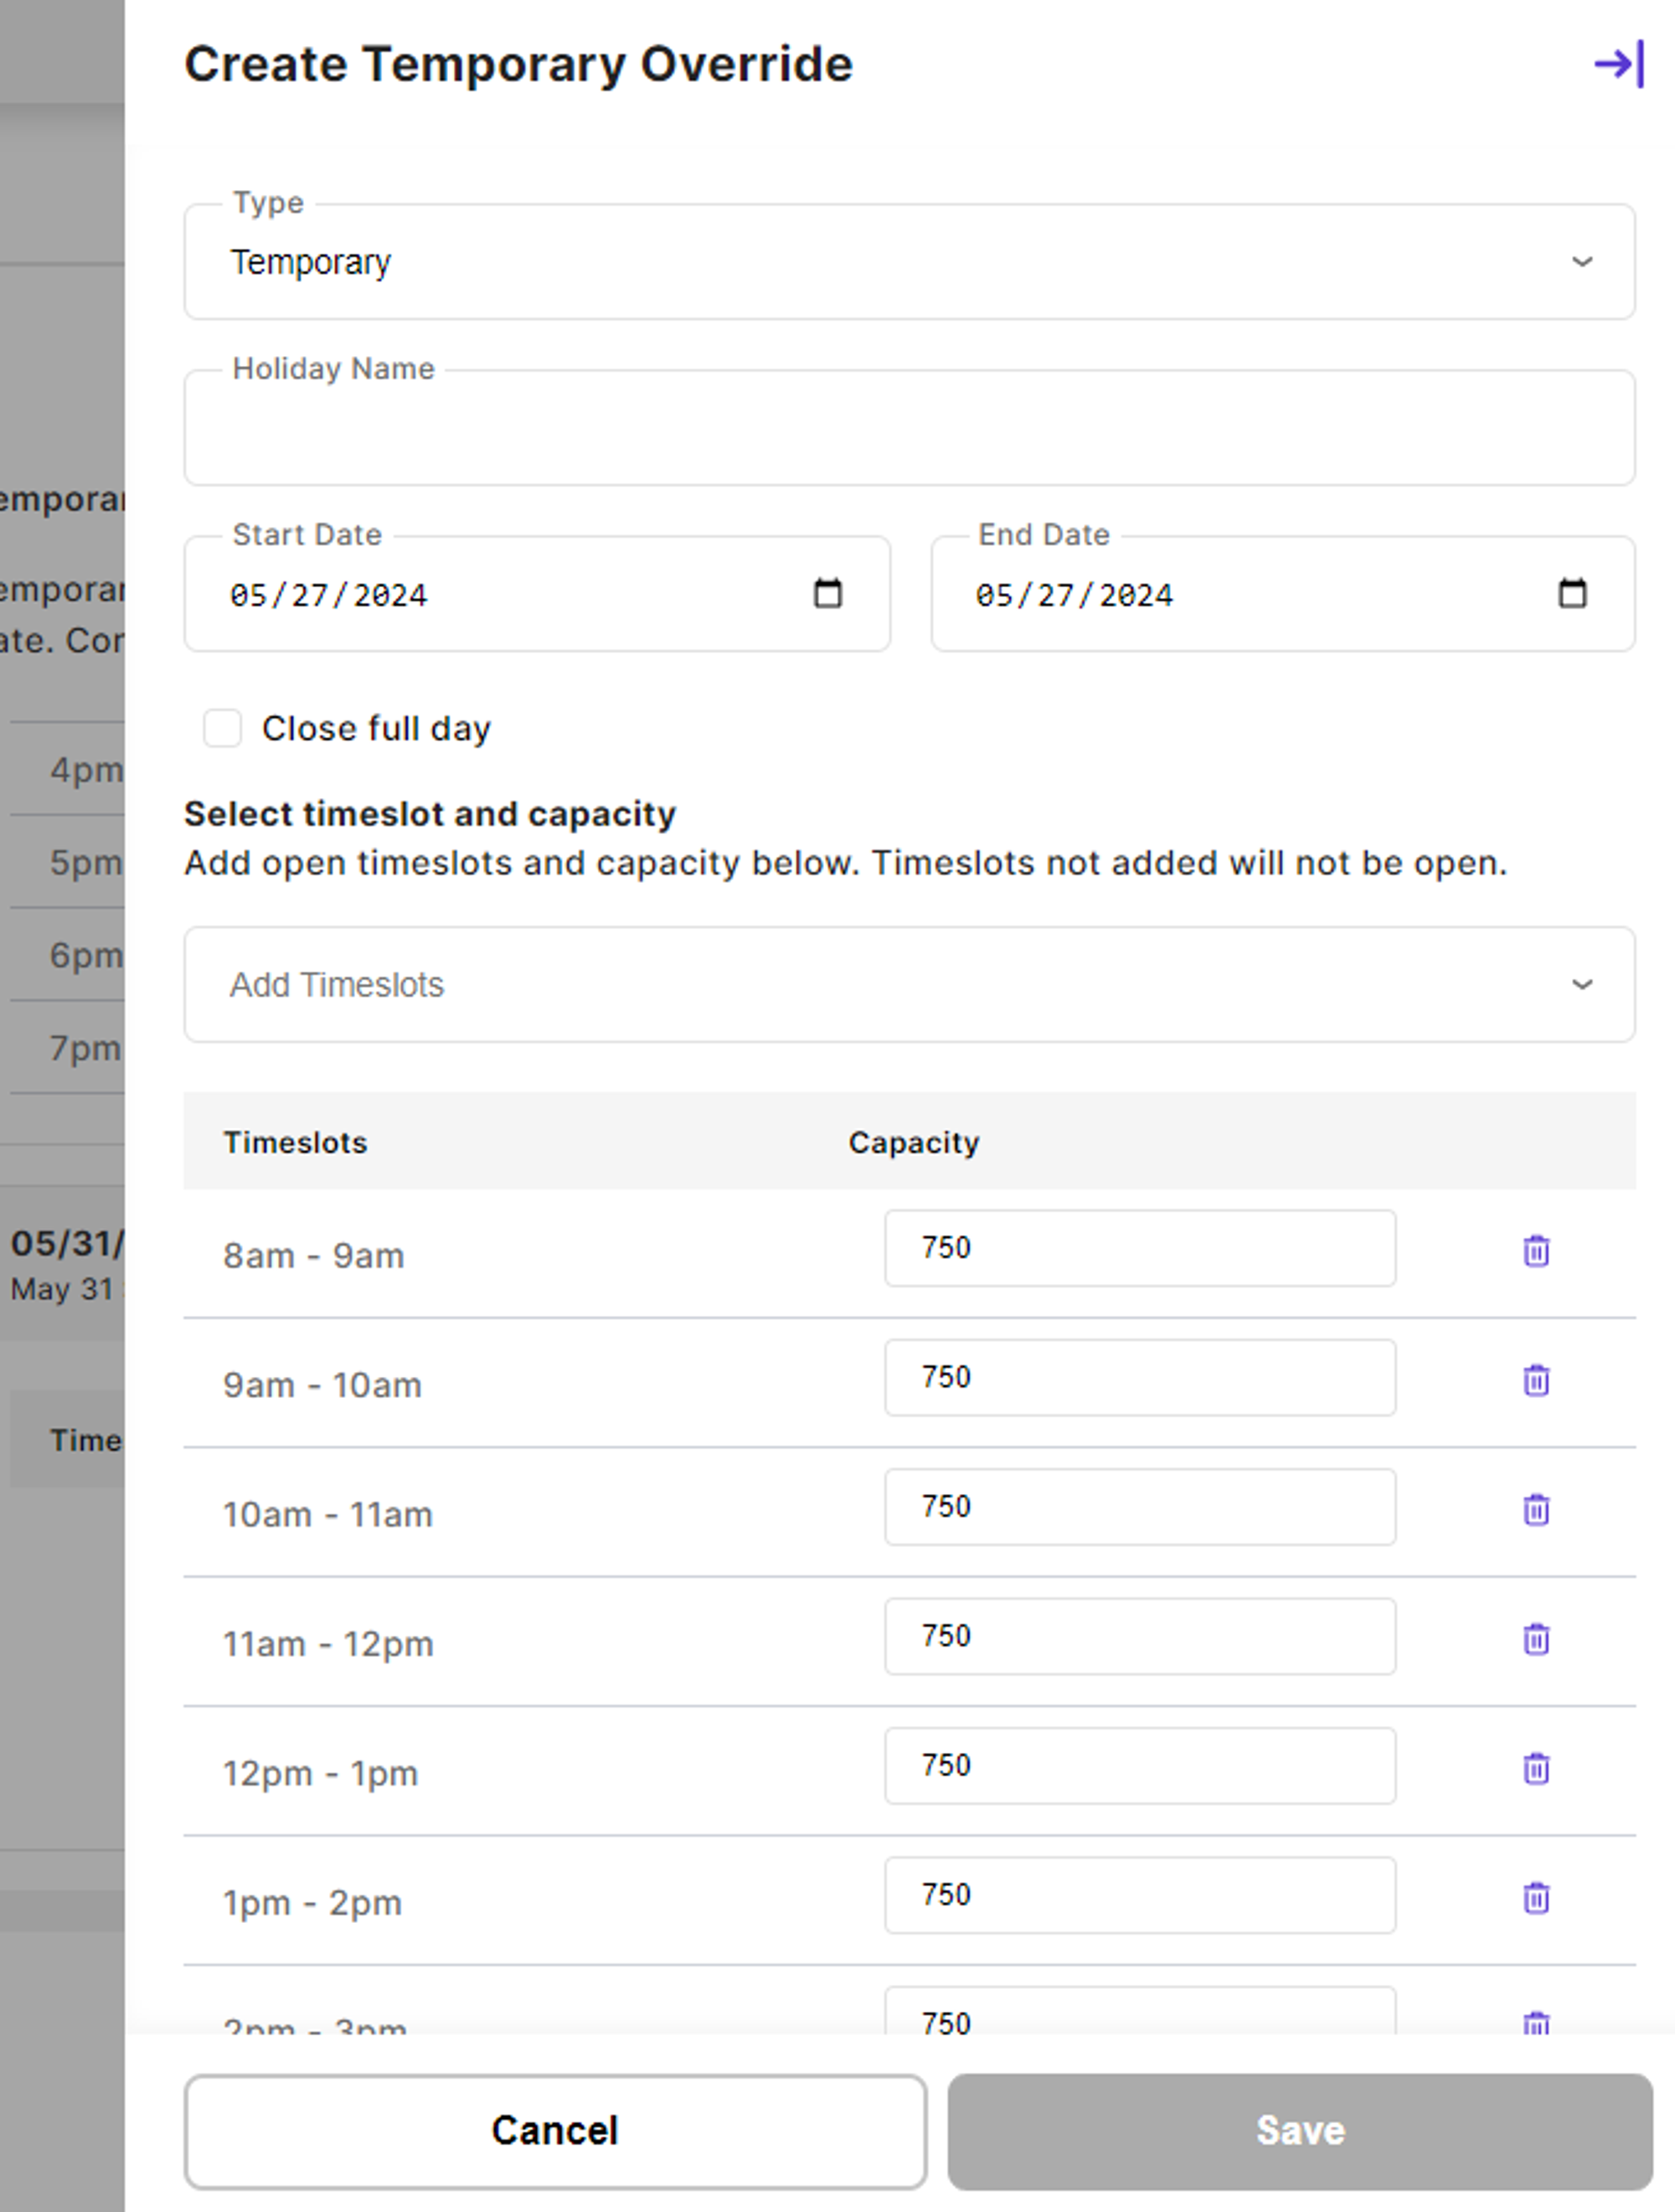
Creating Overrides
- Click on “Add New”
- Select the type, Temporary or Permanent
- For Type = Temporary
- Add a name, e.g. Lunar New Year 2024
- Add a start date and end date
- Start date must be beyond dates displayed in checkout. The earliest start is the next date not shown in checkout. You can use the Timeslot Calendar tab to find the earliest date.
- Example: May 22nd, May 23rd, May 24th are shown in checkout. The earliest start date you can set is May 25th.
- The number of days showing in checkout depend on the configurations for your organization
- Timeslots from this override will apply to all dates between start and end date
- Start and end date are inclusive
- Overrides cannot be scheduled more than six months in advance
- Temporary overrides cannot overlap between each other
- Start date must be beyond dates displayed in checkout. The earliest start is the next date not shown in checkout. You can use the Timeslot Calendar tab to find the earliest date.
- Update table with timeslots and capacity
- Use the dropdown to add a timeslot not shown on the page
- Nighttime timeslots (between 10pm and 8am) cannot be selected
- Click on checkbox “Close full day” to remove all timeslots
- There will be no timeslots for the dates selected
- Save updates
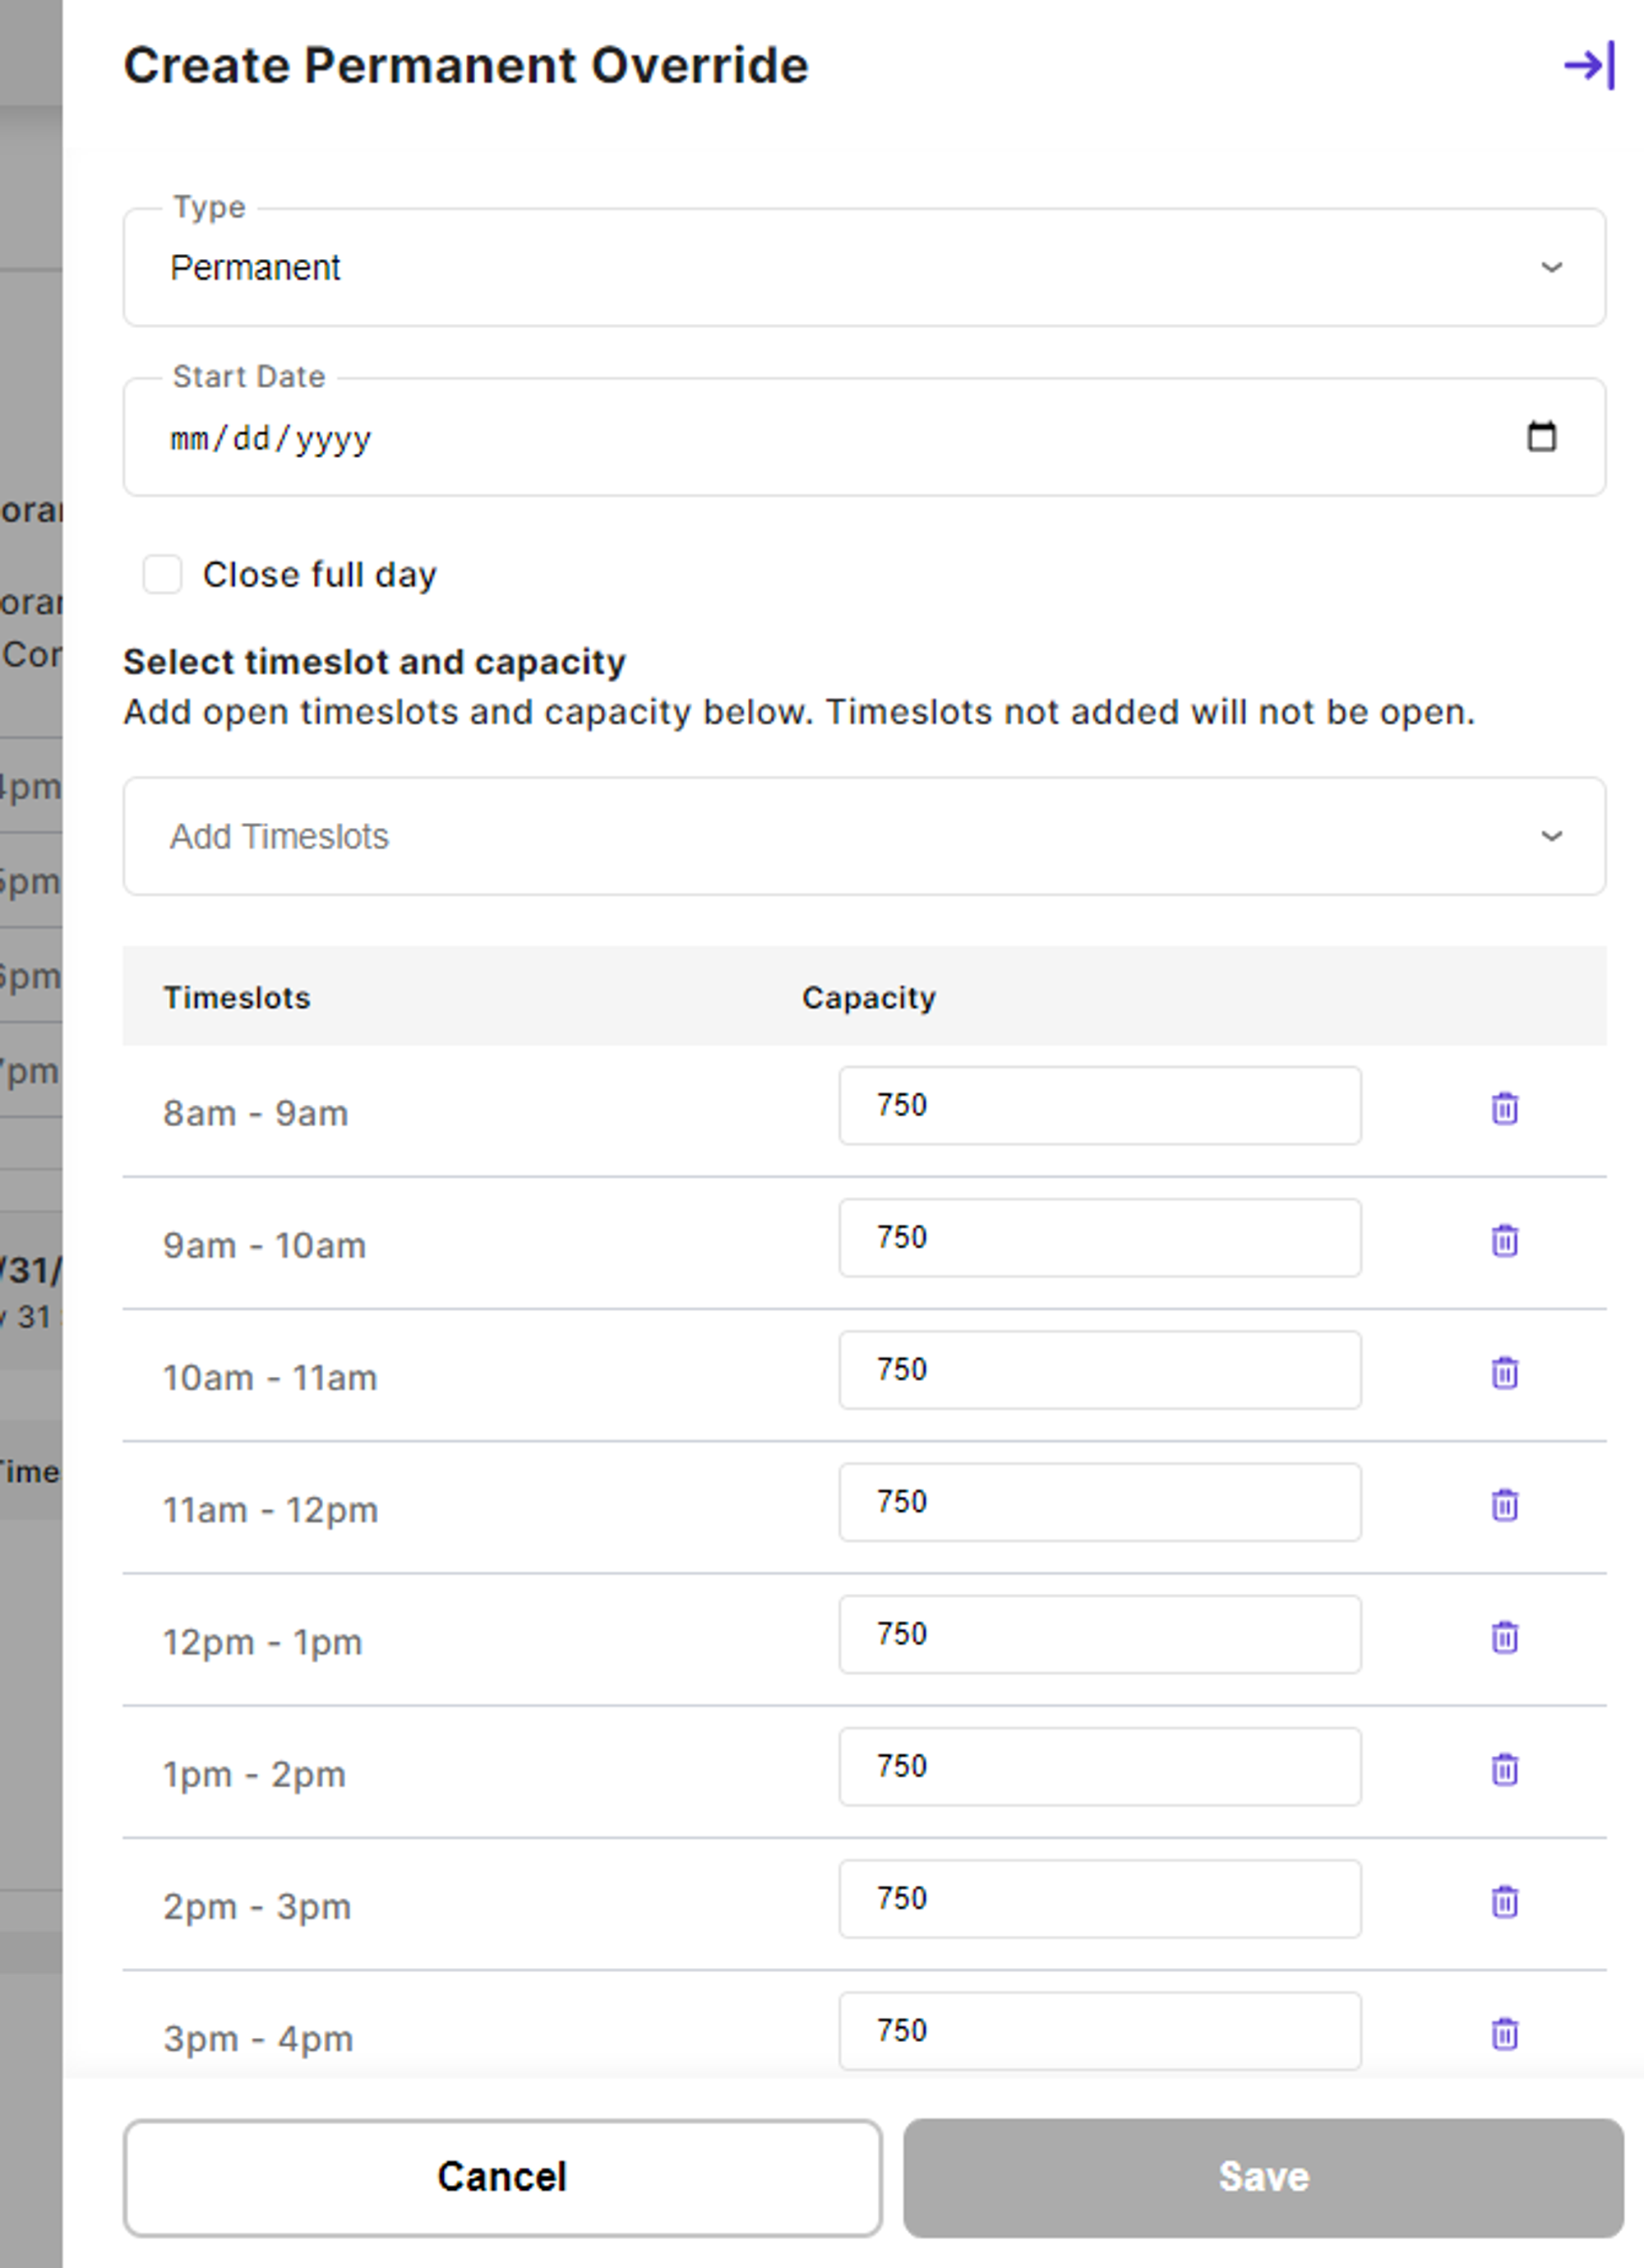
- For Type = Permanent
- Add a name
- Add a start date
- Start date must be beyond dates displayed in checkout. The earliest start is the next date not shown in checkout. You can use the Timeslot Calendar tab to find the earliest date.
- Example: May 22nd, May 23rd, May 24th are shown in checkout. The earliest start date you can set is May 25th.
- The number of days showing in checkout depend on the configurations for your organization
- Timeslots from this override will apply to all dates starting on the start date
- Start date is inclusive
- Overrides cannot be scheduled more than six months in advance
- The permanent override will replace
Default Configson the start date
- Start date must be beyond dates displayed in checkout. The earliest start is the next date not shown in checkout. You can use the Timeslot Calendar tab to find the earliest date.
- Update table with timeslots and capacity
- Use the dropdown to add a timeslot not shown on the page
- Nighttime timeslots (between 10pm and 8am) cannot be selected
- Click on checkbox “Close full day” to remove all timeslots
- There will be no timeslots for the dates selected
- Save updates
A timeslot with capacity 0 is shown in checkout as disabled. A timeslot not added to the table will not be shown in checkout.
If a permanent and a temporary override overlap with each other, the temporary override will be applied over the permanent one.
Editing Overrides
- Permanent Override
- Click on the “Edit” button
- Update timeslots and/or capacity
- Save updates
📣 Start date cannot be updated. You can delete the override and create a new one instead.
📣 Edits are only possible before the override timeslots start to appear at checkout.
Example: override starts on May 25th. Once May 25th timeslots are displayed in checkout, the override cannot be edited. Prior to that, the override is editable.
The number of days showing in checkout depend on the configurations for your organization
- Temporary Override
- Click on the “Edit” button
- Update timeslots and/or capacity
- Save updates
📣 Name cannot be updated
📣 Edits are only possible before the permanent timeslots start to appear at checkout.
Example: override starts on May 25th. Once May 25th timeslots are displayed in checkout, the override cannot be edited. Prior to that, the override is editable.
The number of days showing in checkout depend on the configurations for your organization
Deleting overrides
- Click on “Delete” button and confirm the deletion
📣 Deletions are only possible before the override timeslots start to appear at checkout.
Example: override starts on May 25th. Once May 25th timeslots are displayed in checkout, the override cannot be deleted. Prior to that, the override is deletable.
The number of days showing in checkout depend on the configurations for your organization
Configurations: Timeslot Cutoff
On this page, the user can configure the cutoff time for timeslots. The cutoff time is global and applies to all malls.
Cutoff time for ordering (hours): Lead time required for placing orders. For example, if set to 2 hours, orders must be placed at least 2 hours before the timeslot start time- Must be provided in hours
Enable First Timeslot Cutoff Time: Select this checkbox to use a different cutoff time for the first timeslot of the day. Leave uncheck otherwiseFirst Timeslot Cutoff Time for Ordering: Only applicable ifEnable First Timeslot Cutoff Timeis selected. Lead time required for placing orders for the first timeslot of the day- Must be provided in hours
Configurations: B2B Timeslots
You can have a different set of timeslot configurations for Business customers when this feature is enabled. Otherwise, the same timeslots apply to all customer types by default.
This is only applicable if your organization uses B2B-specfic timeslots.
Create timeslot configurations for B2B
When this feature is enabled for your organization, you will see two pages under Configurations:
- B2C Timeslots: use this page to configure timeslots for B2C customers
- B2B Timeslots: use this page to configure timeslots for B2B customers
Both pages have the exact same functionality.
At checkout, B2C customers will see configurations set from the B2C timeslot page while B2B customers will see configurations set from the B2B timeslot page.
This allows you to serve separate timeslots for Business customers, with separate capacity as well as separate timeslot cutoff.
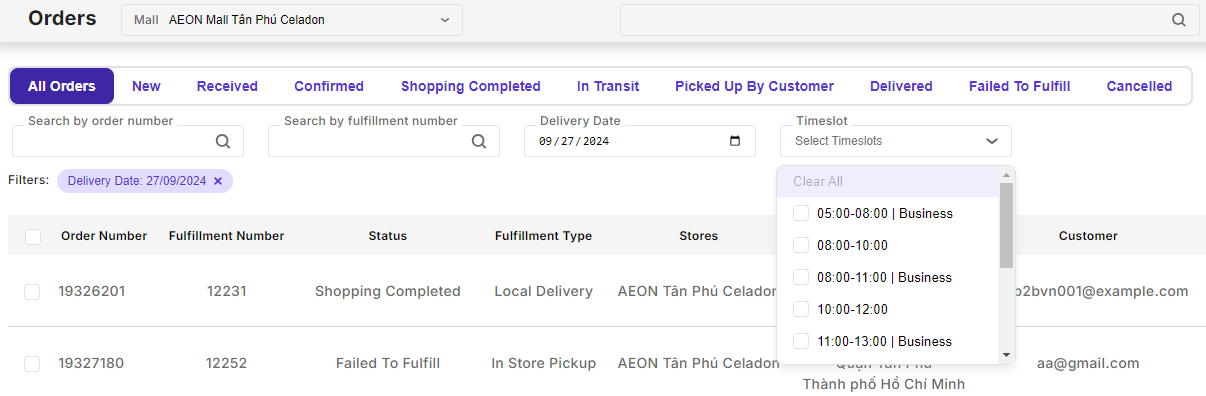
Filter orders by B2B timeslots
On the orders page, the Timeslot filter will display a "Business" tag when the timeslot specifically applies to Business customers. Use this filter to only display orders placed by Business customers.
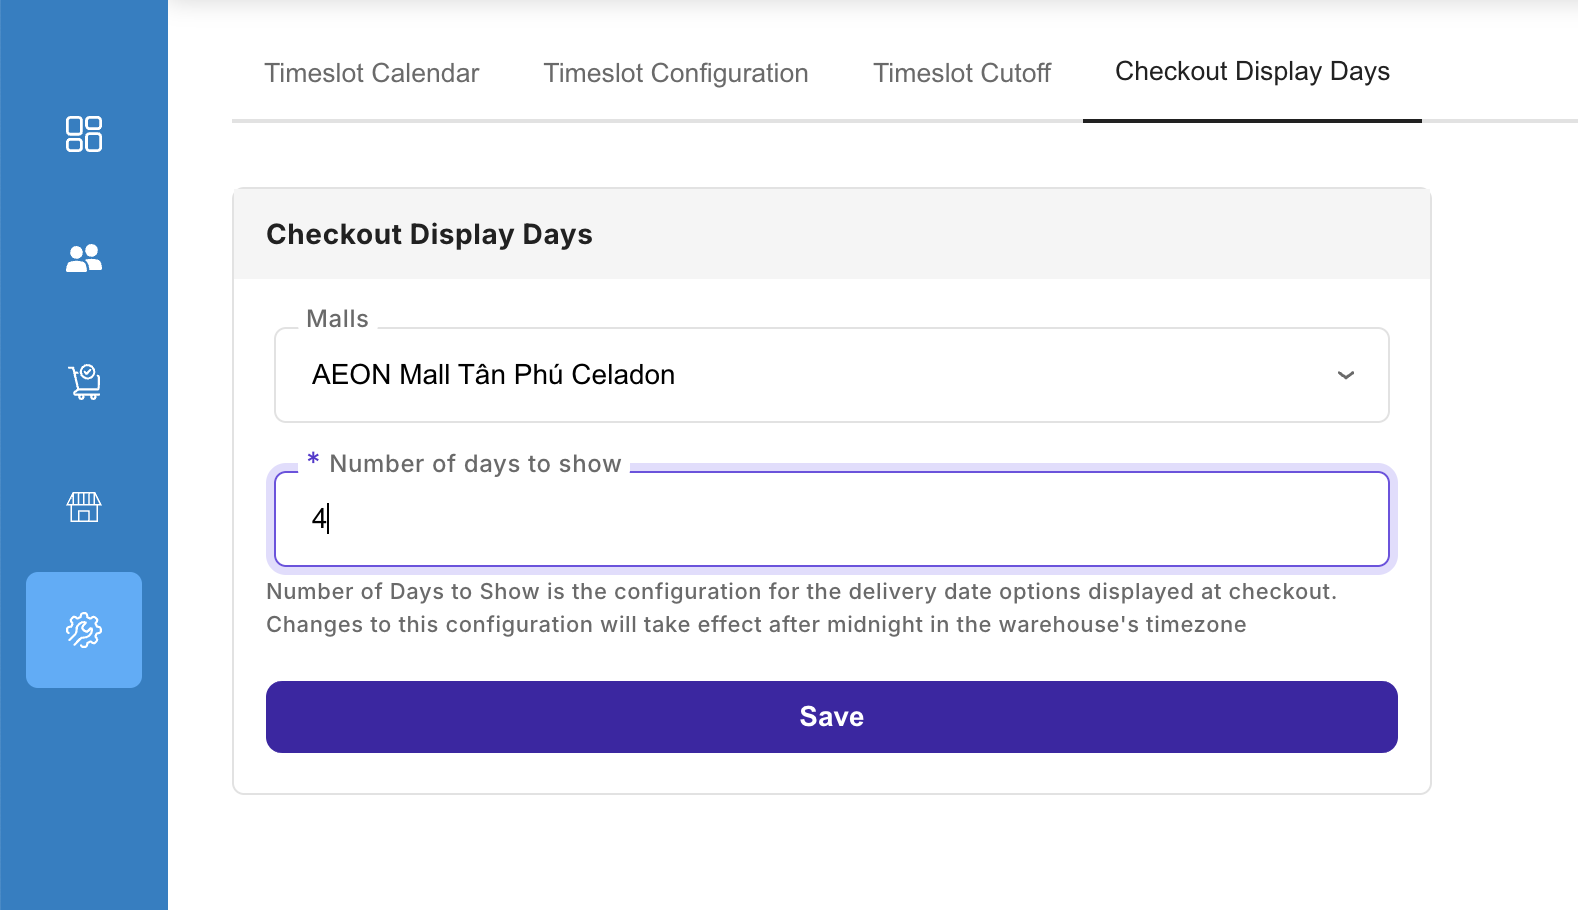
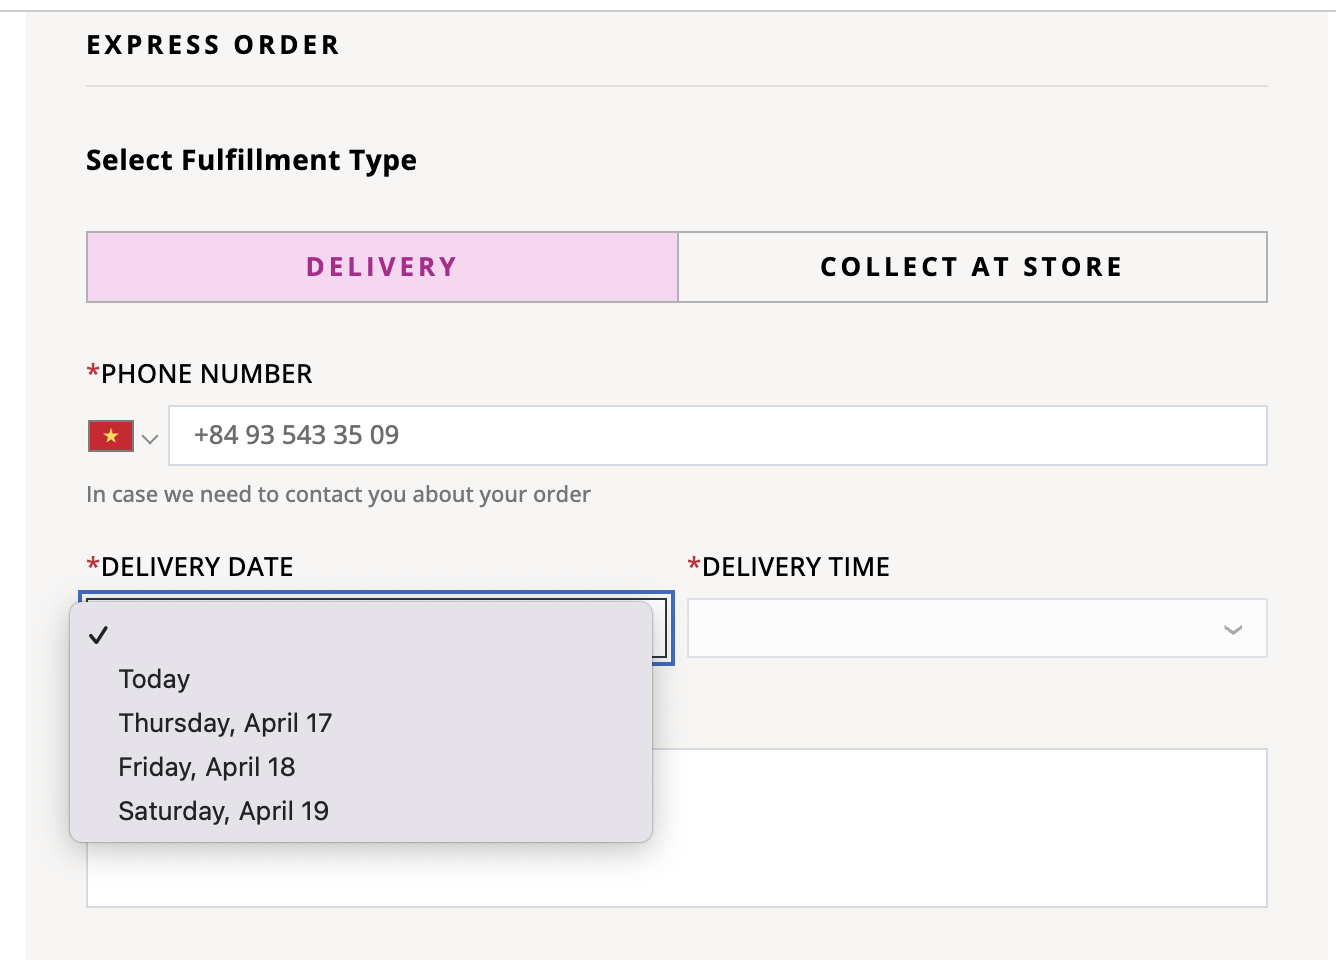
Configurations: Checkout Display Days
Admins can set up the Checkout Display Days for each mall.
Admins can also configure different Checkout Display Days for B2B and B2C orders. If your organization does not use separate configurations for B2B and B2C orders, the same configuration will apply to all orders by default.
Notes
- Changes to this configuration will take effect after midnight in the warehouse's timezone
- If the admin decreases the number of days displayed, it will not affect the days currently showing at checkout. This ensures that orders already placed with those dates remain unaffected
Fast Delivery
On this page, Admins can enable or disable Fast Delivery for each mall. Fast Delivery can be configured separately for B2B and B2C users.
- Enable Fast Delivery
- Select the
Fast Deliveryoption to enable Fast Delivery for the selected mall.
- Select the
Fast Delivery SLA (hours)- Defines the maximum time allowed to fulfill a Fast Delivery order.
- Example: If SLA is set to 1 hour, the order must be delivered within 1 hour.
Earliest Fast Delivery Order Placement Time- The earliest time a customer can place a Fast Delivery order.
- Must be greater than or equal to the mall’s earliest delivery timeslot.
- Example (AEON Mall Tân Phú Celadon delivery timeslot: 8:00 AM – 8:00 PM):
- ✅ Valid: 8:00 AM
- ❌ Invalid: 7:00 AM
- Time format: x:xx AM/PM (e.g. 8:30 AM)
- Customers will not see the Fast Delivery option if they place an order before this time.
Latest Fast Delivery Order Placement Time- The latest time a customer can place a Fast Delivery order.
- Must be less than or equal to (mall’s latest delivery timeslot − SLA).
- Example (delivery timeslot 8:00 AM – 8:00 PM, SLA = 1 hour):
- ✅ Valid: 7:00 PM
- ❌ Invalid: 8:00 PM (delivery would complete at 9:00 PM, outside the delivery timeslot)
- Time format: x:xx AM/PM (e.g. 8:30 AM)
- Customers will not see the Fast Delivery option if they place an order after this time.
Fast Delivery Capacity- The maximum number of concurrent Fast Delivery orders allowed at any given time.
- When the capacity is reached, the Fast Delivery option will not be shown to customers.
